 Yamaha MT-07 - Owner's Manual > Checking the spark plugs
The spark plugs are important engine components, which should be checked periodically, preferably by a Yamaha dealer. Since heat and deposits will cause any spark plug to slowly erode, they should be removed and checked in accordance with the periodic maintenance and lubrication chart. In addition, the condition of the spark plugs can reveal the condition of the engine.
The porcelain insulator around the center electrode of each spark plug should be a medium-to-light tan (the ideal color when the vehicle is ridden normally), and all spark plugs installed in the engine should have the same color. If any spark plug shows a distinctly different color, the engine could be operating improperly. Do not attempt to diagnose such problems yourself. Instead, have a Yamaha dealer check the vehicle.
If a spark plug shows signs of electrode erosion and excessive carbon or other deposits, it should be replaced.
Specified spark plug: NGK/LMAR8A-9
Before installing a spark plug, the spark plug gap should be measured with a wire thickness gauge and, if necessary, adjusted to specification.
- Spark plug gap
Spark plug gap: 0.8-0.9 mm (0.031-0.035 in)
Clean the surface of the spark plug gasket and its mating surface, and then wipe off any grime from the spark plug threads.
Tightening torque:
Spark plug: 13 N*m (1.3 kgf*m, 9.6 lb*ft)
TIP
If a torque wrench is not available when installing a spark plug, a good estimate of the correct torque is 1/4- 1/2 turn past finger tight. However, the spark plug should be tightened to the specified torque as soon as possible.
NOTICE
Do not use any tools to remove or install the spark plug cap, otherwise the ignition coil coupler may get damaged. The spark plug cap may be difficult to remove because the rubber seal on the end of the cap fits tightly. To remove the spark plug cap, simply twist it back and forth while pulling it out; to install it, twist it back and forth while pushing it in.
Canister
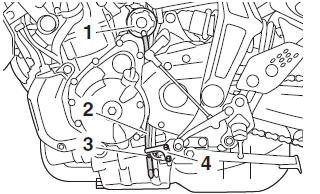
- Canister
- Canister breather hose
- Original position (paint mark)
- Clamp
This model is equipped with a canister to prevent the discharging of fuel vapor into the atmosphere. Before operating this vehicle, make sure to check the following:
- Check each hose connection.
- Check each hose and the canister for cracks or damage, and replace it if necessary.
- Make sure that the end of the canister breather hose is not blocked, and clean it if necessary.
- Make sure that the canister breather hose is routed through the clamp.
- Make sure that the paint mark on the canister breather hose is below the clamp.
See also:
 Yamaha MT-07 - Owner's Manual > Tool kit, Periodic maintenance charts
Periodic maintenance Periodic inspection, adjustment, and lubrication will keep your vehicle in the safest and most efficient condition possible. Safety is an obligation of the vehicle owner/operator. The most important points of vehicle inspection, adjustment, and lubrication are explained on the following pages.
Yamaha MT-07 - Owner's Manual > Engine oil and oil filter cartridge
The engine oil level should be checked before each ride. In addition, the oil must be changed and the oil filter cartridge replaced at the intervals specified in the periodic maintenance and lubrication chart.
 Rider's Manual BMW R 1250 GS GSA
 Owner's Manual Harley-Davidson Sportster XL1200X Forty-Eight
 Owner's Manual Honda CBR650R
 Service manual Honda CBR650
 Owner's Manual Honda PCX125
 Owner's Manual Kawasaki Z1000SX
 Service manual Kawasaki Z1000SX
 Owner's Manual Lexmoto Echo
 Owner's Manual Royal Enfield Interceptor 650
 Service manual Royal Enfield Interceptor 650
 Owner's Manual Yamaha MT-07