 Kawasaki Z1000SX - Owner's Manual > Drive Chain
The drive chain slack and lubrication must be checked each day before riding the motorcycle and must be maintained in accordance with the Periodic Maintenance Chart for safety and to prevent excessive wear. If the chain becomes badly worn or maladjusted - either too loose or too tight - the chain could jump off the sprockets or break.
WARNING A chain that breaks or jumps off the sprockets could snag on the engine sprocket or lock the rear wheel, severely damaging the motorcycle and causing it to go out of control. Inspect the chain for damage and proper adjustment before each ride.
Chain Slack Inspection
- Set the motorcycle up on its side stand.
- Check the wheel alignment. Confirm that the notch on the swingarm and the mark on the chain adjuster are at the same position on the left and right sides. If they are different, adjust the wheel alignment (see Wheel Alignment Adjustment).
- Notch
- Marks
WARNING Misalignment of the wheel will result in abnormal wear, and may result in an unsafe riding condition.
Align the rear wheel using the marks on the swingarm or measuring the distance between the center of the axle and swingarm pivot.
- Rotate the rear wheel to find the position where the chain is tightest, and measure the maximum chain slack by pulling up and pushing down the chain midway between the engine sprocket and rear wheel sprocket.
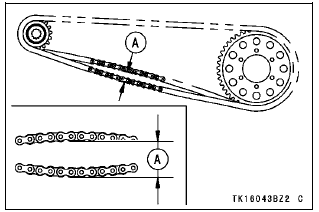
- Chain Slack
- If the drive chain is too tight or too loose, adjust it so that the chain slack will be within the standard value.
Drive Chain Slack

Chain Slack Adjustment
- Loosen the chain adjuster clamp bolts on the left and right sides.
- Turn the chain adjuster with the allen wrench until the drive chain has the correct amount of slack.
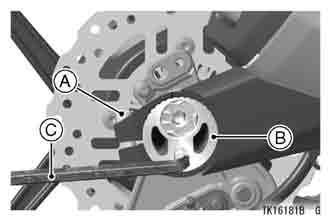
- Clamp Bolt
- Chain Adjuster
- Allen Wrench
- Tighten the chain adjuster clamp bolts to the specified torque.
- Rotate the wheel, measure the chain slack again at the tightest position, and readjust if necessary.
WARNING A loose clamp bolts can lead to an accident resulting in serious injury or death. Tighten the clamp bolts to the proper torque.
- Check the wheel alignment.
- Check the rear brake (see Brakes section in this chapter).
Tightening Torque

NOTE
- If a torque wrench is not available, this item should be serviced by a Kawasaki dealer.
Wheel Alignment Adjustment
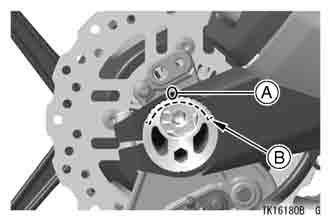
- Remove the right retaining ring, and loosen the axle nut.
- Loosen the right clamp bolt.
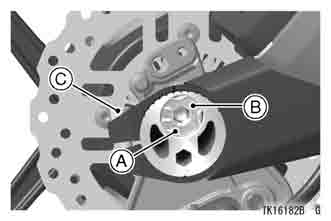
- Retaining Ring
- Axle Nut
- Clamp Bolt
- Turn the right chain adjuster with the allen wrench so that the notch on the swingarm and the mark on the chain adjuster are at the same position on the left and right sides.
- Tighten the axle nut to the specified torque.
- Install the retaining ring.
WARNING A loose axle nut can lead to an accident resulting in serious injury or death. Tighten the axle nut to the proper torque and install a retaining ring.
- Check the rear brake (see Brakes section in this chapter).
Tightening Torque

NOTE
- The wheel alignment adjustment can adjust at left chain adjuster also.
- If a torque wrench is not available, this item should be serviced by a Kawasaki dealer.
Wear Inspection
- Slide the clip to the right.
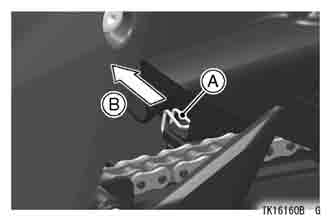
- Clip
- Slide to right
- Remove the bolts.
- Remove the chain cover.
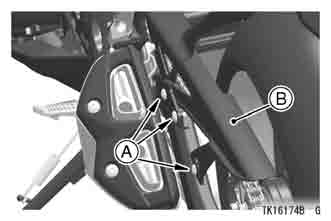
- Bolts
- Chain Cover
- Stretch the chain taut either by using the chain adjusters, or by hanging a 10 kg (22 lb) weight on the chain.
- Measure the length of 20 links on the straight part of the chain from pin center of the 1st pin to pin center of the 21st pin. Since the chain may wear unevenly, take measurements at several places.
- If the length exceeds the service limit, the chain should be replaced.
- Measure
- Weight
Drive Chain 20-Link Length

WARNING For safety, use only the standard chain. It is an endless type and should not be cut for installation; have it installed by an authorized Kawasaki dealer.
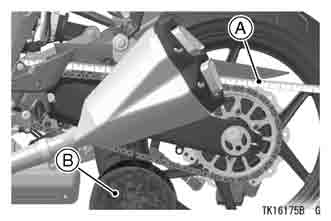
- Rotate the rear wheel to inspect the drive chain for damaged rollers, and loose pins and links.
- Also inspect the sprockets for unevenly or excessively worn teeth, and damaged teeth.
NOTE
- Sprocket wear is exaggerated for illustration.
See Service Manual for wear limits.
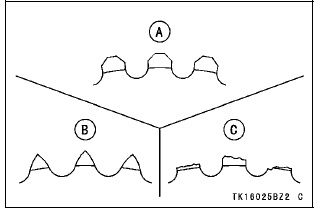
- Good Teeth
- Worn Teeth
- Damaged Teeth
- If there is any irregularity, have the drive chain and/or the sprockets replaced by an authorized Kawasaki dealer.
Lubrication
Lubrication is also necessary after riding through rain or on wet roads, or any time that the chain appears dry. A heavy oil such as SAE 90 is preferred to a lighter oil because it will stay on the chain longer and provide better lubrication.
- Apply oil to the sides of the rollers so that it will penetrate to the rollers and bushings. Apply oil to the O-rings so that the O-rings will be coated with oil. Wipe off any excess oil.
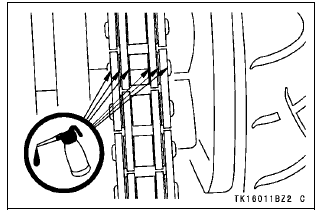
- If the chain is especially dirty, clean it using diesel oil or kerosine and then apply oil as described above.
See also:
 Kawasaki Z1000SX - Owner's Manual > Clutch
Due to friction plate wear and clutch cable stretch over a long period of use, the clutch operation should be checked each day before riding the motorcycle, and must be adjusted in accordance with the Periodic Maintenance Chart.
Kawasaki Z1000SX - Owner's Manual > Brakes
Brake Wear Inspection Inspect the brakes for wear. For each front and rear disc brake caliper, if the thickness of either pad is less than 1 mm (0.04 in.), replace both pads in the caliper as a set. Pad replacement should be done by an authorized Kawasaki dealer. Lining Thickness 1 mm (0.04 in.)
 Rider's Manual BMW R 1250 GS GSA
 Owner's Manual Harley-Davidson Sportster XL1200X Forty-Eight
 Owner's Manual Honda CBR650R
 Service manual Honda CBR650
 Owner's Manual Honda PCX125
 Owner's Manual Kawasaki Z1000SX
 Service manual Kawasaki Z1000SX
 Owner's Manual Lexmoto Echo
 Owner's Manual Royal Enfield Interceptor 650
 Service manual Royal Enfield Interceptor 650
 Owner's Manual Yamaha MT-07