 Honda PCX125 - Owner's Manual > Electrical
Battery
If you plan to store your scooter, we recommend you remove the battery and store it where it can be charged at least every 30 days to maintain its service life.
If you do not remove the battery, we recommend disconnecting the battery cables (negative cable first).
You will get the best storage results from removing the battery and slow charging it every 30 days.
Before you remove the battery, be sure to read all the information that follows, as well as the information on the battery label.
 The battery gives off
explosive hydrogen gas during normal operation.
The battery gives off
explosive hydrogen gas during normal operation.
A spark or flame can cause the battery to explode with enough force to kill or seriously hurt you.
Wear protective clothing and a face shield, or have a skilled mechanic do the battery maintenance.
The battery is located in the battery box under the seat.
UNDER SEAT
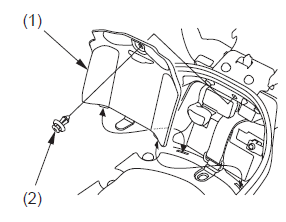
- battery cover
- clip
Removal
1. Make sure the ignition switch is OFF.
2. Open the seat.
3. Remove the battery cover (1) by removing the clip (2).
4. Remove the battery band (3).
5. Disconnect the negative (-) terminal lead (4 from the battery first, then disconnect the positive (+) terminal lead (5).
6. Pull the battery (6) out of the battery box.
7. Charge the battery (see following section), unless you have been riding regularly.
8. Store your battery in an easy-to-reach location off the floor, in an area protected from freezing temperatures and direct sunlight.
9. Clean the battery box after removing the battery for storage. Dry the battery box and, if paint is missing, re-paint the area.
10. Slow charge the battery (see following section) once every 30 days.
Installation
1. Reinstall in the reverse order of removal.
Be sure to connect the positive (+) terminal first, then the negative (-) terminal.
2. Check all bolts and other fasteners are secure.
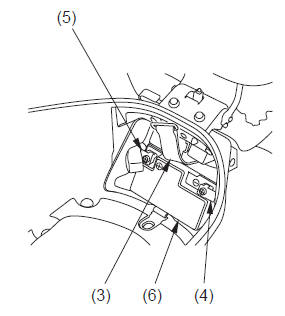
- battery band
- negative (-) terminal lead
- positive (+) terminal lead
- battery
Battery Charging
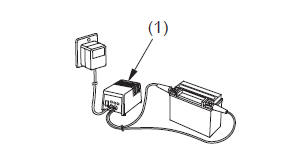
- charger
Be sure to read the information that came with your battery charger and follow the instructions on the battery. Improper charging may damage the battery.
We recommend using a charger designed specifically for your Honda, which can be purchased from your Honda dealer. These units can be left connected for long periods without risking damage to the battery. However, do not intentionally leave the charger connected longer than the time period recommended in the charger's instructions.
Avoid using an automotive-type battery charger. An automotive charger can overheat a scooter battery and cause permanent damage.
Appearance Care
Frequent cleaning and polishing will keep your Honda looking newer longer.
Frequent cleaning also identifies you as an owner who values your scooter. A clean scooter is also easier to inspect and service.
General Recommendations
- To clean your scooter, you may use:
- water
- a mild, neutral detergent and water
- a mild spray and wipe cleaner/ polisher
- a mild spray and rinse cleaner/ degreaser and water
- Avoid products that contain harsh detergents or chemical solvents that could damage the metal, paint, and plastic on your scooter.
- If your scooter is still warm from recent operation, give the engine and exhaust system time to cool off.
- Park in a shady area. Washing your scooter in bright sunlight may cause the finish to fade because water droplets intensify the sun's brightness. Spotting is also more likely because surface water can dry before you have time to wipe it off.
- Clean your scooter regularly to protect surface finishes.
- We recommend the use of a garden hose to wash your scooter. High pressure washers (like those at coinoperated car washes) can damage certain parts of your scooter.

High pressure water (or air) can damage certain parts of your scooter.
- After cleaning, inspect for damage, wear, and leaks (fuel, oil, coolant, and brake fluid).
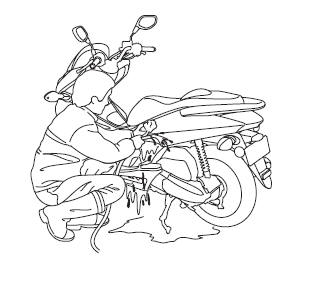
Washing Your Scooter with a Mild Detergent
1. Rinse your scooter thoroughly with cool water to remove loose dirt.
2. Fill a bucket with cool water. Mix in a mild, neutral detergent, such as dish washing liquid or a product made especially for washing scooters or automobiles.
3. Wash your scooter with a sponge or a soft towel. As you wash, check for heavy grime. If necessary, use a mild cleaner/degreaser to remove the grime.
4. After washing, rinse your scooter thoroughly with plenty of clean water to remove any residue. Detergent residue can corrode alloy parts.
5. Dry your scooter with a chamois or a soft towel. Leaving water on the surface to air dry can cause dulling and water spots. As you dry, inspect for chips and scratches.
6. Start the engine and let it idle for several minutes. The engine heat will help dry moist areas.
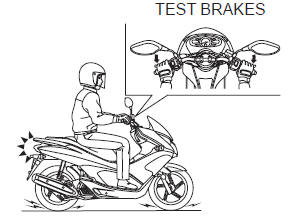
7. As a precaution, ride your scooter at a slow speed and apply the brakes several times. This will help dry the brakes and restore normal braking performance.
If the inside of the headlight lens appears clouded immediately after washing, it should clear after a few minutes of riding.
Cleaning Your Windscreen
Using plenty of water, clean the windscreen with a soft cloth or sponge.
(Avoid using detergents or any kind of chemical cleaner on the windscreen.) Dry with a soft, clean cloth.
To avoid possible scratching or other damage, use only water and a soft cloth or sponge to clean the windscreen.
For a dirtier windscreen, use a diluted neutral detergent with a sponge and plenty of water. Make sure to wash off all the detergent. (Detergent residue may cause windscreen cracks.) Replace the windscreen if scratches cannot be removed and they obstruct clear vision.
Take care to keep battery electrolyte, brake fluid, or other chemical solvents off the windscreen. They will damage the plastic.
Spray Cleaning Your Scooter
Avoid using spray cleaner products on the tires or suspension components.
Suggestions for using spray cleaner(s) follow:
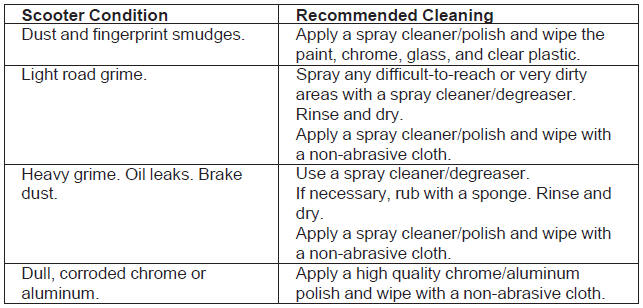
Painted Aluminum Wheel Maintenance
Aluminum may corrode from contact with dirt, mud, or road salt. Clean the wheels after riding through any of these substances. Use a wet sponge and mild detergent. Avoid stiff brushes, steel wool, or cleaners containing abrasives or chemical compounds.
After washing, rinse with plenty of water and dry with a clean cloth.
If the paint is chipped, apply touch-up paint.
Finishing Touches
After washing your scooter, consider using a commercially available spray cleaner/polish or quality liquid or paste wax to finish the job. Use only a nonabrasive polish or wax made specifically for scooters or automobiles. Apply the polish or wax according to the instructions on the container.
If a surface on your scooter is chipped or scratched, your Honda dealer has touch-up paint to match your scooter's color. Be sure to use your scooter's color code when you buy touch-up paint.
If the frame has a chip that exposes the metal, first apply primer (to prevent corrosion) and then apply the touch-up paint. Several thin layers of touch-up paint are better than one thick coat.
See also:
 Honda PCX125 - Owner's Manual > Tires
To safely operate your scooter, your tires must be the proper type and size, in good condition with adequate tread, and correctly inflated for the load you are carrying. Using tires that are excessively worn or improperly inflated can cause a crash in which you can be seriously hurt or killed.
Honda PCX125 - Owner's Manual > Tips
Storing Your Honda If you won't be riding for an extended period, such as during the winter, thoroughly inspect your scooter and correct any problem before storing it. That way, needed repairs won't be forgotten and it will be easier to get your scooter running again.
 Rider's Manual BMW R 1250 GS GSA
 Owner's Manual Harley-Davidson Sportster XL1200X Forty-Eight
 Owner's Manual Honda CBR650R
 Service manual Honda CBR650
 Owner's Manual Honda PCX125
 Owner's Manual Kawasaki Z1000SX
 Service manual Kawasaki Z1000SX
 Owner's Manual Lexmoto Echo
 Owner's Manual Royal Enfield Interceptor 650
 Service manual Royal Enfield Interceptor 650
 Owner's Manual Yamaha MT-07