 Honda CBR650R - Owner's Manual > Engine Oil
Checking the Engine Oil
1. If the engine is cold, idle the engine for 3 to 5 minutes.
2. Turn the ignition switch off, stop the engine and wait for 2 to 3 minutes.
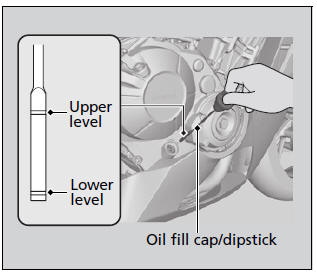
3. Remove the oil fill cap/dipstick and wipe it clean.
4. Place your motorcycle in an upright position on a firm, level surface.
5. Insert the oil fill cap/dipstick until it seats, but don't screw it in.
Check that the oil level is between the upper and lower level marks in the oil fill cap/dipstick.
6. Securely reinstall the oil fill cap/dipstick.
Adding Engine Oil
If the engine oil is below or near the lower level mark, add the recommended engine oil.
1. Remove the oil fill cap/dipstick. Add the recommended oil until it reaches the upper level mark.
- Place your motorcycle in an upright position on a firm, level surface when checking the oil level.
- Do not overfill above the upper level mark.
- Make sure no foreign objects enter the oil filler opening.
- Wipe up any spills immediately.
2. Securely reinstall the oil fill cap/dipstick.
NOTICE Overfilling with oil or operating with insufficient oil can cause damage to your engine. Do not mix different brands and grades of oil. They may affect lubrication and clutch operation.
For the recommended oil and oil selection guidelines, see "Maintenance Fundamentals".
Changing Engine Oil & Filter
Changing the oil and filter requires special tools. We recommend that you have your motorcycle serviced by your dealer.
Use a new Honda Genuine oil filter or equivalent specified for your model.
NOTICE Using the wrong oil filter can result in serious damage to the engine.
1. If the engine is cold, idle the engine for 3 to 5 minutes.
2. Turn the ignition switch off, stop the engine and wait for 2 to 3 minutes.
3. Park on a firm, level surface and lower the side stand.
4. Place a drain pan under the drain bolt.
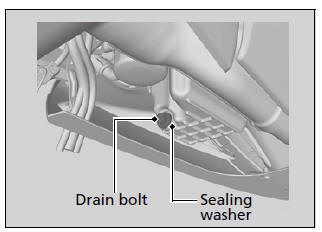
5. Remove the oil fill cap/dipstick, drain bolt, and sealing washer to drain the oil.
6. Remove the oil filter with a filter wrench and let the remaining oil drain out. Make sure the prior seal is not stuck to the engine.
- Discard the oil and oil filter at an approved recycling centre.
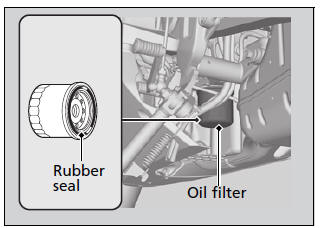
7. Apply a thin coat of engine oil to the rubber seal of a new oil filter.
8. Install a new oil filter and tighten.
Torque: 26 N*m (2.7 kgf*m, 19 lbf*ft).
9. Install a new sealing washer onto the drain bolt. Tighten the drain bolt.
Torque: 30 N*m (3.1 kgf*m, 22 lbf*ft).
10. Fill the crankcase with the recommended oil and install the oil fill cap/ dipstick.
Required oil
When changing oil & engine oil filter:
2.9 litres (3.1 US qt, 2.6 Imp qt)
When changing oil only:
2.6 litres (2.7 US qt, 2.3 Imp qt)
11. Check the oil level.
12. Check that there are no oil leaks.
See also:
 Honda CBR650R - Owner's Manual > Tool Kit
The tool kit is stored under the seat. You can perform some roadside repairs, minor adjustments and parts replacement with the tools contained in the kit. ED, II ED, IV ED and V ED type Helmet set wire 10 × 14 mm Open end wrench Standard/Phillips screwdriver Extension bar Screwdriver handle 5 mm Hex wrench Pin spanner Fuse puller 8 × 12 mm Open end wrench 12 × 14 mm Open end wrench
Honda CBR650R - Owner's Manual > Coolant
Checking the Coolant 1. Place your motorcycle on a firm, level surface. 2. Hold your motorcycle in an upright position. 3. Check that the coolant level is between the UPPER and LOWER level marks on the reserve tank cover.
 Rider's Manual BMW R 1250 GS GSA
 Owner's Manual Harley-Davidson Sportster XL1200X Forty-Eight
 Owner's Manual Honda CBR650R
 Service manual Honda CBR650
 Owner's Manual Honda PCX125
 Owner's Manual Kawasaki Z1000SX
 Service manual Kawasaki Z1000SX
 Owner's Manual Lexmoto Echo
 Owner's Manual Royal Enfield Interceptor 650
 Service manual Royal Enfield Interceptor 650
 Owner's Manual Yamaha MT-07