 Kawasaki Z1000SX - Service manual > Fuel Tank
Fuel Tank Removal
WARNING Gasoline is extremely flammable and can be explosive under certain conditions, creating the potential for serious burns. Make sure the area is well-ventilated and free from any source of flame or sparks; this includes any appliance with a pilot light. Do not smoke. Turn the ignition switch OFF.
Disconnect the battery (-) terminal. To avoid fuel spills, draw it from the tank when the engine is cold. Be prepared for fuel spillage; any spilled fuel must be completely wiped up immediately.
- Turn the ignition switch OFF.
- Wait until the engine cools down.
- Disconnect the battery (-) terminal (see Battery Removal in the Electrical System chapter).
- Remove:
Lower Fairing (see Lower Fairing Removal in the Frame chapter)
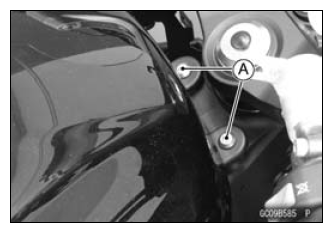
Front Fuel Tank Bolts [A]
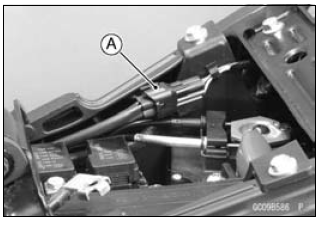
- Disconnect the fuel pump lead connector [A].
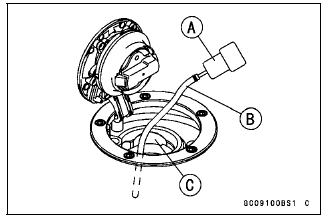
- Open the fuel tank cap [A] to lower the pressure in the tank.
- During tank removal, keep the tank cap open to release pressure in the tank. This makes fuel spillage less.

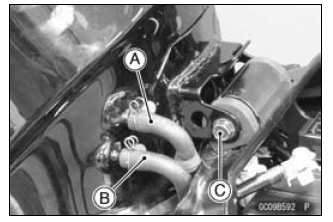
- Draw the fuel out from the fuel tank with a commercially available pump
[A].
- Use a soft plastic hose [B] as a pump inlet hose in order to insert the hose smoothly.
- Put the hose through the fill opening [C] into the tank and draw the fuel out.
WARNING Spilled fuel is flammable and can be explosive under certain conditions. The fuel can not be removed completely from the fuel tank. Be careful for remained fuel spillage.
- Remove the both side cover (see Side Cover Removal in the Frame chapter).
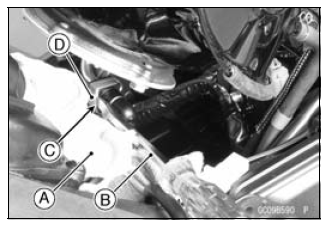
- Lift up the fuel tank, and support it with a suitable bar [A].
- Remove the drain hose [A] and clamp from the fuel tank.
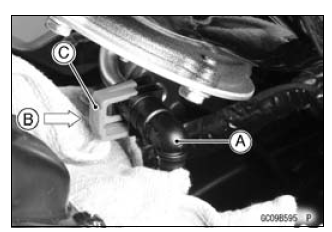
- Be sure to place a piece of cloth [A] around the fuel hose joint.
- Insert a thin blade screwdriver [B] into the slit [C] on the joint lock [D].
- Pry the screwdriver to disconnect the joint lock.
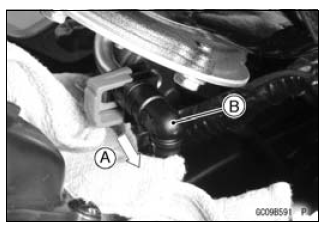
- Pull [A] the fuel hose joint [B] out of the outlet pipe.
WARNING Fuel is flammable and explosive under certain conditions and can cause severe burns. Be prepared for fuel spillage; any spilled fuel must be completely wiped up immediately. When the fuel hose is disconnected, fuel spills out from the hose and the pipe because of residual pressure. Cover the hose connection with a piece of clean cloth to prevent fuel spillage.
- Close the fuel tank cap.
- Remove the bar which supported fuel tank.
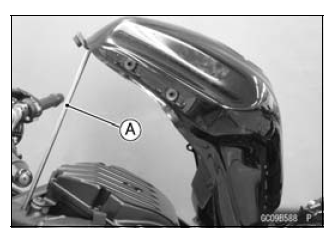
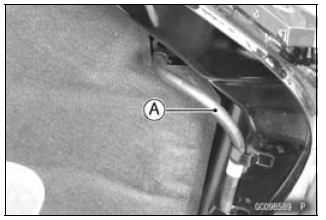
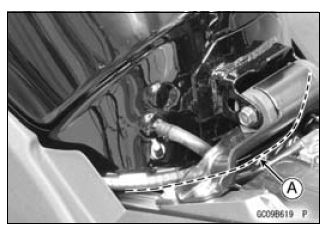
- For other than California and Southeast Asia models, remove the fuel tank breather hose [A] and rear fuel tank bolt [B].
- For the California and Southeast Asia models, remove the following.
Fuel Return Hose [A] (red)
Fuel Tank Breather Hose [B] (blue)
Rear Fuel Tank Bolt [C]
- Remove the fuel tank, and place it on a flat surface.
- Do not apply the load to the fuel pipe of the fuel pump.
- For the California and Southeast Asia models, note the following.
NOTICE For the California and Southeast Asia models, if gasoline, solvent, water or any other liquid enters the canister, the canister's vapor absorbing capacity is greatly reduced. If the canister does become contaminated, replace it with a new one.
- Be sure to plug the evaporative fuel return hose to prevent fuel spilling before fuel tank removal.
WARNING Spilled fuel is flammable and can be explosive under certain conditions. For California and Southeast Asia models, be careful not to spill fuel through the return hose.
If liquid or gasoline flows into the breather hose, remove the hose and blow it clean with compressed air.
- Be careful of fuel spillage from the fuel tank since fuel still remains in the fuel tank and fuel pump.
WARNING Gasoline is extremely flammable and can be explosive under certain conditions, creating the potential for serious burns. Store the fuel tank in an area which is well-ventilated and free from any source of flame or sparks. Do not smoke in this area. Place the fuel tank on a flat surface and plug the fuel pipes to prevent fuel leakage.
Fuel Tank Installation
- Note the above WARNING (see Fuel Tank Removal).
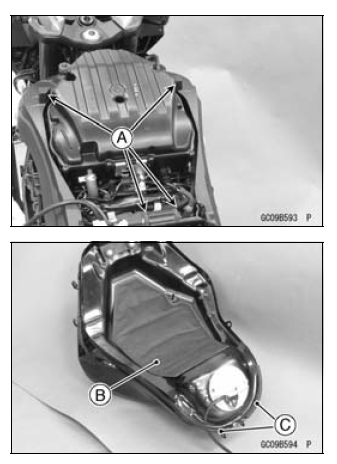
- Check that the dampers [A], pad [B] and trims [C] are in place on the
frame and the fuel tank.
If the dampers, pad or trims are damaged or deteriorated, replace them.
- Install the drain hose and clamp securely.
- Run the hoses correctly (see Cable,Wire, and Hose Routing section in the Appendix chapter).
- For the California and Southeast Asia models, note the following.
- To prevent the gasoline from flowing into or out of the canister, hold the separator perpendicular to the ground.
- Connect the hoses according to the diagram of the evaporative emission control system. Make sure they do not get pinched or kinked.
- Run hoses with a minimum of bending so that the air or vapor will not be obstructed.
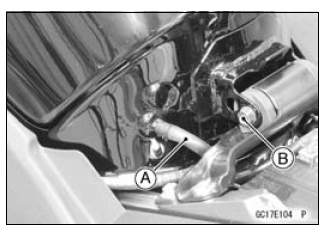
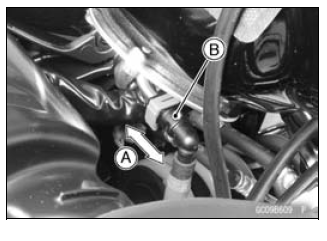
- Insert the fuel hose joint [A] straight onto the fuel outlet pipe until the hose joint clicks.
- Push [B] the joint lock [C] until the hose joint clicks.
- Push and pull [A] the hose joint [B] back and forth more than two times, and make sure it is locked and does not come off.
WARNING Make sure the hose joint is installed correctly on the delivery pipe or the fuel could leak.
If it comes off, reinstall the hose joint.
- Connect the fuel pump lead connector and the battery (-) terminal (see Battery Installation in the Electrical System chapter).
- Be careful not to pinch the leads, cables or harnesses around rear part of the fuel tank [A].
Fuel Tank and Cap Inspection
- Open the tank cap.
- Visually inspect the gasket [A] on the tank cap for any damage.
Replace the tank cap if gasket is damaged.
- Check to see if the water drain pipe [B] and fuel breather pipe [C] in
the tank are not clogged. Check the tank cap breather also.
If they are clogged, remove the tank and drain it, and then blow the breather free with compressed air.
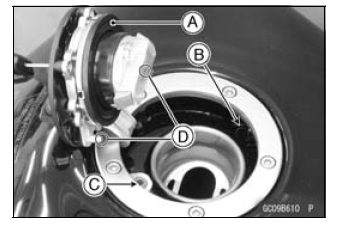
NOTICE Do not apply compressed air to the air vent holes [D] in the tank cap. This could cause damage and clogging of the labyrinth in the cap.
Fuel Tank Cleaning
WARNING Gasoline and low-flash point solvents can be flammable and/or explosive and cause severe burns. Clean the tank in a well-ventilated area, and take care that there are no sparks or flame anywhere near the working area. Do not use gasoline or low-flash point solvents to clean the tank.
- Remove:
Fuel Tank (see Fuel Tank Removal)
Fuel Pump (see Fuel Pump Removal) - Pour some high-flash point solvent into the fuel tank and shake the tank to remove dirt and fuel deposits.
- Draw the solvent out of the fuel tank.
- Dry the tank with compressed air.
- Install:
Fuel Pump (see Fuel Pump Installation)
Fuel Tank (see Fuel Tank Installation)
See also:
 Kawasaki Z1000SX - Service manual > Air Cleaner
Air Cleaner Element Removal/Installation Refer to the Air Cleaner Element Replacement in the Periodic Maintenance chapter. Air Cleaner Element Inspection Remove the air cleaner element (see Air Cleaner Element Replacement in the Periodic Maintenance chapter). Visually check the element [A] for tears or breaks.
Kawasaki Z1000SX - Service manual > Evaporative Emission Control System (CAL and SEA-B1 Models)
The Evaporative Emission Control System routes fuel vapors from the fuel system into the running engine or stores the vapors in a canister when the engine is stopped. Although no adjustments are required, a thorough visual inspection must be made at the intervals specified by the Periodic Maintenance Chart.
 Rider's Manual BMW R 1250 GS GSA
 Owner's Manual Harley-Davidson Sportster XL1200X Forty-Eight
 Owner's Manual Honda CBR650R
 Service manual Honda CBR650
 Owner's Manual Honda PCX125
 Owner's Manual Kawasaki Z1000SX
 Service manual Kawasaki Z1000SX
 Owner's Manual Lexmoto Echo
 Owner's Manual Royal Enfield Interceptor 650
 Service manual Royal Enfield Interceptor 650
 Owner's Manual Yamaha MT-07