 Harley-Davidson Sportster XL1200X Forty-Eight - Owner's Manual > Fuses
Fuse Replacement
 Always use replacement
fuses that are of the correct type and amperage rating. Use of incorrect fuses
can result in damage to electrical systems.
Always use replacement
fuses that are of the correct type and amperage rating. Use of incorrect fuses
can result in damage to electrical systems.
If replacing a fuse does not correct the problem or if a fuse is repeatedly blown, see a Harley-Davidson dealer.
1. Turn off the ignition.
- Keyed ignition: Turn the key to OFF.
- Keyless ignition: With a fob near, switch OFF/RUN switch to OFF.
2. Open left side cover.
3. See Fuse Block. Pull the fuse block from the oil tank.
4. Lift the side latches to remove the cover.
NOTE: Models with sirens: With fob present, turn OFF/RUN switch to RUN.
5. See Fuses. Remove the suspect fuse.
- Main fuse (1)
- P&A (2)
- Battery (3)
6. Inspect the element. If the element is burned or separated, replace the fuse with an automotive type ATO fuse with the same Amp rating.
7. Align fuse block cover with retaining guide. Slide the fuse block cover until tab latches.
8. Press the fuse block into the recess in the oil tank.
9. Close left side cover.
Main Fuse
The 40 amp main fuse can be removed to disconnect power from the electrical system (except starter motor/solenoid).
To prevent a security siren from sounding, turn on the ignition with the hands-free fob present to disarm the security system before removing the main fuse.
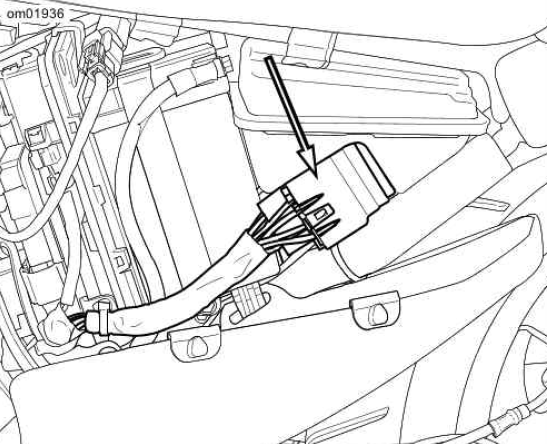 Fuse Block
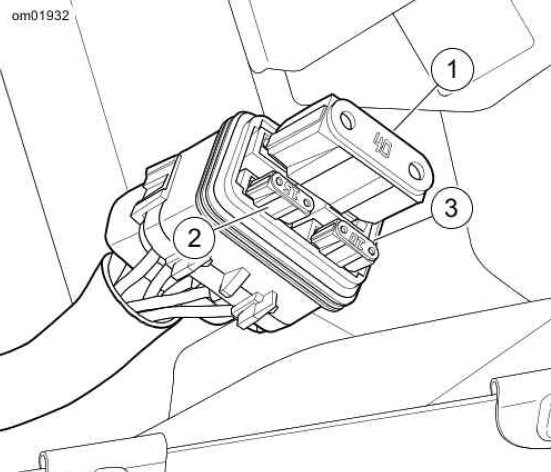 Fuses
Fuses
- Main
- P&A
- Battery
Seat
Removal
1. See Remove Seat. Remove mounting screw (1) to detach seat from rear fender.
2. Press seat down and forward (2).
3. Lift (3) slightly to detach keyhole bracket from seat post.
4. Pull seat back (4) to detach seat tongue from fuel tank bracket.
5. Verify that tongue and mounting bracket are tightly secured to the seat bottom.
NOTE: The passenger strap is not sold separately. Replace entire seat if the strap is damaged.
6. Two-up seat: Inspect passenger strap for damage or excessive wear.
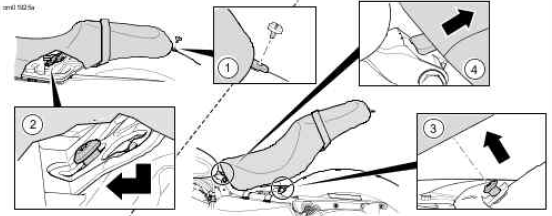 Remove Seat
- Remove screw
- Press down and forward
- Lift
- Pull back
Installation
1. See Solo and Two-Up Seats. Position seat on frame with mounting bracket (1) at rear.
2. Slide seat forward until the tongue (2) fits snugly under fuel tank bracket.
3. Push seat forward to engage keyhole (3) onto seat post. Pull seat back slightly.
NOTE: Mounting bracket of solo seat uses forward hole in rear fender. Dual seat bracket uses rearward hole.
4. Install seat mounting screw with captive washer to fasten seat mounting bracket to top of rear fender. Tighten to 15-30 in-lbs (1.7-3.4 Nm).
 After installing seat,
pull upward on seat to be sure it is locked in position. While riding, a loose
seat can shift causing loss of control, which could result in death or serious
injury.
After installing seat,
pull upward on seat to be sure it is locked in position. While riding, a loose
seat can shift causing loss of control, which could result in death or serious
injury.
5. Pull up on seat to verify that it is locked at all three points.
 Solo and Two-Up Seats
- Mounting bracket
- Tongue
- Keyhole
- Passenger strap
See also:
 Harley-Davidson Sportster XL1200X Forty-Eight - Owner's Manual > Installation and Connection
Connect the cables to the correct battery terminals. Failure to do so could result in damage to the motorcycle electrical system.
Harley-Davidson Sportster XL1200X Forty-Eight - Owner's Manual > Motorcycle Storage
Placing Motorcycle in Storage Proper storage is important for the trouble-free operation of your motorcycle. See your Owner's Manual for storage recommendations or see a Harley-Davidson dealer. Improper storage procedures can lead to equipment damage.
 Rider's Manual BMW R 1250 GS GSA
 Owner's Manual Harley-Davidson Sportster XL1200X Forty-Eight
 Owner's Manual Honda CBR650R
 Service manual Honda CBR650
 Owner's Manual Honda PCX125
 Owner's Manual Kawasaki Z1000SX
 Service manual Kawasaki Z1000SX
 Owner's Manual Lexmoto Echo
 Owner's Manual Royal Enfield Interceptor 650
 Service manual Royal Enfield Interceptor 650
 Owner's Manual Yamaha MT-07