 Harley-Davidson Sportster XL1200X Forty-Eight - Owner's Manual > Instruments
Speedometer
 Travel at speeds
appropriate for road and conditions and never travel faster than posted speed
limit. Excessive speed can cause loss of vehicle control, which could result in
death or serious injury.
Travel at speeds
appropriate for road and conditions and never travel faster than posted speed
limit. Excessive speed can cause loss of vehicle control, which could result in
death or serious injury.
See Instruments. The speedometer (1) registers miles per hour (U.S. models only), kilometers per hour (international models only) or in certain markets, displays both MPH and km/h.
The instrument backlight activates after a slight delay. The backlight may change briefly when ambient lighting changes (such as going through a tunnel).
Odometer
See Instruments. The odometer window (2) is located in the speedometer face.
Keyed ignition: The ignition switch must be in the ACC or IGNITION position.
Keyless ignition: With an assigned fob within range, turn the OFF/RUN switch to RUN.
The odometer window provides the following selectable displays:
- Odometer
- Trip odometer A
- Trip odometer B
- Time
- Gear number and tachometer
Press and release the TRIP switch to cycle through the displays.
Changing Units of Measurement
With odometer displayed, press and hold the TRIP switch until the units change to MI or KM. All odometer functions will display the selected unit.
 Instruments
- Speedometer
- Odometer
Trip Odometers A and B
See Trip Odometers, Gear Indicator and RPM. To check mileage or to reset trip odometers, press and release the TRIP switch (1) to display either the A (2) or B (3) trip odometer. An A or B in the upper left of the display window identifies the trip odometer.
To reset trip odometers, select the A or B odometer. Press the TRIP switch and hold for approximately three seconds. The trip odometer resets to zero.
Gear Selection/Tachometer
See Trip Odometers, Gear Indicator and RPM. Press and release the TRIP switch (1) to cycle through the odometer displays to select the gear number and the tachometer display (4). The odometer shows the current gear (15) and the engine speed in revolutions per minute (rpm).
When the transmission is in neutral or the clutch lever is pulled in, the gear number is blank.
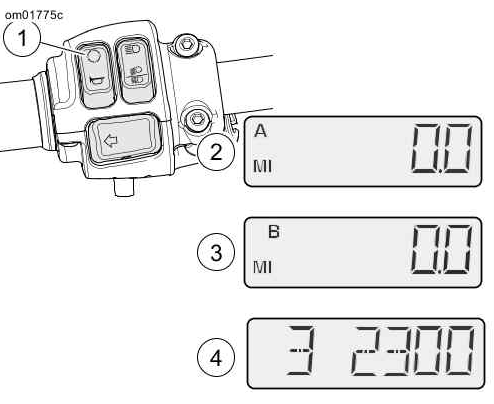 Trip Odometers, Gear Indicator and RPM
- Trip switch
- Trip odometer A
- Trip odometer B
- Gear and rpm
Time
Press and release the TRIP switch to cycle through the odometer window displays to the time display. To set the time:
1. See Time Displays. Press and release the TRIP switch (1) until time (hour and minutes) is displayed. Press and hold the TRIP switch until 12h (2) begins to blink in the speedometer display window. Release the switch.
2. Press and release the TRIP switch once to advance to a blinking 24h or military style time display. Each time you press and release the switch, the display switches between 12h and 24h.
3. When the desired time style is displayed, press and hold the TRIP switch until the hours display (3) is blinking.
4. Press and release the TRIP switch repeatedly to advance the hours.
5. When the correct hour is displayed, press and hold the TRIP switch until the minutes display (4) starts blinking.
6. Press and release the TRIP switch repeatedly to advance the minutes display.
7. When the correct minutes are displayed (5), press and hold the TRIP switch until the display advances to AM or PM (6).
NOTE: AM or PM does not appear in the regular time display. The motorcycle uses the selection for diagnostic purposes.
8. In the 12h display, AM or PM flashes. Select AM or PM with the TRIP switch and press and hold the switch for five seconds.
9. Turn the OFF/RUN switch to OFF.
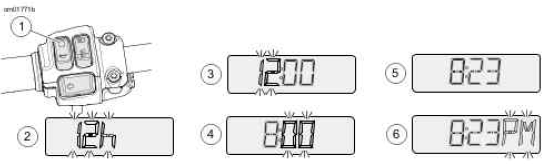 Time Displays
- Trip switch
- 12 hour or 24 hour
- Hour select
- Minute select
- Hour and minutes set
- AM or PM
Tip Message
If tip occurs, check all
controls for proper operation. Restricted control movement can adversely affect
the performance of the brakes, clutch or ability to shift, which could result in
loss of vehicle control and death or serious injury.
See tIP, NO FOB and SidEStAnd. Should motorcycle be tipped over, the word "tIP" (1) appears in the odometer window. The engine does not start until reset.
Keyed reset: To reset, set the motorcycle upright and turn the ignition switch OFF-IGNITION.
Keyless reset: To reset, set the motorcycle upright and turn the OFF/RUN switch OFF-RUN.
No Fob Message
See tIP, NO FOB and SidEStAnd. If the motorcycle is equipped with a security system and is driven off leaving the fob behind, "NO FOB" (2) is displayed in the odometer window as the motorcycle starts moving. The display lasts for 10 seconds as a reminder to retrieve the fob.
With the motorcycle separated from its assigned fob, the motorcycle can only be started with a manual PIN entry to disarm the security system. See Arming and Disarming.
Sidestand Message
See tIP, NO FOB and SidEStAnd. On international (HDI) models, if the motorcycle is placed into gear while the jiffy stand is down a 'SidEstAnd' (3) message is displayed.
See Jiffy Stand Interlock: International Models.
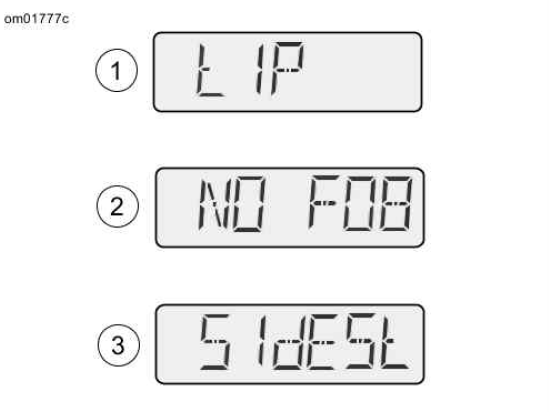 tIP, NO FOB and SidEStAnd
- Tip over
- No fob
- Jiffy stand down
Instrument Lamps
See Instrument Lamps. Warning lamps are in the instrument face.
Check Engine
The check engine lamp (1) indicates whether the engine/engine management system is operating normally. The engine lamp color is amber.
The check engine lamp normally comes on when the ignition is first turned on and remains on for approximately 4 seconds, as the engine management system runs a series of self-diagnostics.
If the check engine lamp comes on at any other time, see a Harley-Davidson dealer.
Low Fuel
The low fuel lamp (2) indicates when fuel falls below the reserve level in the fuel tank. The low fuel lamp color is amber. Refer to Capacities: XL883 Models.
The low fuel lamp will not turn off until there is sufficient fuel in the tank, the ignition switch has been turned off and back on, and the vehicle has begun forward speed. If the low fuel lamp flashes at a steady rate, see a Harley-Davidson dealer.
Battery
The red battery charging lamp (3) indicates either overcharging or undercharging of the battery. See Battery Maintenance.
If the lamp remains illuminated, see a Harley-Davidson dealer.
Security Lamp
The red security lamp (4) indicates when the security system is armed. See Security System.
If the lamp remains lit continuously, see a Harley-Davidson dealer.
ABS Lamp
If ABS lamp continues
flashing at speeds greater than 3 mph (5 km/h) or remains on continuously, the
ABS is not operating. The standard brake system is operational, but wheel lock
up can occur. Contact a Harley-Davidson Dealer to have ABS repaired. A locked
wheel will skid and can cause loss of vehicle control, which could result in
death or serious injury.
Flashing: On vehicles with ABS, the ABS lamp begins flashing when the vehicle is turned on. The flashing lamp indicates that the system is in self-diagnosis mode. It continues to flash until motorcycle speed exceeds 3 mph 5 km/h. ABS is not operational until the lamp turns off. Refer to Brake System.
Solid: Continuous illumination of the lamp indicates an ABS malfunction. ABS is disabled and the brakes are operating as if they were non-ABS brakes. See a Harley-Davidson dealer for service.
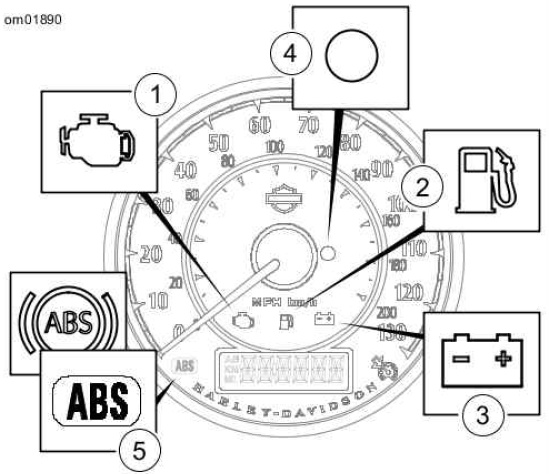 Instrument Lamps
- Check engine
- Low fuel
- Battery
- Security system
- ABS (ABS km/h icon also shown)
Indicator Lamps
See Indicator Lamp Bar. Five indicator lamps are provided in the instrument panel.
Turn Indicator Lamps
The turn indicators (1, 5) flash when a turn signal is activated. When the 4-way hazard flashers are operating, both turn indicators flash simultaneously.
Headlamp High Beam Indicator Lamp
The headlamp high beam indicator lamp (2) is lit when the high beam or flash to pass switch is activated.
Neutral Indicator Lamp
The neutral indicator lamp (3) is lit when the transmission is in neutral.
Oil Pressure Indicator Lamp
The oil pressure indicator lamp (4) is lit when sufficient oil is not circulating through the engine.
The lamp is lit when the ignition is turned on before starting the engine. With engine running, lamp should be off when engine speed is above idle.
Circumstances that could cause the oil indicator lamp to illuminate:
- Low oil level. Stop engine immediately. Add oil.
- Diluted oil. Change oil as soon as possible.
- Incorrect oil for the operating temperature. Change oil as soon as possible.
- For further information, see Troubleshooting.
 If the oil pressure
indicator lamp remains lit, always check the oil supply first. If the oil supply
is normal and the lamp is still lit, stop the engine at once and do not ride
further until the trouble is located and the necessary repairs are made. Failure
to do so may result in engine damage.
If the oil pressure
indicator lamp remains lit, always check the oil supply first. If the oil supply
is normal and the lamp is still lit, stop the engine at once and do not ride
further until the trouble is located and the necessary repairs are made. Failure
to do so may result in engine damage.
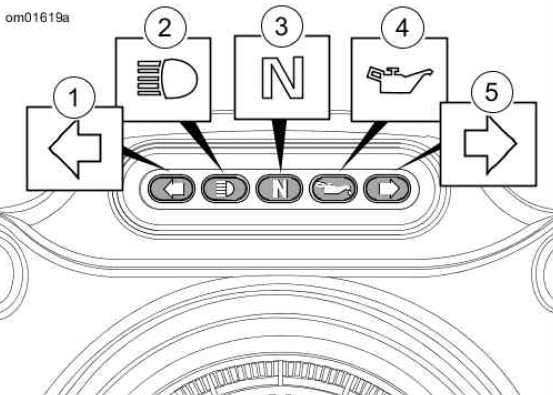 Indicator Lamp Bar
- Left turn
- High beam
- Neutral
- Oil pressure
- Right turn
See also:
 Harley-Davidson Sportster XL1200X Forty-Eight - Owner's Manual > Right Hand Control Switches
Hazard Warning 4-Way Flasher See Right Hand Control Module. This switch is used to allow a stranded motorcycle to be left in the 4-way flashing mode. With the flashers, the motorcycle can be left with the ignition locked until help is found. Refer to Right Hand Control Switches.
Harley-Davidson Sportster XL1200X Forty-Eight - Owner's Manual > Gear Shift Lever
Location See Shift Lever and Shift Pattern. The gear shift lever is located on the left side of the motorcycle and is operated with the left foot. The shift lever changes gears in a sequential five-speed transmission.
 Rider's Manual BMW R 1250 GS GSA
 Owner's Manual Harley-Davidson Sportster XL1200X Forty-Eight
 Owner's Manual Honda CBR650R
 Service manual Honda CBR650
 Owner's Manual Honda PCX125
 Owner's Manual Kawasaki Z1000SX
 Service manual Kawasaki Z1000SX
 Owner's Manual Lexmoto Echo
 Owner's Manual Royal Enfield Interceptor 650
 Service manual Royal Enfield Interceptor 650
 Owner's Manual Yamaha MT-07