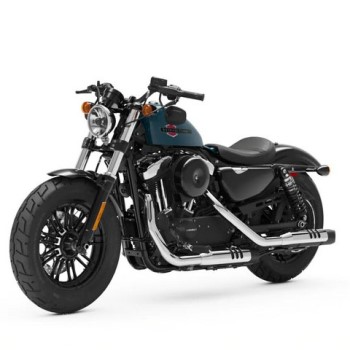
 Harley-Davidson Sportster XL1200X Forty-Eight - Owner's Manual > Operation
Operating Recommendations
 Motorcycles are different
from other vehicles. They operate, steer, handle and brake differently.
Unskilled or improper use could result in loss of control, death or serious
injury.
Motorcycles are different
from other vehicles. They operate, steer, handle and brake differently.
Unskilled or improper use could result in loss of control, death or serious
injury.
Do not tow a disabled
motorcycle. Towing can adversely affect stability and handling, which could
result in death or serious injury.
- Take a rider training course.
- Read the Owner's Manual before riding, adding accessories or servicing.
- Wear a helmet, eye protection and protective clothing.
- Never tow a trailer.
 Do not run the engine at
extremely high RPM with clutch disengaged or transmission in neutral. Running an
engine at high RPM can result in engine damage.
Do not run the engine at
extremely high RPM with clutch disengaged or transmission in neutral. Running an
engine at high RPM can result in engine damage.
Do not exceed the maximum
safe RPM specified below under any conditions. Exceeding the maximum safe engine
RPM can result in equipment damage.
- The maximum recommended safe engine speed is 6000 rpm.
- Do not idle engine unnecessarily for more than a few minutes with motorcycle standing still.
If motorcycle will not be ridden for a period of two weeks or more with security system armed, it is recommended to connect an automatic constant monitoring battery charger/tender to maintain battery charge. If security system will not be armed, remove the 40 A main fuse. See Fuses.
Air-cooled engines
require air movement over the cylinders and heads to maintain proper operating
temperature. Extended periods of idling or parade duty can overheat the engine,
resulting in serious engine damage.
An engine running long-distance at high speed must be given closer than ordinary attention to avoid overheating and possible engine damage.
NOTE: Have the engine checked regularly and keep it well tuned.
This applies particularly to a motorcycle equipped with windshield and fairing.
When riding on wet roads,
brake efficiency and traction are greatly reduced. Failure to use care when
braking, accelerating or turning on wet roads can cause loss of control, which
could result in death or serious injury.
Continuous use of brake
causes overheating and reduced efficiency, which could result in death or
serious injury.
NOTE: When descending upon a long, steep grade, downshift. Use engine compression together with intermittent application of both brakes to slow the motorcycle.
Break-in Riding Rules
The First 500 Miles (800 Kilometers)
The sound design, quality materials, and workmanship that are built into your new Harley-Davidson will give you optimum performance right from the start.
To allow your engine to wear-in its critical parts, we recommend that you observe the riding rules provided below for the first 500 mi 800 km.
1. During the first 50 mi 80 km of riding, keep the engine speed below 3000 rpm in any gear. Do not lug the engine by running or accelerating at very low rpm, or by running at high rpm longer than needed for shifting or passing.
2. Up to 500 mi 800 km , vary the engine speed and avoid operating at any steady engine speed for long periods. Engine speed up to 3500 rpm in any gear is permissible.
3. Drive slowly and avoid fast starts at wide open throttle until the engine has warmed up.
4. Avoid lugging the engine by not running the engine at very low speeds in higher gears.
5. Avoid hard braking. Break-in new brakes with moderate use for the first 100 mi 160 km.
Pre-Riding Checklist
Read the CONTROLS AND
INDICATORS section before riding your motorcycle. Failure to understand the
operation of the motorcycle could result in death or serious injury.
Always inspect motorcycle condition before riding.
Stop the engine when
refueling or servicing the fuel system. Do not smoke or allow open flame or
sparks near gasoline. Gasoline is extremely flammable and highly explosive,
which could result in death or serious injury.
Avoid spills. Slowly
remove filler cap. Do not fill above bottom of filler neck insert, leaving air
space for fuel expansion. Secure filler cap after refueling. Gasoline is
extremely flammable and highly explosive, which could result in death or serious
injury.
Use care when refueling.
Pressurized air in fuel tank can force gasoline to escape through filler tube.
Gasoline is extremely flammable and highly explosive, which could result in
death or serious injury.
1. Check fuel level. Add fuel if necessary.
2. Adjust mirrors to proper riding positions.
3. Check engine oil level. Add oil if necessary.
4. Check controls to make sure that they operate properly. Operate the front and rear brakes, throttle, clutch and shifter. All controls should operate freely without binding.
5. Check steering for proper operation by turning the handlebars through the full operating range. Handlebars should turn smoothly without binding.
Be sure tires are
properly inflated, balanced, undamaged, and have adequate tread. Inspect your
tires regularly and see a Harley-Davidson dealer for replacements. Riding with
excessively worn, unbalanced, improperly inflated, overloaded or damaged tires
can lead to tire failure and adversely affect stability and handling, which
could result in death or serious injury.
6. Check tire condition, pressure and motorcycle loading. Incorrect pressure and excessive loading can lead to tire or wheel failure, and can affect handling and stability. For correct tire pressures, refer to Specified Tires.
Be sure headlamp, tail
and stop lamp and turn signals are operating properly before riding.
Poor visibility of rider to other motorists can result in death or serious injury.
7. Test all switches and lights for proper operation.
8. Check for any fuel, oil or hydraulic fluid leaks. Check for coolant leaks on applicable vehicles.
9. Check drive belt for wear or damage.
10. Service your motorcycle as necessary.
Starting the Engine
Shift transmission to
neutral before starting engine to prevent accidental movement, which could
result in death or serious injury.
The engine should be
allowed to run slowly for 15-30 seconds. This will allow the engine to warm up
and let oil reach all surfaces needing lubrication. Failure to comply can result
in engine damage.
NOTE: Do not open the throttle before starting the engine.
1. Turn the ignition on.
- Keyed ignition: Turn key to IGNITION.
- Keyless ignition: Bring an assigned fob within range.
2. See Right Handlebar Controls. Switch the OFF/RUN switch to the RUN (1) position.
NOTE: The engine lamp will light for approximately 4 seconds. You will hear the fuel pump purr for approximately 2 seconds as it operates to fill the fuel lines with gasoline.
3. Though the illuminated green neutral lamp indicates that the transmission is in neutral, verify neutral by rolling the motorcycle back and forth with the clutch lever out.
4. Squeeze the clutch lever against the handlebar.
5. Press the start switch (2).
6. When the engine has started, you can operate your motorcycle as you normally would after raising the jiffy stand.
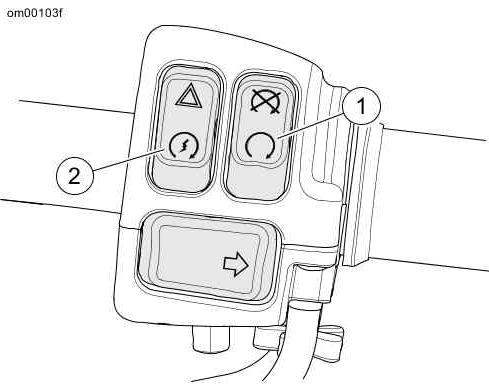 Right Handlebar Controls
- Engine run switch
- Engine start switch
Starting after Tip Over
If tip occurs, check all
controls for proper operation. Restricted control movement can adversely affect
the performance of the brakes, clutch or ability to shift, which could result in
loss of vehicle control and death or serious injury.
After a tip over, reset the ignition before starting the engine.
NOTE: The word "tIP" appears in the odometer window.
1. Set the motorcycle upright.
2. Keyed ignition: Reset the ignition by turning the ignition switch OFF-IGNITION.
3. Keyless ignition: Reset the ignition by turning the OFF/RUN switch OFF-RUN.
Shifting Gears
The clutch must be fully
disengaged before attempting a gear shift. Failure to fully disengage the clutch
can result in equipment damage.
Stopped, Engine Off
Squeeze in the clutch lever to fully disengage the clutch. Gears may not engage because the transmission shafts are not turning and shifter components are not lined up. Rock the motorcycle backward and forward while lightly pressing on the shift lever.
Starting from a Stop
NOTE: Always start the engine with the transmission in neutral. Always start forward motion in first gear.
1. With the engine running and the jiffy stand retracted, pull the clutch hand lever in against the handlebar grip to fully disengage the clutch.
2. Press the gear shift lever down to the end of its travel and release. The transmission is now in first gear.
3. Ease out the clutch lever and at the same time, gradually open the throttle.
Upshift (Acceleration)
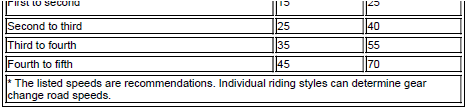
See Upshift Sequence: Sportster Models. Engage the next higher gear when the motorcycle reaches the shifting speed. Refer to Upshift (Acceleration) Road Speeds*.
Upshift (Acceleration) Road Speeds*

1. Close the throttle.
2. Squeeze in the clutch lever to fully disengage the clutch.
3. Lift the gear shift lever up to the end of its travel and release.
4. Ease out the clutch lever and gradually open the throttle.
5. Repeat the previous steps to engage remaining gears.
NOTES:
- Disengage the clutch completely before each gear change.
- Partially open the throttle so the engine does not drag when the clutch lever is released.
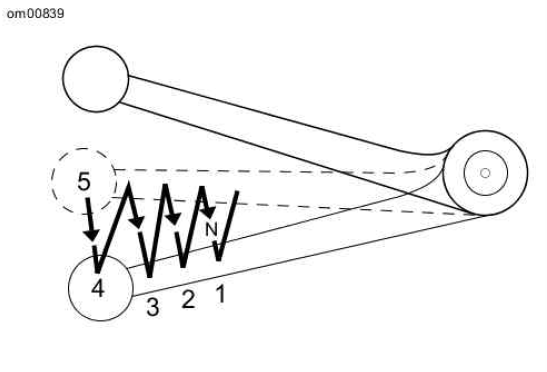
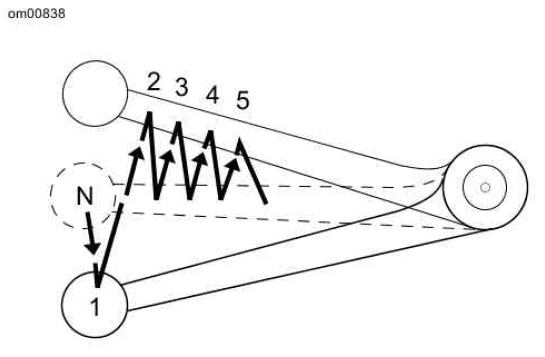 Upshift Sequence: Sportster Models
Downshift (Deceleration)
Do not downshift at
speeds higher than those listed. Shifting to lower gears when speed is too high
can cause the rear wheel to lose traction and lead to loss of vehicle control,
which could result in death or serious injury.
See Downshift Sequence: Sportster Models. When speed decreases, as when climbing a hill or slowing for a turn, shift to the next lower gear. Refer to Downshift (Deceleration) Road Speeds*.
Downshift (Deceleration) Road Speeds*


NOTE: The shifting points shown in the table are recommendations. Vehicle owners may determine that their individual shifting patterns may differ from those stated and are appropriate for individual riding styles.
1. Close the throttle.
2. Squeeze in the clutch lever to fully disengage the clutch.
3. Press the gear shift lever down to the end of its travel and release.
4. Ease out the clutch lever and gradually open the throttle.
5. Repeat the previous steps to engage remaining gears.
NOTES:
- Disengage the clutch completely before each gear change.
- Partially open the throttle so the engine does not drag when clutch lever is released.
Shift to neutral before
stopping engine. Shifting mechanism can be damaged by shifting gears while
engine is stopped.
The gear shifter mechanism permits shifting the transmission to neutral from either first or second gear.
 Downshift Sequence: Sportster Models
Stopping the Engine
NOTE: Keyed ignition: If the engine stalls or is stopped, turn the ignition switch to OFF to prevent battery discharge until the engine is restarted.
1. Keyed ignition:
- Stop the engine by turning the engine OFF/RUN switch to OFF.
- Turn the ignition switch to OFF.
2. Keyless ignition: Stop the engine by turning the engine OFF/RUN switch to OFF.
See also:
 Harley-Davidson Sportster XL1200X Forty-Eight - Owner's Manual > Alarm
Warnings Once armed, if the motorcycle is moved or lifted up off of its jiffy stand and the fob is not present, the alarm will warn the operator with three alternate flashes of the turn signals and a chirp of the siren.
 Rider's Manual BMW R 1250 GS GSA
 Owner's Manual Harley-Davidson Sportster XL1200X Forty-Eight
 Owner's Manual Honda CBR650R
 Service manual Honda CBR650
 Owner's Manual Honda PCX125
 Owner's Manual Kawasaki Z1000SX
 Service manual Kawasaki Z1000SX
 Owner's Manual Lexmoto Echo
 Owner's Manual Royal Enfield Interceptor 650
 Service manual Royal Enfield Interceptor 650
 Owner's Manual Yamaha MT-07