 Honda CBR650R - Owner's Manual > Operation Guide
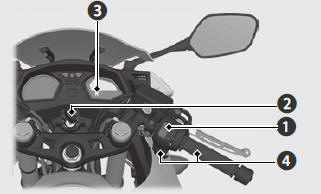
Parts Location
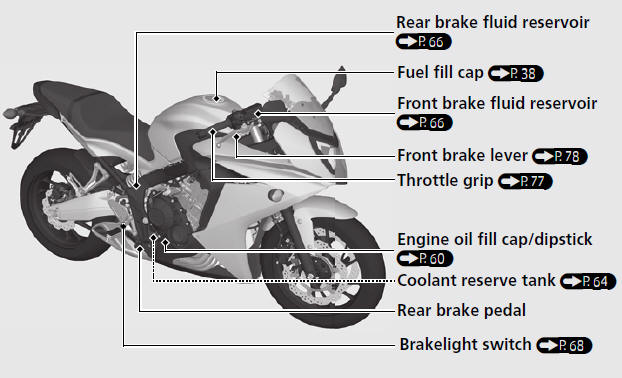
- Rear brake fluid reservoir
- Fuel fill cap
- Front brake fluid reservoir
- Front brake lever
- Throttle grip
- Engine oil fill cap/dipstick
- Coolant reserve tank
- Rear brake pedal
- Brakelight switch
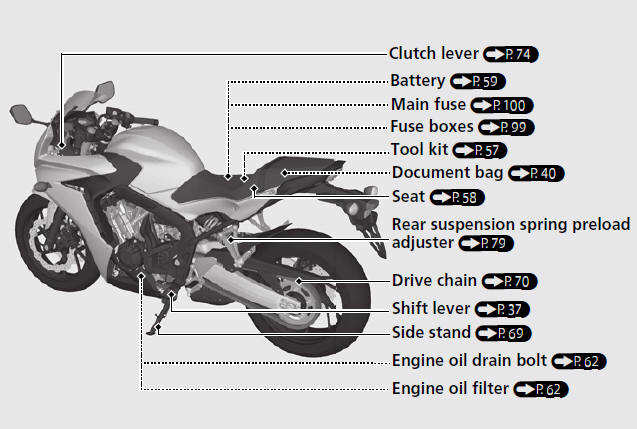
- Clutch lever
- Battery
- Main fuse
- Fuse boxes
- Tool kit
- Document bag
- Seat
- Rear suspension spring preload adjuster
- Drive chain
- Shift lever
- Side stand
- Engine oil drain bolt
- Engine oil filter
Instruments
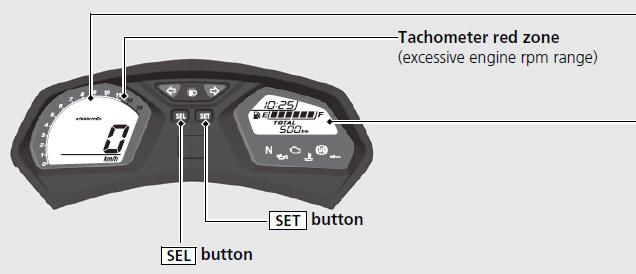
- Tachometer red zone (excessive engine rpm range)
-
 button
 -
 button
Display Check
When the ignition switch is turned on, the display will temporarily show all the modes and digital segments.
If any part of these displays does not come on when it should, have your dealer check for problems.
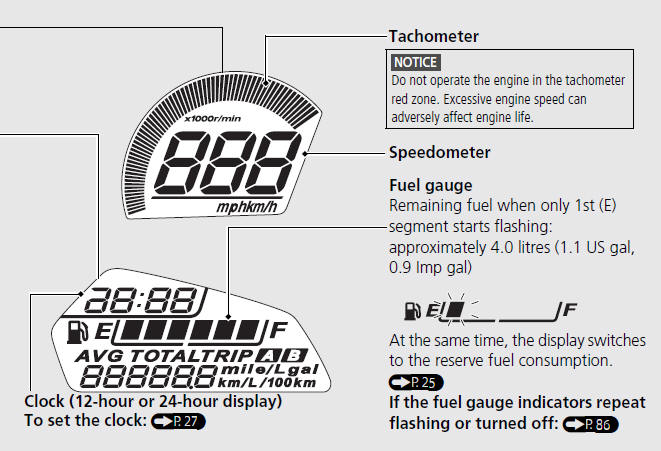
- Tachometer
NOTICE Do not operate the engine in the tachometer red zone. Excessive engine speed can adversely affect engine life.
- Speedometer
- Clock (12-hour or 24-hour display)
- Fuel gauge
Remaining fuel when only 1st (E) segment starts flashing:
approximately 4.0 litres (1.1 US gal, 0.9 Imp gal)

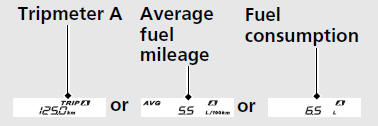
- Odometer [TOTAL] & Tripmeter [TRIP A/B] & Fuel mileage meter &
Fuel consumption meter
button selects the odometer, tripmeter A, tripmeter B, current fuel mileage,
average fuel mileage and fuel consumption
The average fuel mileage and fuel consumption will be based on tripmeter A.
- Current fuel mileage:
Current instant fuel mileage. If your speed is less than 7 km/h (5 mph), " "
is displayed.
"
is displayed.When "
 " is displayed at speeds
above 7 km/h (5 mph), go to your dealer for service.
" is displayed at speeds
above 7 km/h (5 mph), go to your dealer for service. - Average fuel mileage:
Average fuel mileage since tripmeter A was reset. When " "
is displayed, go to your dealer for service.
"
is displayed, go to your dealer for service. - Fuel consumption:
Total fuel consumption since tripmeter A was reset. When " "
is displayed, go to your dealer for service.
"
is displayed, go to your dealer for service. - Reserve fuel consumption:
If the engine stop switch is in the (Off) position, "
 " is displayed.
when "
" is displayed.
when " " is displayed in other
cases, go to your dealer for service.
" is displayed in other
cases, go to your dealer for service.- To reset the average fuel mileage and fuel consumption
To reset the tripmeter, average fuel mileage and fuel consumption
-
To reset tripmeter A, average fuel mileage, and fuel consumption together, press and hold
 button with tripmeter A, average fuel mileage, or fuel consumption displayed.
- When they are reset, reset display appears at each indication.

- Then, the display returns to the last selected indication.

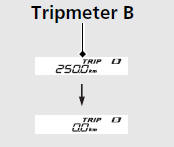
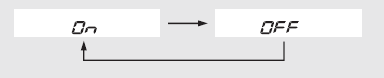
- To reset tripmeter B, press and hold
button with tripmeter B displayed.
Also, the tripmeter A, average fuel mileage, and fuel consumption will automatically reset by refuelling more than the reserve amount and riding your motorcycle for 0.1 km (0.06 mile).
You can activate or deactivate the automatic reset mode by refuelling.
Reserve fuel consumption display
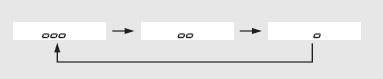
When the 1st (E) segment of the fuel gauge starts flashing, the odometer & tripmeter & fuel mileage meter & fuel consumption meter switches to the reserve fuel consumption. You should refill the tank as soon as possible.
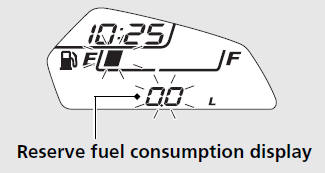
- Flashes from "0.0" L or gal.
- When the amount of consumed fuel is more than 2.1 litres (0.55 US gal, 0.46 Imp gal) the display blinks faster.
- If you change the display to odometer, tripmeter, fuel mileage meter and fuel consumption meter, it will automatically return to the reserve fuel consumption display if the buttons are not pressed after for about 10 seconds.
After refuelling more than the reserve amount, the display returns to normal when your motorcycle travel 0.1 km (0.06 mile).
Display Setting
Following items to change sequentially.
- Time format setting
- Clock setting
- Backlight brightness adjustment
- Activating/deactivating of tripmeter A, average fuel mileage and fuel consumption automatic reset mode
- Setting of HISS indicator
- Changing of speed and mileage unit
- Changing of fuel mileage meter unit
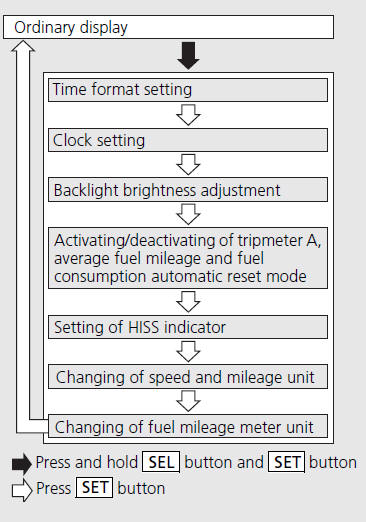
In addition, to move the ordinary display at display setting.
- The button is not pressed for about 30 seconds.
- Turn the ignition switch off and then on.
1 - Time format setting:
You can switch the time format between 12 hour format or 24 hour format.
- Turn the ignition switch to ON.
- Press and hold
button and
button, the current time format and the clock start flashing.

-
Press button to select "12hr" or "24hr".

- Press
button. The time format is set, and
then the display moves to the clock adjustment.
2 - Clock setting:
- Press
button until the desired hour is displayed.
- Press and hold to advance the hour fast.

- Press
button. The minute digits start
flashing.

- Press
button until the desired minute is displayed.
- Press and hold to advance the minute fast.

- Press
button. The clock is set, and then
the display moves to the backlight brightness adjustment.
3 - Backlight brightness adjustment:
You can adjust the brightness to one of three levels.
- Press
button. The brightness is switched.
- Press
button. The backlight is set, and
then the display moves to activating/ deactivating of tripmeter A, average
fuel mileage and fuel consumption automatic reset mode.
4 - Activating/deactivating of tripmeter A, average fuel mileage and fuel consumption automatic reset mode:
You can activate or deactivate the automatic reset mode by refuelling after 1st (E) segment of the fuel gauge starts flashing. Deactivation is initially set.
- Press
button to select "
 " (activate)
or "
" (activate)
or " " (deactivate) in the
automatic reset mode.
" (deactivate) in the
automatic reset mode.
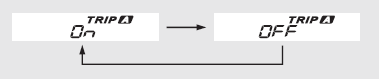
- To end the selection, press
button.
The activation/deactivation of automatic reset mode is set, and then the display moves to the setting of HISS indicator (HISS indicator comes on).
5 - Setting of HISS indicator:
You can select the blink or off the HISS indicator.
- Press button to select "" (blinks)
or "" (off).
- Press button. The HISS indicator setting is set, and then the display moves to the changing of the speed and mileage unit.
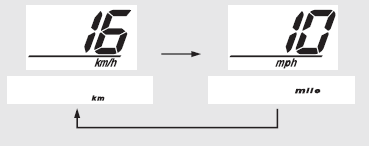
6 - Changing of speed and mileage unit:
- Press
button to select either "km/h" and "km" or "mph" and "mile".
- Press
button. The speed and mileage unit
is set, and then the display moves to the changing of the fuel mileage meter
unit.
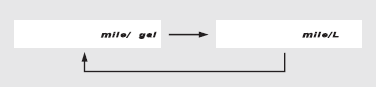
7 - Changing of fuel mileage meter unit:
- Press
button to select "L/100km" or "km/L".
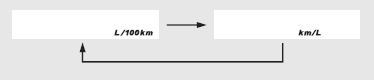
If the "mph" for speed and "mile" for mileage are selected, the fuel mileage shown by "mile/gal" or "mile/L".
- To end the selection, press
button.
The established setting can also be set by turning the ignition switch to OFF.
The control is automatically switched from the setting mode to the ordinary display if the button is not pressed for about 30 seconds. Even in this case, established setting is maintained.
Indicators
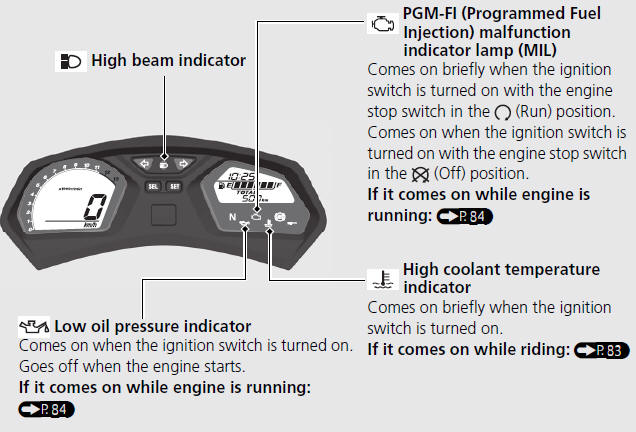
-
 High
beam indicator
High
beam indicator -
 PGM-FI
(Programmed Fuel Injection) malfunction indicator lamp (MIL)
PGM-FI
(Programmed Fuel Injection) malfunction indicator lamp (MIL) -
 Low oil
pressure indicator
Low oil
pressure indicator -
 High
coolant temperature indicator
High
coolant temperature indicator
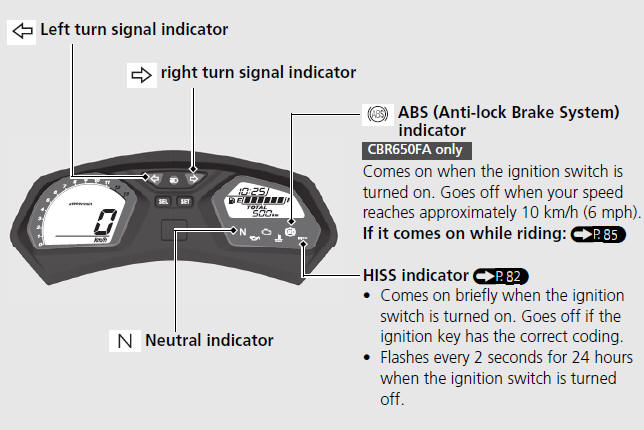
-
 Left
turn signal indicator
Left
turn signal indicator -
 right
turn signal indicator
right
turn signal indicator -
 ABS
(Anti-lock Brake System) indicator
ABS
(Anti-lock Brake System) indicator -
HISS indicator
-
 Neutral
indicator
Neutral
indicator
Switches
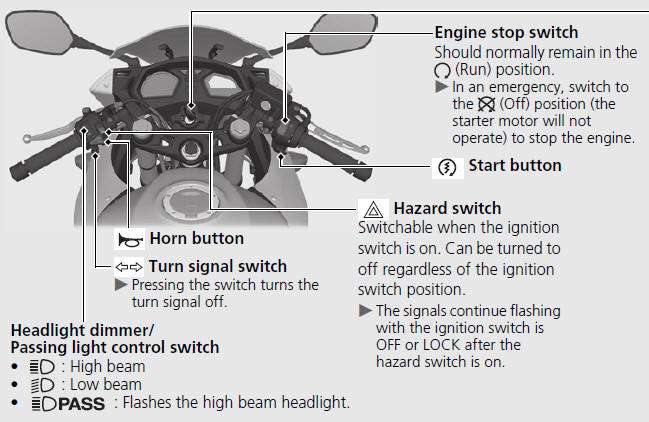
-
 Horn
button
Horn
button -
 Turn
signal switch
Turn
signal switch -
Headlight dimmer/Passing light control switch
-
 : High beam
 -
 : Low beam
 -
 : Flashes the
high beam headlight.
: Flashes the
high beam headlight. -
Engine stop switch
-
 Start
button
Start
button -
 Hazard
switch
Hazard
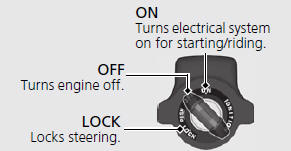
switch - Ignition Switch
Steering Lock
Lock the steering when parking to help prevent theft.
A U-shaped wheel lock or similar device is also recommended.
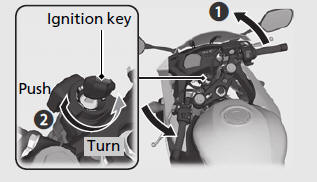
Locking
- Turn the handlebars all the way to the left.
- Push the key down, and turn the ignition switch to the LOCK position.
- Jiggle the handlebars if the lock is difficult to engage.
- Remove the key.
Unlocking
Insert the key, push it in, and turn the ignition switch to the OFF position.
Starting the Engine
Start your engine using the following procedure, regardless of whether the engine is cold or warm.
- Make sure the engine stop switch is in the
 (Run) position.
 - Turn the ignition switch to the ON position.
- Shift the transmission to Neutral (
 indicator comes on). Alternatively, pull in the clutch lever to start your
motorcycle with the transmission in gear so long as the side stand is raised.
indicator comes on). Alternatively, pull in the clutch lever to start your
motorcycle with the transmission in gear so long as the side stand is raised. - Press the start button with the throttle completely closed.
NOTICE
- If the engine does not start within 5 seconds, turn the ignition off and wait 10 seconds before trying to start the engine again to recover battery voltage.
- Extended fast idling and revving the engine can damage the engine, and the exhaust system.
- Snapping the throttle or fast idling for more than about 5 minutes may cause exhaust pipe discolouration.
- The engine will not start if the throttle is fully open.
If the engine does not start:
- Open the throttle fully and press the start button for 5 seconds.
- Repeat the normal starting procedure.
- If the engine starts, open the throttle slightly if idling is unstable.
- If the engine does not start, wait 10 seconds before trying steps 1 & 2 again.
If Engine Will Not Start
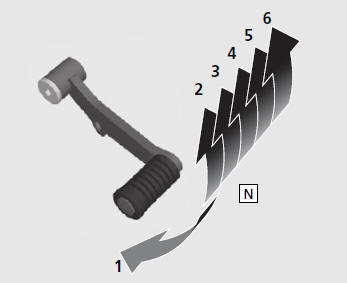
Shifting Gears
Your motorcycle transmission has six forward gears in a one-down, five-up shift pattern.
If you put the motorcycle in gear with the side stand down, the engine will shut off.
Refuelling
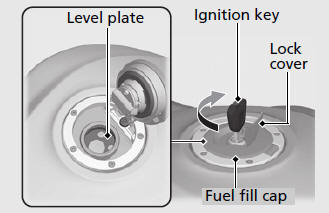
Do not fill with fuel above the level plate.
Fuel type: Unleaded petrol only
Fuel octane number: Your motorcycle is designed to use Research Octane Number (RON) 91 or higher.
Tank capacity: 17.3 litres (4.57 US gal, 3.81 Imp gal)
Refuelling and Fuel Guidelines
Opening the Fuel Fill Cap
Open the lock cover, insert the ignition key, and turn it clockwise to open the cap.
Closing the Fuel Fill Cap
- After refuelling, push the fuel fill cap closed until it locks.
- Remove the key and close the lock cover.
- The key cannot be removed if the cap is not locked.
WARNING
Petrol is highly flammable and explosive. You can be burned or seriously injured when handling fuel.
- Stop the engine, and keep heat, sparks, and flame away.
- Handle fuel only outdoors.
- Wipe up spills immediately.
Storage Equipment
The helmet holder, the helmet set wire (in the tool kit) and the tool kit are located under the seat. There is also space to store a U-shaped lock.
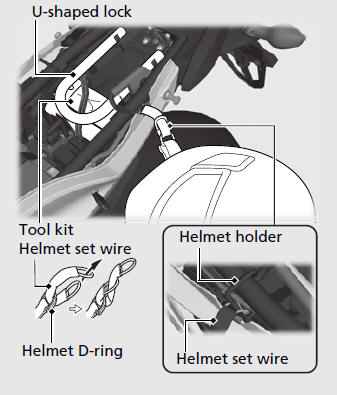
- The U-shaped lock is held in place above the rear fender.
- Use the helmet holder only when parked.
- Some U-shaped locks may not fit in the compartment due to their size or design.
WARNING
Riding with a helmet attached to the holder can interfere with the rear wheel or suspension and could cause a crash in which you can be seriously hurt or killed.
Use the helmet holder only while parked. Do not ride with a helmet secured by the holder.
The document bag and luggage tie-down hooks are located on the underside of the seat.
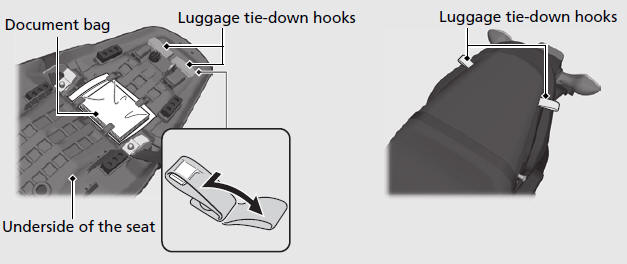
Never use the tie-down hooks to tow or lift the motorcycle.
See also:
 Honda CBR650R - Owner's Manual > Riding Precautions
Running-in Period During the first 500 km (300 miles) of running, follow these guidelines to ensure your motorcycle's future reliability and performance. Avoid full-throttle starts and rapid acceleration. Avoid hard braking and rapid down-shifts. Ride conservatively.
 Rider's Manual BMW R 1250 GS GSA
 Owner's Manual Harley-Davidson Sportster XL1200X Forty-Eight
 Owner's Manual Honda CBR650R
 Service manual Honda CBR650
 Owner's Manual Honda PCX125
 Owner's Manual Kawasaki Z1000SX
 Service manual Kawasaki Z1000SX
 Owner's Manual Lexmoto Echo
 Owner's Manual Royal Enfield Interceptor 650
 Service manual Royal Enfield Interceptor 650
 Owner's Manual Yamaha MT-07