 Kawasaki Z1000SX - Owner's Manual > Periodic Maintenance Chart, Engine Oil
The maintenance and adjustments outlined in this chapter must be carried out in accordance with the Periodic Maintenance Chart to keep the motorcycle in good running condition. The initial maintenance is vitally important and must not be neglected.
With a basic knowledge of mechanics and the proper use of tools, you should be able to carry out many of the maintenance items described in this chapter. If you lack proper experience or doubt your ability, all adjustments, maintenance, and repair work should be completed by a qualified technician.
Please note that Kawasaki cannot assume any responsibility for damage resulting from incorrect or improper adjustment done by the owner.
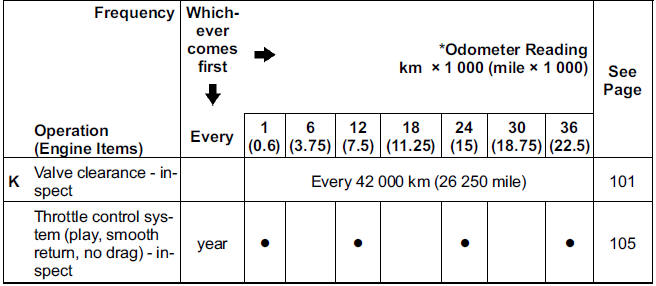
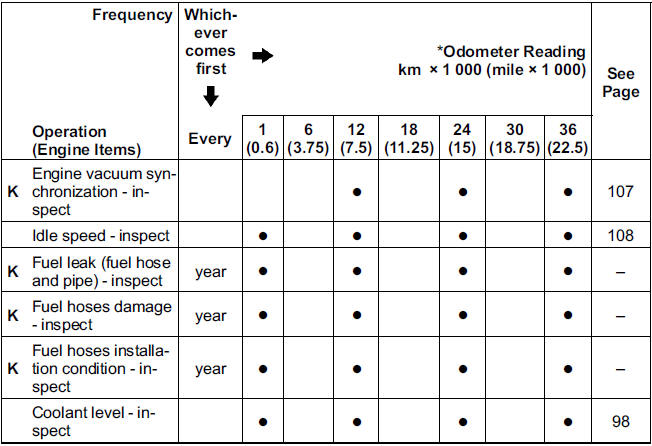
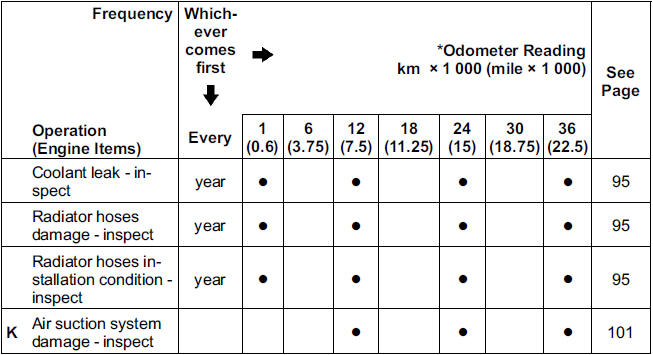
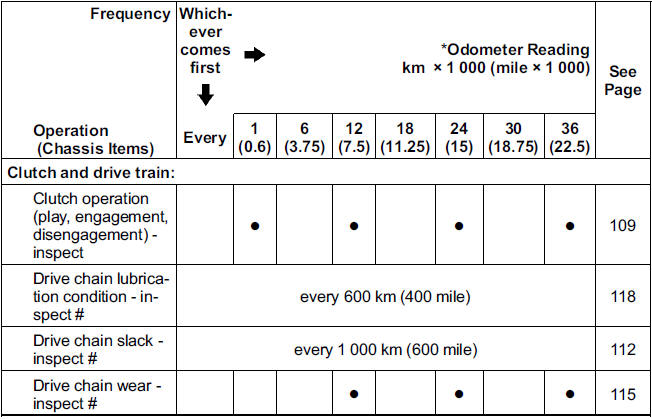
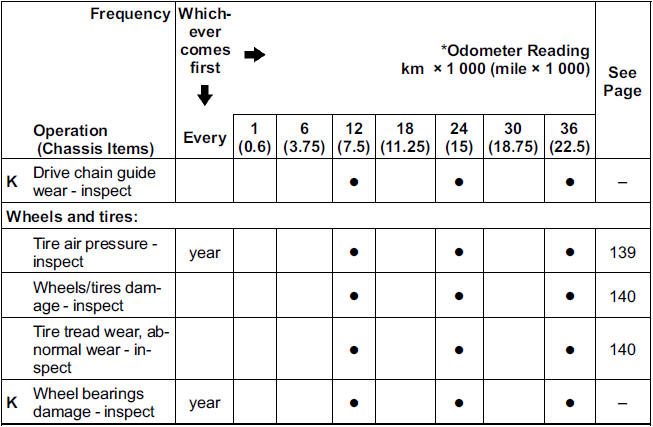
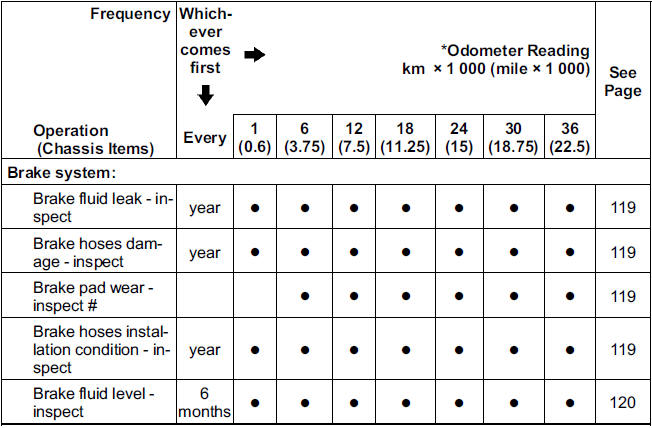
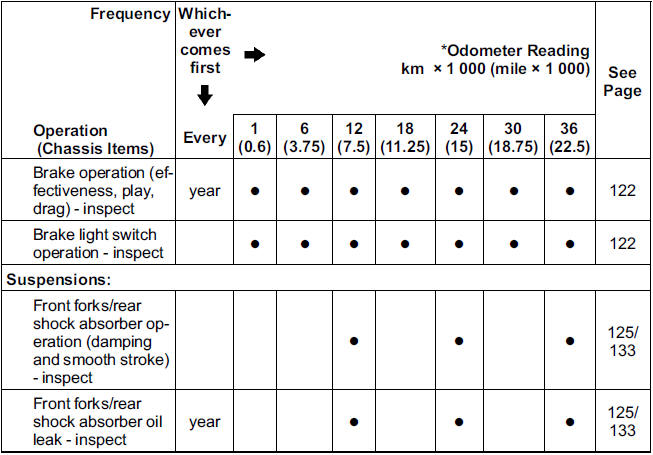
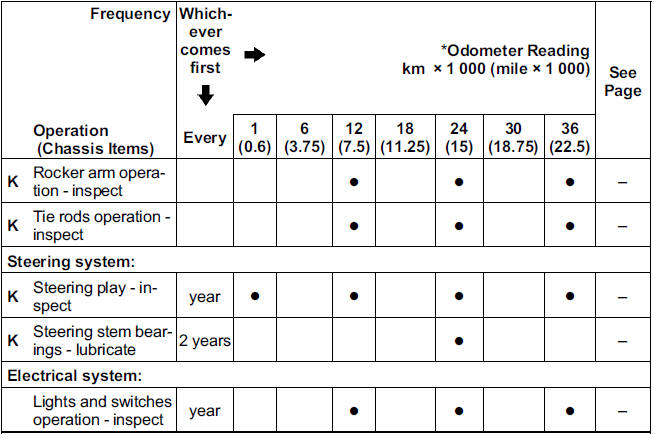
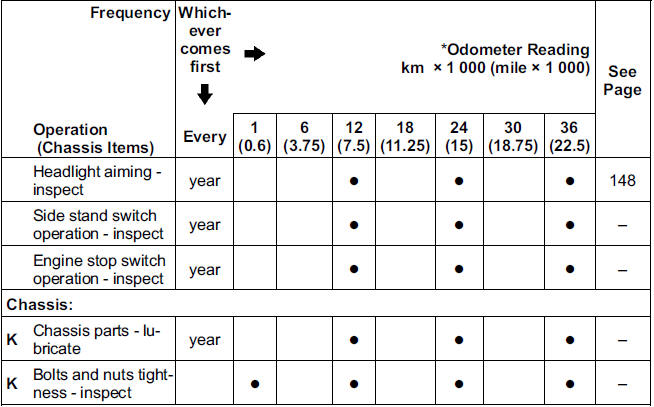
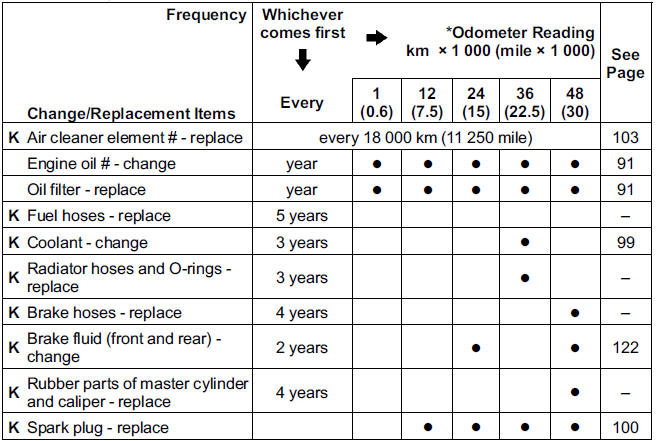
Periodic Maintenance Chart
K: Should be serviced by an authorized Kawasaki dealer.
*: For higher odometer readings, repeat at the frequency interval established
here.
#: Service more frequently when operating in severe conditions: dusty, wet,
muddy, high speed, or frequent starting/stopping.
1. Periodic Inspection (Engine Related Items)
2. Periodic Inspection (Chassis Related Items)
3. Periodic Replacement
Engine Oil
In order for the engine, transmission, and clutch to function properly, maintain the engine oil at the proper level, and change the oil and replace the oil filter in accordance with the Periodic Maintenance Chart. Not only do dirt and metal particles collect in the oil, but the oil itself loses its lubricative quality if used too long.
WARNING Motorcycle operation with insufficient, deteriorated, or contaminated engine oil will cause accelerated wear and may result in engine or transmission seizure, accident, and injury. Check the oil level before each ride and change the oil according to the periodic maintenance chart in the Owner's Manual.
Oil Level Inspection
- If the oil has just been changed, start the engine and run it for several minutes at idle speed. This fills the oil filter with oil. Stop the engine, then wait several minutes until the oil settles.
NOTICE Racing the engine before the oil reaches every part can cause engine seizure.
- If the motorcycle has just been used, wait several minutes for all the oil to drain down.
- Check the engine oil level through the oil level inspection window. With the motorcycle held level, the oil level should come up between the upper and lower level lines next to the oil level inspection window.
- Oil Level Inspection Window
- Oil Filler Cap
- Lower Level Line
- Upper Level Line
- If the oil level is too high, remove the excess oil through the oil filler opening using a syringe or some other suitable device.
- If the oil level is too low, add the oil to reach the correct level. Use the same type and brand of oil that is already in the engine.
NOTICE If the engine oil gets extremely low or if the oil pump does not function properly or oil passages are clogged, the warning indicator light in the meter instrument and oil pressure warning symbol in the digital meter will blink. If they blink on when the engine speed is above idle, stop the engine immediately and have it serviced. Failure to do so could cause serious engine damage.
- Oil Pressure Warning Symbol
- Warning Indicator Light
Oil and/or Oil Filter Change
- Warm up the engine thoroughly, and then stop it.
- Place an oil pan beneath the engine.
- Remove the engine oil drain bolt.
- Engine Oil Drain Bolt
- Let the oil completely drain with the motorcycle perpendicular to the ground.
WARNING Engine oil is a toxic substance.
Dispose of used oil properly.
Contact your local authorities for approved disposal methods or possible recycling.
- If the oil filter is to be replaced, remove the oil filter cartridge and replace it with a new one.
NOTE
- If a torque wrench or required Kawasaki special tool is not available, this item should be serviced by a Kawasaki dealer.
- Oil Filter
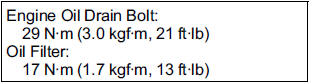
- Apply a thin film of oil to the packing and tighten the cartridge to the specified torque.
- Packing
- Install the drain bolt with a new gasket.
Tighten it to the specified torque.
NOTE
- Replace any gaskets with new ones.
Tightening Torque
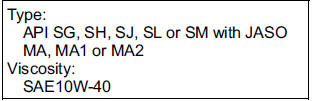
Recommended Engine Oil
NOTE
- Do not add any chemical additive to the oil. Oils fulfilling the above requirements are fully formulated and provide adequate lubrication for both the engine and the clutch.
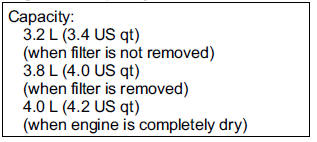
Engine Oil Capacity
Although 10W-40 engine oil is the recommended oil for most conditions, the oil viscosity may need to be changed to accommodate atmospheric conditions in your riding area.
See also:
 Kawasaki Z1000SX - Owner's Manual > Cooling System
Radiator and Cooling Fan Check the radiator fins for obstruction by insects or mud. Clean off any obstructions with a stream of low-pressure water. WARNING The cooling fan spins at high speed and can cause serious injuries.
 Rider's Manual BMW R 1250 GS GSA
 Owner's Manual Harley-Davidson Sportster XL1200X Forty-Eight
 Owner's Manual Honda CBR650R
 Service manual Honda CBR650
 Owner's Manual Honda PCX125
 Owner's Manual Kawasaki Z1000SX
 Service manual Kawasaki Z1000SX
 Owner's Manual Lexmoto Echo
 Owner's Manual Royal Enfield Interceptor 650
 Service manual Royal Enfield Interceptor 650
 Owner's Manual Yamaha MT-07