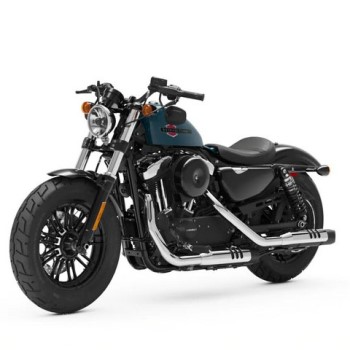
 Harley-Davidson Sportster XL1200X Forty-Eight - Owner's Manual > Primary Controls
Clutch Hand Lever
 Do not position fingers
between hand control lever and handlebar grip. Improper hand positioning can
impair control lever operation and cause loss of vehicle control, which could
result in death or serious injury.
Do not position fingers
between hand control lever and handlebar grip. Improper hand positioning can
impair control lever operation and cause loss of vehicle control, which could
result in death or serious injury.
The clutch hand lever is located on the left handlebar and is operated with the fingers of the left hand.
A clutch switch is incorporated into the left handlebar switch assembly. It enables the rider to start the vehicle in any gear (or in neutral) as long as the clutch lever is pulled in. If the clutch is not disengaged and the vehicle is in gear, the vehicle will not start.
Gear Shift Lever
The gear shift lever is located in front of the left rider footrest. The gear shift is operated with the left foot.
Neutral is found between first and second gear in a five speed shift pattern. See Shifting Gears.
Front Brake Lever
The front brake lever operates the front brake. Operate the hand lever with the fingers of the right hand. See Brake System.
Throttle Control Grip
The throttle control grip is located on the right handlebar control and is operated with the right hand.
To reduce rider fatigue on long trips, a spring-loaded throttle friction adjustment screw (10) is located at the bottom of the throttle grip clamp on non-cruise equipped models.
1. Slowly turn throttle control grip clockwise (toward the front) to close the throttle (decelerate).
2. Slowly turn throttle control grip counter-clockwise (toward rear of motorcycle) to open the throttle (accelerate).
Do not tighten throttle
friction adjustment screw to the point where the engine will not return to idle
automatically. Over-tightening can lead to loss of vehicle control, which could
result in death or serious injury.
3. Loosen the throttle friction adjustment screw so the throttle returns to the idle position when the hand is removed from the grip.
NOTE: The throttle adjustment screw should not be used under normal stop and go operating conditions.
4. Screw the throttle adjustment screw in to increase friction on the grip. This friction provides a damping effect on throttle motion.
Rear Brake Pedal
The rear brake pedal operates the brake on the rear wheel. Operate the rear brake pedal with the right foot. See Brake System.
Left Hand Control Switches
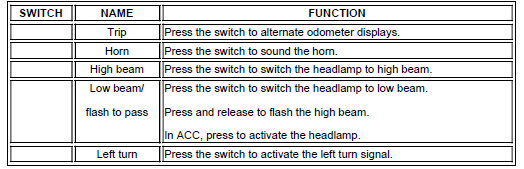
Trip
The TRIP switch activates the trip odometers and is used to activate the odometer display to scroll through the optional screens. With the ignition off, the TRIP switch can activate time or odometer displays. Refer to Left Hand Control Switches.
Horn
See Left Hand Switch Module. The horn is operated by pressing on the HORN switch. The horn can be activated for up to 10 seconds at a time. If the HORN switch is held for a longer period, the horn will automatically deactivate. Refer to Left Hand Control Switches.
High Beam
See Left Hand Switch Module. Press the high beam switch to activate the high beam. The (blue) high beam indicator lamp is lit when the high beam is on. Refer to Left Hand Control Switches.
Low Beam/Flash to Pass
Low beam: See Left Hand Switch Module. Press the bottom of the switch to activate the low beam.
Flash to pass: When the low beam switch is on, press and release the flash to pass switch to flash the high beam before passing another vehicle. The high beam indicator lamp in the speedometer face is illuminated as long as the flash to pass switch is pressed.
When in accessory, press the flash to pass switch to activate the headlamp. Refer to Left Hand Control Switches.
Left Turn Signal
Activate: See Left Hand Switch Module. Press the left turn signal switch to activate the left turn signal. Refer to Left Hand Control Switches.
Cancel: Press the left turn signal switch to cancel the left turn signal. For detailed operation, see Turn Signal Switch Operation.
NOTE: Front turn signal lamps also function as running lamps. This feature may not be available in all markets.
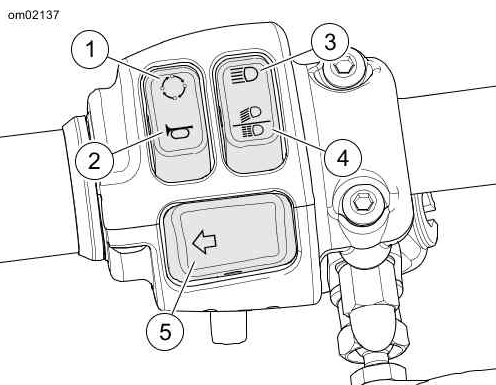 Left Hand Switch Module
- Trip
- Horn
- High beam
- Low beam/flash to pass
- Left turn signal
Left Hand Control Switches
See also:
 Harley-Davidson Sportster XL1200X Forty-Eight - Owner's Manual > General: Controls and Indicators
Read the CONTROLS AND INDICATORS section before riding your motorcycle. Failure to understand the operation of the motorcycle could result in death or serious injury.
Harley-Davidson Sportster XL1200X Forty-Eight - Owner's Manual > Right Hand Control Switches
Hazard Warning 4-Way Flasher See Right Hand Control Module. This switch is used to allow a stranded motorcycle to be left in the 4-way flashing mode. With the flashers, the motorcycle can be left with the ignition locked until help is found. Refer to Right Hand Control Switches.
 Rider's Manual BMW R 1250 GS GSA
 Owner's Manual Harley-Davidson Sportster XL1200X Forty-Eight
 Owner's Manual Honda CBR650R
 Service manual Honda CBR650
 Owner's Manual Honda PCX125
 Owner's Manual Kawasaki Z1000SX
 Service manual Kawasaki Z1000SX
 Owner's Manual Lexmoto Echo
 Owner's Manual Royal Enfield Interceptor 650
 Service manual Royal Enfield Interceptor 650
 Owner's Manual Yamaha MT-07