 Honda CBR650 - Service manual > Service information
GENERAL
- This section covers service of the alternator stator and flywheel. All service can be done with the engine installed in the frame.
- For alternator charging coil inspection.
- For CKP sensor inspection.
Component location
Left crankcase cover
REMOVAL/INSTALLATION
Support the motorcycle in an upright position on a level surface.
Lift the fuel tank and support it.
Remove the under cowl (CBR650F/FA only).
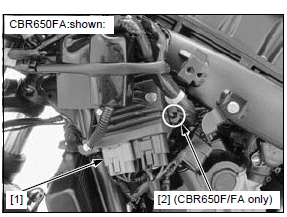
Disconnect the alternator 3P (Gray) connector [1].
Release the alternator wire clip [2] (CBR650F/FA only).
Release the alternator wire clip [1].
Remove the alternator wire out of the frame.

NOTE:
- Place a clean oil pan under the engine because engine oil will flow out when removing the left crankcase cover. Add the recommended engine oil to the specified level after installation.
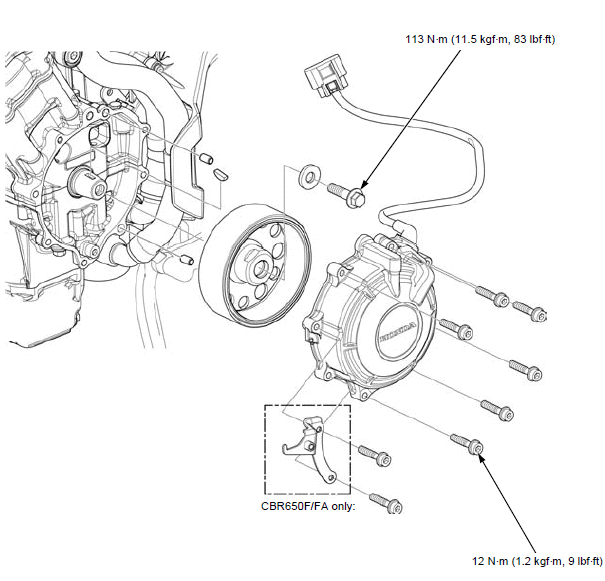
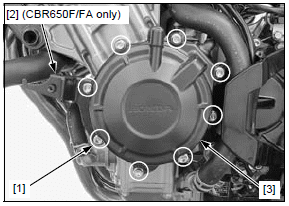
Remove the following:
- Left crankcase cover bolts [1]
- Under cowl stay (CBR650F/FA only) [2]
- Left crankcase cover [3]
NOTE:
- The left crankcase cover (stator) is magnetically attracted to the flywheel, be careful during removal and installation.
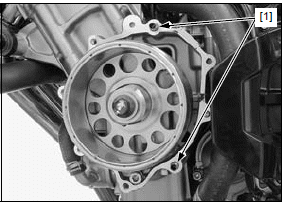
Remove the dowel pins [1].
Be careful not to damage the mating surfaces.
Clean any sealant off from the alternator cover mating surfaces.
Installation is in the reverse order of removal.
TORQUE:
Left crankcase cover bolt:
12 N*m (1.2 kgf*m, 9 lbf*ft)
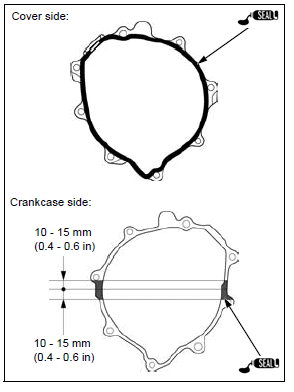
NOTE:
- Apply sealant (TB1207B manufactured by ThreeBond or an equivalent) to the mating areas of crankcase cover and crankcase as shown.
Check the oil level.
Make sure there are no oil leaks.
See also:
 Honda CBR650 - Service manual > Stator
REMOVAL/INSTALLATION Remove the left crankcase cover. Remove and install the stator as following illustration. Installation is in the reverse order of removal.
 Rider's Manual BMW R 1250 GS GSA
 Owner's Manual Harley-Davidson Sportster XL1200X Forty-Eight
 Owner's Manual Honda CBR650R
 Service manual Honda CBR650
 Owner's Manual Honda PCX125
 Owner's Manual Kawasaki Z1000SX
 Service manual Kawasaki Z1000SX
 Owner's Manual Lexmoto Echo
 Owner's Manual Royal Enfield Interceptor 650
 Service manual Royal Enfield Interceptor 650
 Owner's Manual Yamaha MT-07