 Kawasaki Z1000SX - Service manual > Tires
Air Pressure Inspection/Adjustment
- Refer to the Air Pressure Inspection in the Periodic Maintenance chapter.
Tire Inspection
- Refer to the Wheel/Tire Damage Inspection in the Periodic Maintenance chapter.
Tire Removal
- Remove:
Wheels (see Front/Rear Wheel Removal)
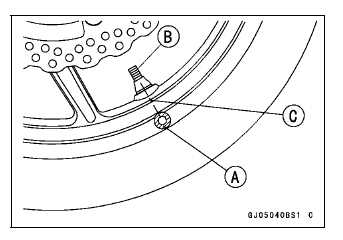
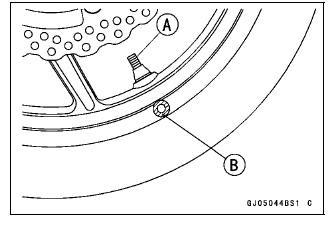
Valve Core (Let out the air) - To maintain wheel balance, mark the valve stem position on the tire with
chalk so that the tire can be reinstalled in the same position.
Chalk Mark or Yellow Mark [A]
Air Valve [B]
Align [C]
- Lubricate the tire beads and rim flanges on both sides with a soap and water solution or rubber lubricant. This helps the tire beads slip off the rim flanges.
NOTICE Never lubricate with engine oil or petroleum distillates because they will deteriorate the tire.
- Remove the tire from the rim using a suitable commercially available tire changer.
NOTE
- The tires cannot be removed with hand tools because they fit the rims too tightly.
Tire Installation
WARNING Some replacement tires may adversely affect handling and cause an accident resulting in serious injury or death. To ensure proper handling and stability, use only the recommended standard tires for replacement, inflated to the standard pressure.
- Inspect the rim and tire, and replace them if necessary.
- Clean the sealing surfaces of the rim and tire, and smooth the sealing surfaces of the rim with a fine emery cloth if necessary.
- Remove the air valve and discard it.
NOTICE Replace the air valve whenever the tire is replaced.
Do not reuse the air valve.
- Install a new valve in the rim.
- Remove the valve cap, lubricate the stem seal [A] with a soap and water solution or rubber lubricant, and pull [B] the valve stem through the rim from the inside out until it snaps into place.
NOTICE Do not use engine oil or petroleum distillates to lubricate the stem because they will deteriorate the rubber.
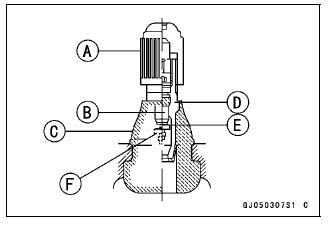
- The air valve is shown in the figure.
Valve Cap [A]
Valve Core [B]
Stem Seal [C]
Valve Stem [D]
Valve Seat [E]
Valve Opened [F]
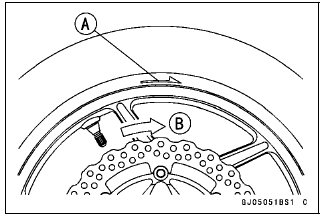
- Check the tire rotation mark on the front and rear tires and install
them on the rim accordingly.
Tire Rotation Mark [A]
Rotating Direction [B]
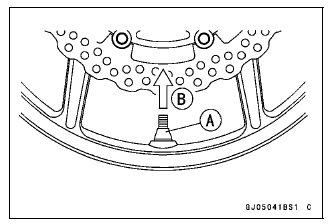
- Position the tire on the rim so that the valve [A] align with the tire balance mark [B] (the chalk mark made during removal, or the yellow paint mark on a new tire).
- Install the tire bead over the rim flange using a suitable commercially available tire changer.
- Lubricate the tire beads and rim flanges with a soap and water solution or rubber lubricant to help seat the tire beads in the sealing surfaces of the rim while inflating the tire.
- Center the rim in the tire beads, and inflate the tire with compressed air until the tire beads seat in the sealing surfaces.
WARNING Overinflating a tire can cause it to explode, causing serious injury or death. Be sure to install the valve core whenever inflating the tire, and do not inflate the tire to more than 400 kPa (4.0 kgf/cm², 57 psi).
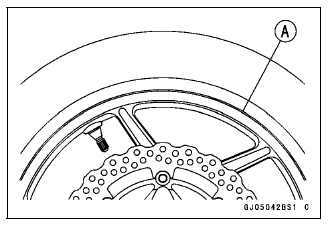
- Check to see that the rim lines [A] on both sides of the tire sidewalls
are parallel with the rim flanges.
If the rim flanges and tire sidewall rim lines are not parallel, remove the valve core.
- Lubricate the rim flanges and tire beads.
- Install the valve core and inflate the tire again.
- After the tire beads seat in the rim flanges, check for air leakage.
- Inflate the tire slightly above standard inflation.
- Use a soap and water solution or submerge the tire, and check for bubbles that would indicate leakage.
- Adjust the air pressure to the specified pressure (see Air Pressure Inspection in the Periodic Maintenance chapter).
- Install the air valve cap.
- Adjust the wheel balance (see Balance Adjustment).
Tire Repair
Currently two types of repair for tubeless tires have come into wide use. One type is called a temporary (external) repair which can be carried out without removing the tire from the rim, and the other type is called permanent (internal) repair which requires tire removal. It is generally understood that higher running durability is obtained by permanent (internal) repairs than by temporary (external) ones.
Also, permanent (internal) repairs have the advantage of permitting a thorough examination for secondary damage not visible from external inspection of the tire. For these reasons, Kawasaki does not recommend temporary (external) repair. Only appropriate permanent (internal) repairs are recommended. Repair methods may vary slightly from make to make. Follow the repair methods indicated by the manufacturer of the repair tools and materials so that safe results can be obtained.
See also:
 Kawasaki Z1000SX - Service manual > Balance Adjustment
If the wheel always stops in one position, provisionally attach a balance weight [A] on the rim at the marking using adhesive tape. Rotate the wheel 1/4 turn [B], and see whether or not the wheel stops in this position. If it does, the correct balance weight is being used.
Kawasaki Z1000SX - Service manual > Hub Bearing
Hub Bearing Removal Remove the wheels (see Front/Rear Wheel Removal), and take out the following. Collars [A] Coupling [B] (Out of rear hub) Grease Seals [C] Circlip [D]
 Rider's Manual BMW R 1250 GS GSA
 Owner's Manual Harley-Davidson Sportster XL1200X Forty-Eight
 Owner's Manual Honda CBR650R
 Service manual Honda CBR650
 Owner's Manual Honda PCX125
 Owner's Manual Kawasaki Z1000SX
 Service manual Kawasaki Z1000SX
 Owner's Manual Lexmoto Echo
 Owner's Manual Royal Enfield Interceptor 650
 Service manual Royal Enfield Interceptor 650
 Owner's Manual Yamaha MT-07