 Kawasaki Z1000SX - Service manual > Transmission Shaft Removal
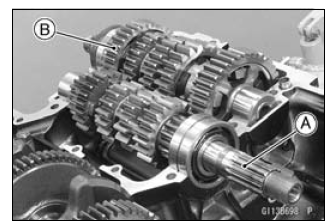
Crankshaft/Transmission / Transmission / Transmission Shaft Removal
- Split the crankcase (see Crankcase Splitting).
- Remove the drive shaft [A] and output shaft [B].
Transmission Shaft Installation
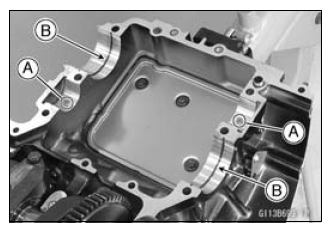
- Check to see that the set pins [A] and set rings [B] are in place.
- Install the drive shaft and output shaft into the upper crankcase half.
- Apply engine oil to the bearings.
- The bearing set pins and rings must match properly with the holes or grooves in the bearing outer races. When they are properly matched, there is no clearance [A] between the crankcase and the bearing outer races.
- Assemble the crankcase (see Crankcase Assembly).
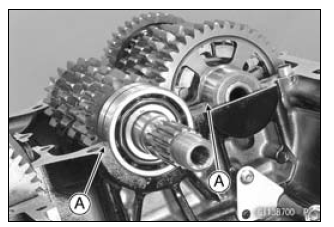
- Apply high-temperature grease to the oil seal lips.
- Apply water-soluble lubricant to the out side surface of the oil seal
[A].
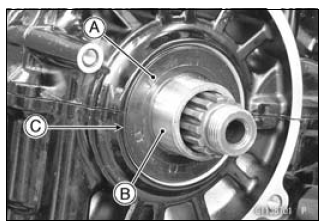
Sealant - ThreeBond: TB2720C
- Press in the oil seal onto collar [B] so that the surface of the oil seal is flush with the surface [C] of the crankcase.
See also:
 Kawasaki Z1000SX - Service manual > Transmission Shaft Disassembly
Remove the transmission shafts (see Transmission Shaft Removal). Remove the circlips, and disassemble the transmission shafts. Special Tool - Outside Circlip Pliers: 57001-144 The 5th gear [A] on the output shaft has three steel balls assembled into it for the positive neutral finder mechanism.
 Rider's Manual BMW R 1250 GS GSA
 Owner's Manual Harley-Davidson Sportster XL1200X Forty-Eight
 Owner's Manual Honda CBR650R
 Service manual Honda CBR650
 Owner's Manual Honda PCX125
 Owner's Manual Kawasaki Z1000SX
 Service manual Kawasaki Z1000SX
 Owner's Manual Lexmoto Echo
 Owner's Manual Royal Enfield Interceptor 650
 Service manual Royal Enfield Interceptor 650
 Owner's Manual Yamaha MT-07