 Honda CBR650R - Owner's Manual > Tyre Puncture
Repairing a puncture or removing a wheel requires special tools and technical expertise.
We recommend you have this type of service performed by your dealer.
After an emergency repair, always have the tyre inspected/replaced by your dealer.
Emergency Repair Using a Tyre Repair Kit
If your tyre has a minor puncture, you can make an emergency repair using a tubeless tyre repair kit.
Follow the instructions provided with the emergency tyre repair kit.
Riding your motorcycle with a temporary tyre repair is very risky. Do not exceed 50 km/h (30 mph). Have the tyre replaced by your dealer as soon as possible.
WARNING
Riding your motorcycle with a temporary tyre repair can be risky. If the temporary repair fails, you can crash and be seriously injured or killed.
If you must ride with a temporary tyre repair, ride slowly and carefully and do not exceed 50 km/h (30 mph) until the tyre is replaced.
Removing Wheels
Follow these procedures if you need to remove a wheel in order to repair a puncture.
CBR650FA only
When removing and installing the wheel, be careful not to damage the wheel speed sensor and pulser ring.
Front Wheel
Removal
1. Park on a firm, level surface.
2. Cover both sides of the front wheel and brake calipers with protective tape or cloth.
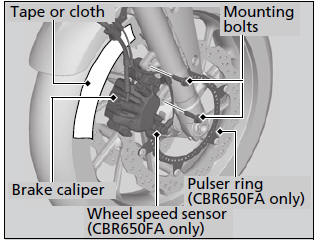
3. On the left side, remove the mounting bolts and remove the brake caliper 4. On the right side, remove the mounting bolts and brake caliper.
- Support the brake caliper assembly so that it doesn't hang from the brake hose. Do not twist the brake hose.
- Avoid getting grease, oil, or dirt on the disc or pad surfaces.
- Do not pull the brake lever while the brake caliper is removed.
- Take care to prevent the brake caliper from scratching the wheel during removal.
5. Loosen the right axle pinch bolt.
6. Remove the front axle bolt.
7. Support your motorcycle securely and raise the front wheel off the ground using a maintenance stand or a hoist.
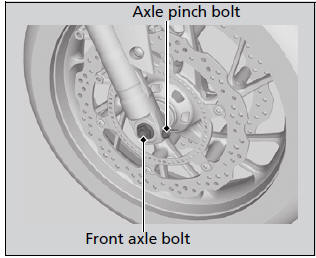
8. Loosen the left axle pinch bolt.
9. On the left side, withdraw the front axle shaft, and remove the side collars and wheel.

Installation
1. Attach the side collars to the wheel.
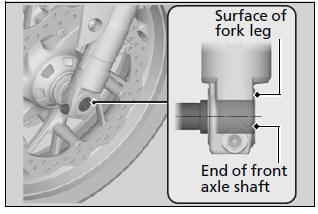
2. On the left side, place the wheel between the fork legs and insert the lightly greased front axle shaft to the end, through the left fork leg and wheel hub.
3. Align the end of the front axle shaft with the surface of the fork leg.
4. Tighten the left axle pinch bolt to hold the axle.
5. Tighten the axle bolt.
Torque: 59 N*m (6.0 kgf*m, 44 lbf*ft).
6. Loosen the left axle pinch bolt.
7. Tighten the right axle pinch bolt.
Torque: 22 N*m (2.2 kgf*m, 16 lbf*ft).
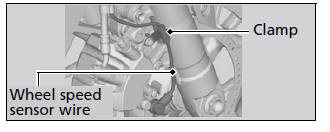
8. CBR650FA only
Secure the wheel speed sensor wire with the clamp.
9. Install the right brake caliper and tighten new mounting bolts.
Torque: 30 N*m (3.1 kgf*m, 22 lbf*ft).
10. Install the left brake caliper and tighten new mounting bolts.
Torque: 30 N*m (3.1 kgf*m, 22 lbf*ft).
- Take care to prevent the brake caliper from scratching the wheel during installation.
- Use new mounting bolts when installing the brake calipers.
NOTICE When installing the brake calipers into position on the fork legs, carefully fit the brake disc between the pads to avoid scratching them.
11. Lower the front wheel on the ground.
12. Apply the brake lever several times.
Then, pump the fork several times.
13. Retighten the left axle pinch bolt.
Torque: 22 N*m (2.2 kgf*m, 16 lbf*ft).
14. Raise the front wheel off the ground again, and check that the wheel rotates freely after you release the brake.
15. Remove the protective tape or cloth.
If a torque wrench was not used for installation, see your dealer as soon as possible to verify proper assembly.
Improper assembly may lead to loss of braking capacity.
Rear Wheel
Removal
1. Support your motorcycle securely and raise the rear wheel off the ground using a maintenance stand or a hoist.
2. Loosen the rear axle nut, lock nuts and turn the adjusting bolts so the rear wheel can be moved all the way forward for maximum drive chain slack.
3. Remove the drive chain from the rear wheel sprocket by pushing the rear wheel forward.
4. Remove the rear axle nut and washer.
5. Remove the rear axle shaft and adjusting plates.

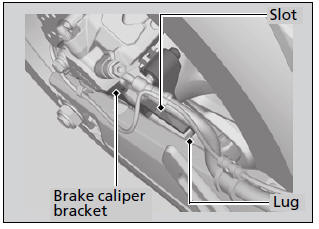
6. Remove the brake caliper bracket, rear wheel and side collars.
- Support the brake caliper assembly so that it doesn't hang from the brake hose. Do not twist the brake hose.
- Avoid getting grease, oil, or dirt on the disc or pad surfaces.
- Do not push the brake pedal while the brake caliper is removed.
Installation
1. To install the rear wheel, reverse the removal procedure.
- Take care to prevent the brake caliper from scratching the wheel during installation.
NOTICE When installing the brake caliper into position, carefully fit the brake disc between the pads to avoid scratching them.
2. Make sure that the slot on the brake caliper bracket is positioned in the lug on the swingarm.
3. Adjust the drive chain.
4. Tighten the rear axle nut.
Torque: 98 N*m (10.0 kgf*m, 72 lbf*ft).
5. Hold the adjusting bolts and tighten the lock nuts.
Torque: 27 N*m (2.8 kgf*m, 20 lbf*ft).
6. After installing the wheel, apply the brake pedal several times, then check if the wheel rotates freely. Recheck the wheel if the brake drags or if the wheel does not rotate freely.
If a torque wrench was not used for installation, see your dealer as soon as possible to verify proper assembly.
Improper assembly may lead to loss of braking capacity.
See also:
 Honda CBR650R - Owner's Manual > Warning Indicators On or Flashing
Low Oil Pressure Indicator If the low oil pressure indicator comes on, pull safely to the side of the road and stop the engine. NOTICE Continuing to ride with low oil pressure can cause serious damage to the engine.
Honda CBR650R - Owner's Manual > Electrical Trouble
Battery Goes Dead Charge the battery using a motorcycle battery charger. Remove the battery from the motorcycle before charging. Do not use an automobile-type battery charger, as these can overheat a motorcycle battery and cause permanent damage.
 Rider's Manual BMW R 1250 GS GSA
 Owner's Manual Harley-Davidson Sportster XL1200X Forty-Eight
 Owner's Manual Honda CBR650R
 Service manual Honda CBR650
 Owner's Manual Honda PCX125
 Owner's Manual Kawasaki Z1000SX
 Service manual Kawasaki Z1000SX
 Owner's Manual Lexmoto Echo
 Owner's Manual Royal Enfield Interceptor 650
 Service manual Royal Enfield Interceptor 650
 Owner's Manual Yamaha MT-07