 Kawasaki Z1000SX - Service manual > Balancer
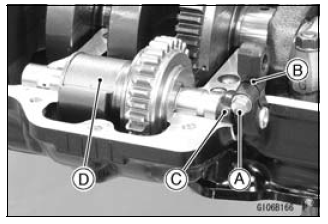
Balancer Removal
- Split the crankcase (see Crankcase Splitting).
- Unscrew:
Balancer Shaft Clamp Bolt [A]
Balancer Shaft Lever [B]
Oil Seal [C] - Remove the balancer [D] from the upper crankcase half.
Balancer Installation
- Check that the rubber dampers [A] are in place as shown in the figure.
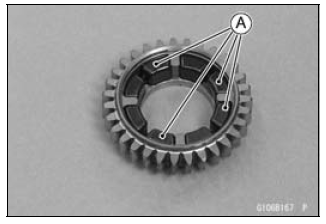
- Apply molybdenum disulfide oil solution to the damper contact portions of the balancer weight.
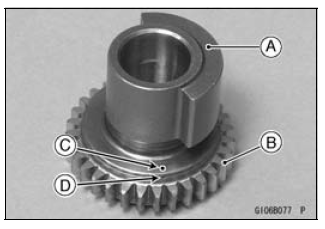
- Install the balancer weight [A] into the gear [B].
- Align the punch mark [C] of the balancer weight with the groove [D] of the gear.
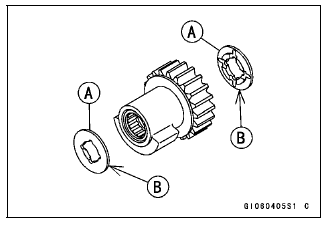
- Apply molybdenum disulfide oil solution to the needle bearings. Insert the needle bearings.
- Fit the copper washers [A] on both ends of the weight and gear assembly. The projected sides [B] face inward.
- Insert the pin [A] as shown in the figure.
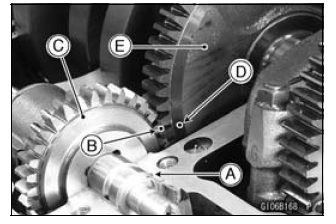
- Set the balancer on the upper crankcase half.
- Align the punch mark [B] on the balancer gear [C] with the mark [D] on the balancer drive gear [E] of crankshaft.
- Assemble the crankcase (see Crankcase Assembly).
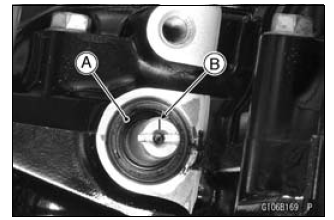
- Fill the oil seal lips with grease.
- Install the new oil seal [A] so that its surface is flush with the surface of the crankcase.
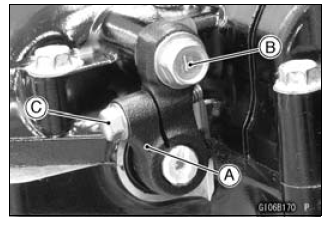
- Turn the balancer shaft so that its mark [B] faces downward (This photo is shown with the upside down).
- Install the balancer shaft lever [A].
- Apply a non-parmanent locking agent to the threads of the balancer shaft clamp lever bolt [B].
- Tighten:
Torque -
Balancer Shaft Clamp Lever Bolt: 25 N*m (2.5 kgf*m, 18 ft*lb)
Balancer Shaft Clamp Bolt [C]: 9.8 N*m (1.0 kgf*m, 87 in*lb)
Balancer Adjustment
- Remove the lower fairing (see Lower Fairing Removal in the Frame chapter).
- Start the engine and warm it up thoroughly.
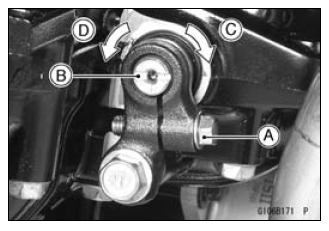
- Adjust the balancer gear backlash with the engine idling.
The amount of backlash can be changed by turning the balancer shaft which has eccentric journals.
- Start the engine and let it idle.
- Loosen the clamp bolt [A] and turn the balancer shaft [B] clockwise [C] until the balancer gear makes a whining sound.
- Turn the shaft counterclockwise [D] until the balancer gear whining sound disappears and tighten the clamp bolt.
Torque - Balancer Shaft Clamp Bolts: 9.8 N*m (1.0 kgf*m, 87 in*lb)
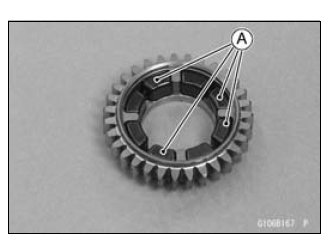
Balancer Damper Inspection
- Remove the balancer and disassemble the weight and gear assembly.
- Visually inspect the rubber dampers [A].
If they appear damaged or deteriorated, replace them.
See also:
 Kawasaki Z1000SX - Service manual > Crankshaft Runout Inspection
Measure the crankshaft runout. If the measurement exceeds the service limit, replace the crankshaft. Crankshaft Runout Standard: TIR 0.02 mm (0.0008 in.) or less Service Limit: TIR 0.05 mm (0.0020 in.)
Kawasaki Z1000SX - Service manual > Starter Motor Clutch
Starter Motor Clutch Removal/Installation Refer to the Alternator Rotor Removal/Installation in the Electrical System chapter. Starter Motor Clutch Inspection Remove: Alternator Cover (see Alternator Cover Removal in the Electrical System chapter) Starter Idle Gear and Shaft Turn the starter motor clutch gear [A] by hand. The starter motor clutch gear should turn clockwise [B] freely, but should not turn counterclockwise [C].
 Rider's Manual BMW R 1250 GS GSA
 Owner's Manual Harley-Davidson Sportster XL1200X Forty-Eight
 Owner's Manual Honda CBR650R
 Service manual Honda CBR650
 Owner's Manual Honda PCX125
 Owner's Manual Kawasaki Z1000SX
 Service manual Kawasaki Z1000SX
 Owner's Manual Lexmoto Echo
 Owner's Manual Royal Enfield Interceptor 650
 Service manual Royal Enfield Interceptor 650
 Owner's Manual Yamaha MT-07