 Kawasaki Z1000SX - Service manual > Starter Motor Clutch
Crankshaft/Transmission / Starter Motor Clutch
Starter Motor Clutch Removal/Installation
- Refer to the Alternator Rotor Removal/Installation in the Electrical System chapter.
Starter Motor Clutch Inspection
- Remove:
Alternator Cover (see Alternator Cover Removal in the Electrical System chapter)
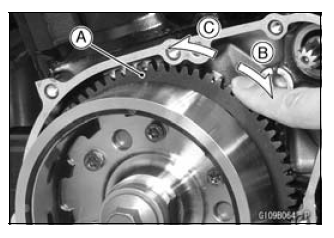
Starter Idle Gear and Shaft - Turn the starter motor clutch gear [A] by hand. The starter motor clutch
gear should turn clockwise [B] freely, but should not turn counterclockwise
[C].
If the starter motor clutch does not operate as it should or if it makes noise, go to the next step.
- Disassemble the starter motor clutch, and visually inspect the clutch
parts.
If there is any worn or damaged part, replace it.
NOTE
- Examine the starter motor clutch gear as well. Replace it if it worn or damaged.
Starter Motor Clutch Disassembly
- Remove:
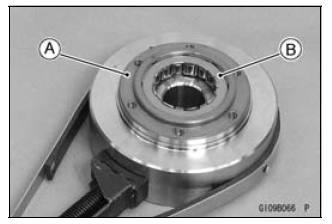
Alternator Rotor (see Alternator Rotor Removal in the Electrical System chapter) - Hold the alternator rotor with the flywheel holder [A].
Special Tool - Flywheel Holder: 57001-1313
- Remove the starter motor clutch bolts [B].

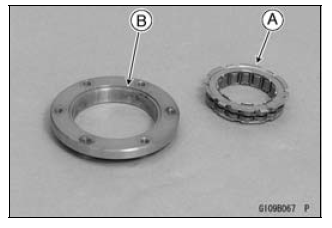
- Remove:
Starter Motor Clutch Housing [A]
Starter Motor Clutch [B]
Starter Motor Clutch Assembly
- Install the starter motor clutch to the housing so that the flange [A] fit to the housing groove [B].
- Apply a non-permanent locking agent to the threads of the starter motor
clutch bolts and tighten them.
Torque - Starter Motor Clutch Bolts: 12 N*m (1.2 kgf*m, 106 in*lb)
See also:
 Kawasaki Z1000SX - Service manual > Balancer
Balancer Removal Split the crankcase (see Crankcase Splitting). Unscrew: Balancer Shaft Clamp Bolt [A] Balancer Shaft Lever [B] Oil Seal [C] Remove the balancer [D] from the upper crankcase half.
 Rider's Manual BMW R 1250 GS GSA
 Owner's Manual Harley-Davidson Sportster XL1200X Forty-Eight
 Owner's Manual Honda CBR650R
 Service manual Honda CBR650
 Owner's Manual Honda PCX125
 Owner's Manual Kawasaki Z1000SX
 Service manual Kawasaki Z1000SX
 Owner's Manual Lexmoto Echo
 Owner's Manual Royal Enfield Interceptor 650
 Service manual Royal Enfield Interceptor 650
 Owner's Manual Yamaha MT-07