 Kawasaki Z1000SX - Service manual > Brake Lever, Brake Pedal
Brakes / Brake Lever, Brake Pedal
Brake Lever Position Adjustment
The brake lever adjuster has 6 positions so that the brake lever position can be adjusted to suit the operator's hand.
- Push the lever forward and turn the adjuster [A] to align the number
with the arrow mark [B] on the lever holder.
- The distance from the grip to the lever is minimum at number 6 and maximum at number 1.

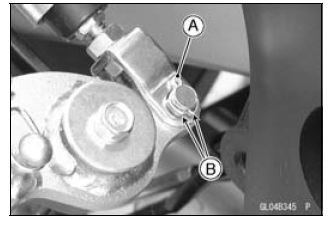
Brake Pedal Position Inspection
- Check that the brake pedal [A] is in the correct position.
[B] Footpeg
Pedal Position
Standard: About 62 mm (2.4 in.) [C] below top of footpeg
If it is incorrect, adjust the brake pedal position.

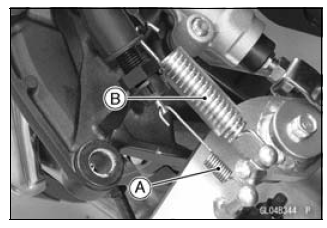
Brake Pedal Position Adjustment
NOTE
- Usually it is not necessary to adjust the pedal position, but always adjust it when the push rod locknut has been loosened.
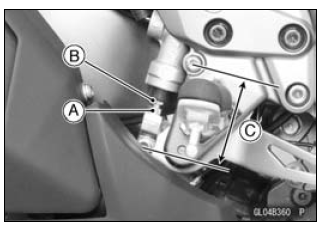
- Loosen the locknut [A] and turn the push rod with the hex head [B] to
achieve the correct pedal position.
If the length [C] shown is 70 +-1 mm (2.76 +-0.04 in.), the pedal position will be within the standard range.
- Tighten:
Torque - Rear Master Cylinder Push Rod Locknut: 17 N*m (1.7 kgf*m, 12 ft*lb) - Check the brake light switch operation (see Brake Light Switch Operation Inspection in the Periodic Maintenance chapter).
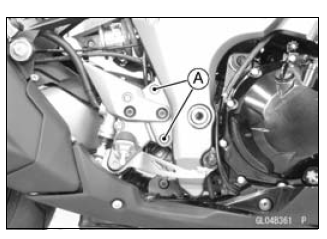
Brake Pedal Removal
- Remove:
Rear Lower Fairing (see Rear Lower Fairing Removal in the Frame chapter)
Right Front Footpeg Bracket Bolts [A]
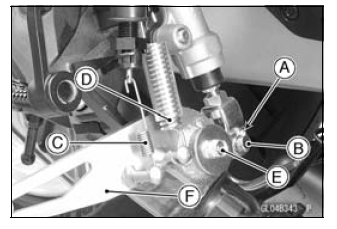
- Remove:
Cotter Pin [A]
Joint Pin [B]
Rear Brake Light Switch Spring [C]
Return Spring [D]
Brake Pedal Bolt [E]
Brake Pedal [F]
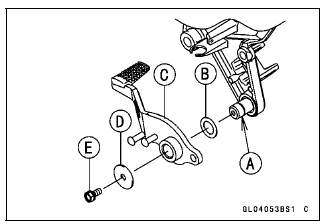
Brake Pedal Installation
- Apply grease to the footpeg pivot shaft [A].
- Install:
Washer [B]
Brake Pedal [C]
Washer [D] - Apply a non-permanent locking agent to the threads of the brake pedal
bolt [E], and tighten it.
Torque - Brake Pedal Bolt: 8.8 N*m (0.90 kgf*m, 78 in*lb)
- Hook the longer end of the rear brake light switch spring [A] on the brake light switch.
- Hook the upper end of the return spring [B] on the footpeg bracket hook.
- Face the both lower spring ends forward.
- Replace the cotter pin [A] with a new one.
- Insert the cotter pin and bend the pin ends [B].
- Install the front footpeg bracket.
- Tighten:
Torque - Front Footpeg Bracket Bolts: 25 N*m (2.5 kgf*m, 18 ft*lb) - Check the brake pedal position (see Brake Pedal Position Inspection).

 Rider's Manual BMW R 1250 GS GSA
 Owner's Manual Harley-Davidson Sportster XL1200X Forty-Eight
 Owner's Manual Honda CBR650R
 Service manual Honda CBR650
 Owner's Manual Honda PCX125
 Owner's Manual Kawasaki Z1000SX
 Service manual Kawasaki Z1000SX
 Owner's Manual Lexmoto Echo
 Owner's Manual Royal Enfield Interceptor 650
 Service manual Royal Enfield Interceptor 650
 Owner's Manual Yamaha MT-07