 Harley-Davidson Sportster XL1200X Forty-Eight - Owner's Manual > Changing Oil and Filter
Draining Oil Tank
 Be sure that no
lubricants or fluids get on tires, wheels or brakes when changing fluid.
Be sure that no
lubricants or fluids get on tires, wheels or brakes when changing fluid.
Traction can be adversely affected, which could result in loss of control of the motorcycle and death or serious injury.
 Do not switch lubricant
brands indiscriminately because some lubricants interact chemically when mixed.
Use of inferior lubricants can damage the engine.
Do not switch lubricant
brands indiscriminately because some lubricants interact chemically when mixed.
Use of inferior lubricants can damage the engine.
Completely drain oil tank of used oil at scheduled service intervals. Refill with fresh oil. Refer to Regular Service Intervals: 2016 Sportster Models.
NOTES:
- Change oil at specified intervals in normal service at warm or moderate temperatures.
- Change engine oil at shorter intervals in cold weather or in severe operating conditions. See Winter Lubrication.
- Change engine oil at shorter intervals if ridden extremely hard, used in competition or driven on dusty roads.
- Always change oil filter when changing engine oil.
1. Run motorcycle until engine is at normal operating temperature.
2. Remove dipstick from oil tank.
NOTE: The drain pan must hold approximately 3.0 qt 2.8 L.
3. Place a drain pan directly under the oil tank.
4. See Drain Hose. Pull clip (1) from frame tube.
5. Direct drain hose (2) in front of bracket (3) into drain pan.
6. Loosen clamp (4). Remove plug (5) from end of hose.
NOTE: Completely drain engine oil from oil tank.
7. Allow oil to drain.
8. Install plug into hose.
9. Tighten clamp to 6-10 in-lbs (0.7-1.1 Nm).
10. Route drain hose along frame tube.
11. Clip hose to frame.
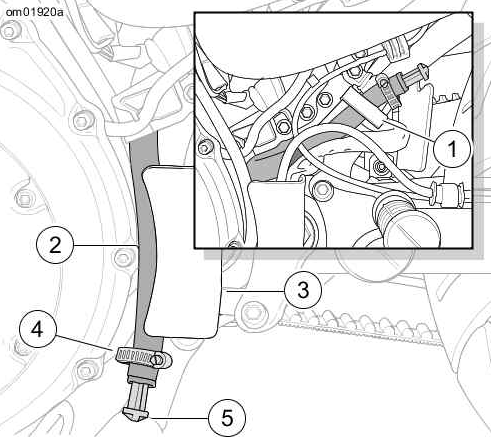 Drain Hose
- Clip
- Drain hose
- Bracket
- Clamp
- Plug
Removing Oil Filter
1. Place a drain pan under the oil filter.
Use Harley-Davidson oil
filter wrench for filter removal. This tool can prevent damage to crankshaft
position sensor and/or sensor cable.
NOTE: See Oil Filter. Turn filter (1) counterclockwise to remove from mount (2).
2. Remove oil filter using HARLEY-DAVIDSON OIL FILTER WRENCH H-D-42311 or HARLEY-DAVIDSON OIL FILTER WRENCH H-D-44067-A.
3. Drain engine oil. Discard oil filter.
4. Clean any oil spills off crankcase and frame.
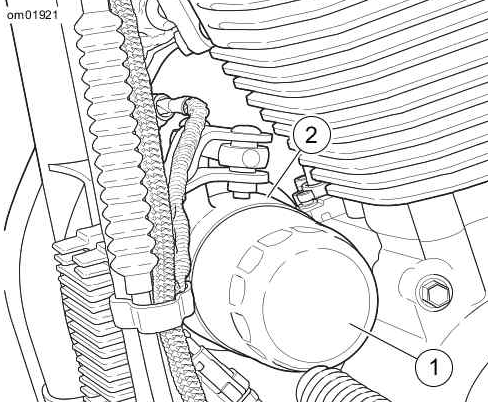 Oil Filter
- Filter
- Mount
Installing Oil Filter
NOTE: To build oil pressure on engine start-up, partially fill oil filter.
1. Pour about 4 fl oz 120 mL of fresh, clean engine oil into new oil filter.
2. Allow time for oil to soak into filter element.
3. See Installing Oil Filter. Wipe oil filter mount contact surface (1) with a clean cloth. Surface must be smooth and free of debris or old gasket material.
4. Apply a thin film of oil to contact surface of the oil filter mount and filter gasket (2) of new oil filter.
NOTE: Do not use oil filter wrench to install new oil filter.
5. Install new oil filter.
- Screw filter onto adapter (3) until gasket contacts the gasket contact surface.
- Hand-tighten one-half to three-quarters turn to secure the oil filter.
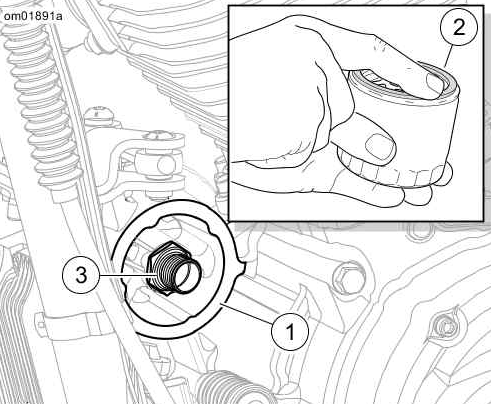 Installing Oil Filter
- Contact surface
- Filter gasket
- Adapter
Refilling Oil Tank
Do not overfill oil.
Doing so can result in oil carryover to the air cleaner leading to equipment
damage and/or equipment malfunction.
NOTE: Use the proper grade of oil for the lowest temperature expected before the next oil change. Refer to Recommended Engine Oils.
1. Pour 2.0 qt 1.9 L of oil into engine oil tank.
2. Install dipstick in oil tank. Seat cap.
3. See Oil Pressure Indicator. Verify oil pressure.
- Start engine.
- Verify that the oil pressure indicator turns off at 1000 rpm or above.
- Turn off engine.
4. Perform engine oil level hot check.
5. Start engine and carefully check for oil leaks around drain plug and oil filter.
 Oil Pressure Indicator
Winter Lubrication
Change engine oil often in colder climates. If motorcycle is frequently used for trips less than 15 mi 24 km , in ambient temperatures below 60 ºF 16 ºC , reduce oil change intervals to 1500 mi 2400 km.
NOTE: Lower ambient temperatures require more frequent oil changes.
Water vapor is a normal by-product of combustion. During cold-weather operation, some water vapor condenses to liquid form on the cool surfaces inside the engine. In freezing weather this water becomes slush or ice. If the engine is not warmed to operating temperature, accumulated slush or ice blocks the oil lines and causes engine damage. Over time, water will accumulate, mix with the engine oil and form a sludge that is harmful to the engine.
If the engine is allowed to warm to normal operating temperature, most of the water evaporates and exits through the crankcase breather.
See also:
 Harley-Davidson Sportster XL1200X Forty-Eight - Owner's Manual > Checking and Adding Oil
Removing and Replacing Oil Filler Cap 1. Park the motorcycle on level ground. 2. See Filler Cap Location. Remove the filler cap from the oil tank. Press straight down on the filler cap and release. The cap will pop up. Pull up on the filler cap while turning counterclockwise one-quarter turn as if removing the filler cap.
Harley-Davidson Sportster XL1200X Forty-Eight - Owner's Manual > Transmission Lubrication
NOTE: When checking the transmission lubricant level, motorcycle should be standing STRAIGHT UP, not leaning on the jiffy stand. Keep motorcycle upright for a short time to equalize lubricant level in the transmission compartments.
 Rider's Manual BMW R 1250 GS GSA
 Owner's Manual Harley-Davidson Sportster XL1200X Forty-Eight
 Owner's Manual Honda CBR650R
 Service manual Honda CBR650
 Owner's Manual Honda PCX125
 Owner's Manual Kawasaki Z1000SX
 Service manual Kawasaki Z1000SX
 Owner's Manual Lexmoto Echo
 Owner's Manual Royal Enfield Interceptor 650
 Service manual Royal Enfield Interceptor 650
 Owner's Manual Yamaha MT-07