 Harley-Davidson Sportster XL1200X Forty-Eight - Owner's Manual > Transmission Lubrication
NOTE: When checking the transmission lubricant level, motorcycle should be standing STRAIGHT UP, not leaning on the jiffy stand. Keep motorcycle upright for a short time to equalize lubricant level in the transmission compartments.
Drain and refill the transmission with fresh lubricant at proper intervals. For best results, drain lubricant while hot. Refer to Regular Service Intervals: 2016 Sportster Models.
 Be sure that no
lubricants or fluids get on tires, wheels or brakes when changing fluid.
Be sure that no
lubricants or fluids get on tires, wheels or brakes when changing fluid.
Traction can be adversely affected, which could result in loss of control of the motorcycle and death or serious injury.
 When draining or adding
lubricant, do not allow dirt, debris or other contaminants to enter the engine.
When draining or adding
lubricant, do not allow dirt, debris or other contaminants to enter the engine.
Do not overfill the
primary chaincase with lubricant. Overfilling can cause rough clutch engagement,
incomplete disengagement, clutch drag and/or difficulty in finding neutral at
engine idle.
Check Lubricant Level
1. Run motorcycle until engine is at normal operating temperature.
2. Position motorcycle straight up.
To prevent accidental
vehicle start-up, which could cause death or serious injury, remove main fuse
before proceeding.
3. Turn off ignition switch and STOP/RUN switch.
4. XL models with mid-mount controls: See Mid-Mount Rider Footrest Assembly. Remove screws and detach the rider footrest support bracket from the left side of the vehicle.
5. See Primary Cover. Remove screws with washers from clutch inspection cover. Remove clutch inspection cover from primary cover.
NOTE: The filler access is the clutch inspection cover.
6. See Chaincase Lubricant Level. Verify that lubricant level is even with bottom of clutch diaphragm spring.
NOTE: Add only enough of FORMULA+ TRANSMISSION AND PRIMARY CHAINCASE LUBRICANT through clutch inspection cover opening until the lubricant reaches the bottom of clutch diaphragm spring.
7. Install the clutch inspection cover.
- Install new quad ring.
- Verify that quad ring is fully seated in groove of primary cover.
- Install clutch inspection cover. Secure with six screws.
- Tighten in a crosswise pattern to 90-120 in-lbs (10.2-13.6 Nm).
8. If the left footrest assembly was removed, install support bracket with two screws. Tighten screws to 45-50 ft-lbs (61.0-67.8 Nm).
9. Start engine. Check for any lubricant leaks.
10. Turn off engine.
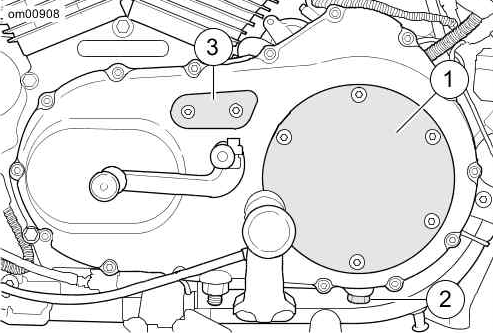 Primary Cover
- Clutch inspection cover
- Drain plug
- Primary chain inspection cover
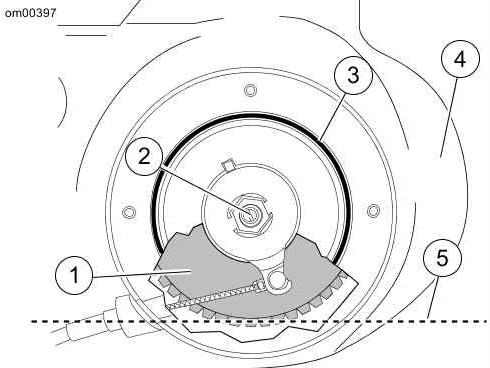 Chaincase Lubricant Level
- Clutch diaphragm spring
- Clutch adjusting screw
- Quad ring
- Primary cover
- Chaincase lubricant level
Changing Lubricant
1. Run motorcycle until engine is at normal operating temperature.
2. When the engine reaches normal operating temperature, park motorcycle on jiffy stand. This allows the chaincase lubricant to drain out of transmission.
To prevent accidental
vehicle start-up, which could cause death or serious injury, remove main fuse
before proceeding.
3. Turn off ignition switch and STOP/RUN switch.
4. See Primary Cover. Position a suitable container under transmission drain plug (2).
5. The drain plug is located under the clutch, on the underside of the primary cover. Remove drain plug and drain lubricant.
6. Position the motorcycle STRAIGHT UP and LEVEL. This allows more fluid to drain from the clutch compartment.
Do not over-tighten
filler or drain plug. Doing so could result in a lubricant leak.
NOTE: Dispose of lubricant in accordance with local regulations.
7. Clean magnetic drain plug. Replace drain plug O-ring if damaged.
8. Apply LOCTITE 565 PIPE SEALANT WITH TEFLON to the drain plug. Install drain plug. Tighten to 14-30 ft-lbs (19.0-40.7 Nm).
9. XL models with mid-mount controls: See Mid-Mount Rider Footrest Assembly. Remove screws (2) and detach the rider footrest support bracket (1) from the left side of the vehicle.
10. See Primary Cover. Remove screws with washers from clutch inspection cover (1). Remove clutch inspection cover from primary cover.
NOTE: The filler access is the clutch inspection cover.
11. See Chaincase Lubricant Level. Add 1.00 qt 0.95 L of FORMULA+ TRANSMISSION AND PRIMARY CHAINCASE LUBRICANT (Part No.98851-05 qt) through clutch inspection cover opening until the lubricant reaches the bottom of clutch diaphragm spring.
12. Install the clutch inspection cover.
- Install new quad ring (3).
- Verify that quad ring is fully seated in groove of primary cover.
- Install clutch inspection cover. Secure with six screws.
- Tighten in a crosswise pattern to 90-120 in-lbs (10.2-13.6 Nm).
13. If the left footrest assembly was removed, install support bracket with two screws. Tighten to 45-50 ft-lbs (61.0-67.8 Nm).
14. Start engine. Check for any lubricant leaks.
15. Turn off engine.
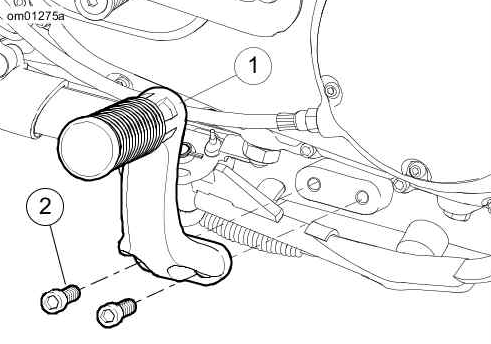 Mid-Mount Rider Footrest Assembly
- Support bracket
- Screws (2)
See also:
 Harley-Davidson Sportster XL1200X Forty-Eight - Owner's Manual > Changing Oil and Filter
Draining Oil Tank Be sure that no lubricants or fluids get on tires, wheels or brakes when changing fluid.
Harley-Davidson Sportster XL1200X Forty-Eight - Owner's Manual > Primary Chain Free Play
Primary Chain Inspection Inspect primary chain free play at proper intervals and adjust as necessary. Loose chains cause the motorcycle to jerk when running at low speed, and chain and sprockets wear excessively. If this happens, see a Harley-Davidson dealer.
 Rider's Manual BMW R 1250 GS GSA
 Owner's Manual Harley-Davidson Sportster XL1200X Forty-Eight
 Owner's Manual Honda CBR650R
 Service manual Honda CBR650
 Owner's Manual Honda PCX125
 Owner's Manual Kawasaki Z1000SX
 Service manual Kawasaki Z1000SX
 Owner's Manual Lexmoto Echo
 Owner's Manual Royal Enfield Interceptor 650
 Service manual Royal Enfield Interceptor 650
 Owner's Manual Yamaha MT-07