 Harley-Davidson Sportster XL1200X Forty-Eight - Owner's Manual > Primary Chain Free Play
Primary Chain Inspection
Inspect primary chain free play at proper intervals and adjust as necessary. Loose chains cause the motorcycle to jerk when running at low speed, and chain and sprockets wear excessively. If this happens, see a Harley-Davidson dealer.
 To prevent accidental
vehicle start-up, which could cause death or serious injury, remove main fuse
before proceeding.
To prevent accidental
vehicle start-up, which could cause death or serious injury, remove main fuse
before proceeding.
1. Remove main fuse. See Fuses.
2. See Primary Chain Inspection Cover. Remove the two screws and the primary chain inspection cover.
3. See Primary Chain Free Play. Check primary chain tension by measuring free play.
- Measure free play through chain inspection cover opening.
- Rotate engine to move primary chain to a different position on sprockets.
- Measure free play several times, each time with primary chain moved so that the measurement is taken with sprockets rotated to the tightest chain position.
4. The tightest measurement in previous step must be within the specifications. Adjust as necessary. Refer to Primary Chain Free Play Specifications.
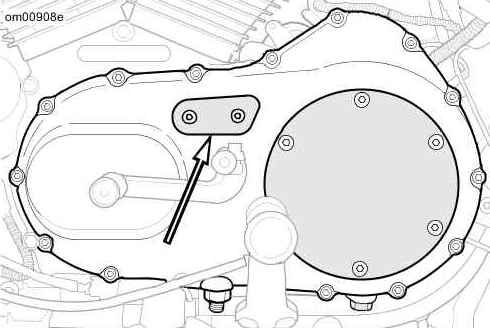 Primary Chain Inspection Cover
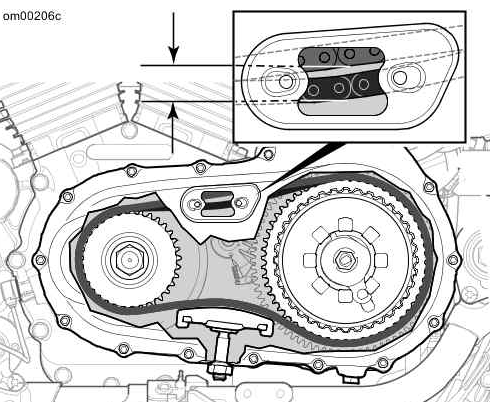 Primary Chain Free Play
Primary Chain Free Play Specifications

Primary Chain Adjustment
 Do not adjust the primary
chain tighter than specified. Running chain too tight will result in excessive
wear.
Do not adjust the primary
chain tighter than specified. Running chain too tight will result in excessive
wear.
1. See Primary Chain Adjuster: Sportster Models. Loosen locknut (1).
2. Turn chain adjuster screw (2) clockwise (inward) to reduce free play or counterclockwise (outward) to increase free play. Free play must fall within specifications. Refer to Primary Chain Free Play Specifications.
NOTE: If free play cannot be set within specification, then primary chain and/or chain adjuster are worn beyond adjustment limits. See your Harley-Davidson dealer.
3. When free play is set correctly, hold chain adjuster screw and tighten locknut to 20-25 ft-lbs (27-34 Nm).
4. Install primary chain inspection cover with a new gasket. Tighten screws to 90-120 in-lbs (10.2-13.6 Nm).
5. Install main fuse.
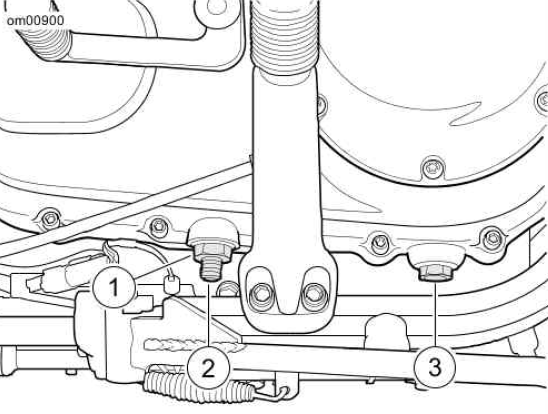 Primary Chain Adjuster: Sportster Models
- Locknut
- Chain adjuster screw
- Transmission chaincase drain plug
Check Drive Belt Deflection
NOTE: Always use BELT TENSION GAUGE H-D-35381-A to measure belt deflection. Failure to use tension gauge may cause under-tensioned belts. Loose belts can fail due to "ratcheting" (jumping a tooth) which causes tensile cord crimping and breakage.
Check deflection:
- As part of pre-ride inspection.
- At every scheduled service interval.
- With transmission in neutral.
- With motorcycle at ambient temperature.
- With motorcycle upright or on jiffy stand with rear wheel on the ground.
- With the vehicle unladen: no rider, no luggage and saddlebags, if equipped, empty.
To prevent accidental
vehicle start-up, which could cause death or serious injury, remove main fuse
before proceeding.
1. Disarm security system. Remove main fuse. See Fuses.
2. See Belt Tension Gauge. Measure belt deflection using H-D BELT TENSION GAUGE H-D-35381-A:
- Slide O-ring (4) to 0 lb 0 kg mark (3).
- Models equipped with belt deflection window: Fit belt cradle (2) against bottom of drive belt in line with belt deflection window.
- All other models: Fit belt cradle (2) against bottom of drive belt halfway between drive pulleys.
- Press upward on knob (6) until O-ring slides down to 10 lb 4.5 kg mark (5) and hold steady.
3. Measure belt deflection:
- Models equipped with belt deflection window: See Checking Belt Deflection. Measure belt deflection as viewed through belt deflection viewing window while holding gauge steady. Each deflection graduation is approximately 1/16 in 1.59 mm.
- All other models: See Belt Deflection Window. Measure amount of deflection (4) while holding gauge steady.
4. Compare with specifications. Adjust as necessary. Refer to Belt Deflection Specifications*.
5. Install main fuse.
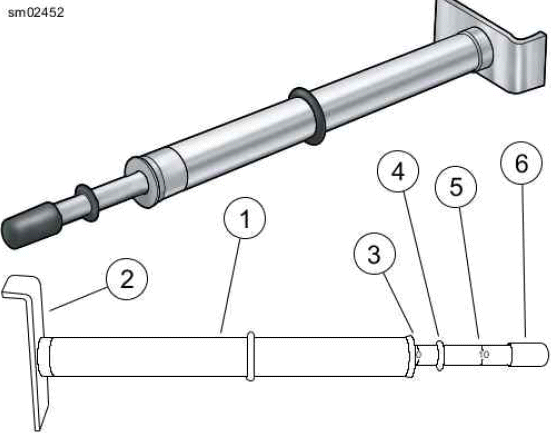 Belt Tension Gauge
- Belt tension gauge
- Belt cradle
- 0 lb (0 kg) mark
- O-ring
- 10 lb (4.5 kg) mark
- Knob
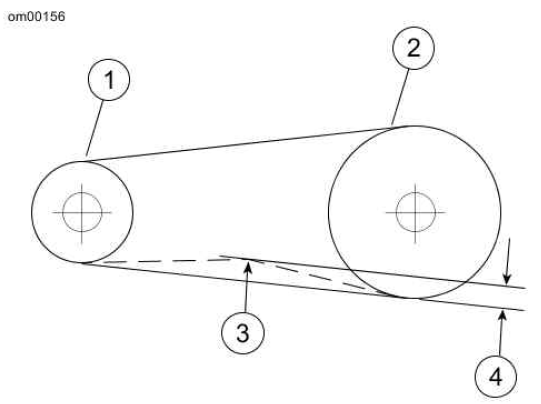 Checking Belt Deflection
- Transmission sprocket
- Rear wheel sprocket
- 10 lb (4.5 kg) of force
- Amount of deflection
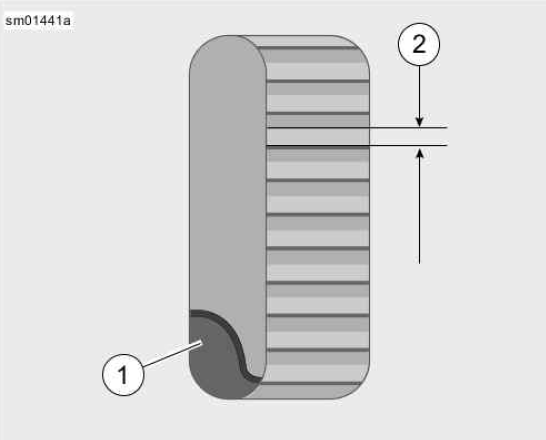 Belt Deflection Window
- Drive belt
- Deflection graduation
Belt Deflection Specifications*

Chassis Lubrication
Refer to Regular Service Intervals: 2016 Sportster Models for all maintenance schedules.
NOTE: Use recommended SPECIAL PURPOSE GREASE for steering head bearings. Use a multipurpose chassis grease for other applications.
1. Remove and lubricate handlebar throttle control grip sleeve with fresh graphite.
2. Lubricate throttle control cables and clutch control cable with HARLEY LUBE.
3. Lubricate front brake hand lever and clutch control hand lever only if necessary.
4. Pack the steering head bearings with SPECIAL PURPOSE GREASE at recommended service intervals.
5. Lubricate the jiffy stand mechanism with SILVER GRADE ANTI-SEIZE.
NOTE: For model specific information regarding the chassis lubrication, refer to the service manual or see a Harley-Davidson dealer.
Oil Applications
Lubricate motorcycle at regular intervals, particularly after washing motorcycle or driving in wet weather. Refer to Regular Service Intervals: 2016 Sportster Models.
Front Fork Oil
Have a Harley-Davidson dealer service the front fork at the specified intervals. If fork does not appear to be working properly or an appreciable amount of oil leakage develops, see a Harley-Davidson dealer. If there is insufficient oil in either side of fork, the rebound action will be incorrect. Refer to Regular Service Intervals: 2016 Sportster Models.
Mechanical Clutch
The clutch control cable
must be oiled and adjusted periodically to compensate for lining wear. See
MAINTENANCE SCHEDULING in this manual. Failure to oil and adjust the clutch
control cable can result in equipment damage.
Adjust the clutch control cable at specified intervals. Refer to Regular Service Intervals: 2016 Sportster Models.
If the clutch slips under load or drags when released, the control cable may need to be adjusted or clutch service may need to be performed. See a Harley-Davidson dealer for service.
Hydraulic Lifters
The hydraulic lifters are self-adjusting.
They automatically adjust length to compensate for engine expansion and valve mechanism wear. This keeps the valve mechanism free of lash when the engine is running.
When starting an engine which has been turned off even for a few minutes, the valve mechanism may be slightly noisy until the hydraulic units completely refill with oil. If at any time the valve mechanism becomes abnormally noisy, other than for a short period immediately after engine is started, it is an indication that one or more of the hydraulic units may not be functioning properly.
Always check the engine oil level first since normal circulation of oil through the engine is necessary for proper operation of the hydraulic lifters.
If engine oil is at the proper level, the lifters may not be functioning properly because of dirt in the oil supply passages leading to the lifter units. See a Harley-Davidson dealer for service.
Steering Head Bearings
Adjustments to steering
head bearings should be performed by a Harley-Davidson dealer.
Improperly adjusted bearings can adversely affect handling and stability, which could result in death or serious injury.
Check for proper steering head bearing adjustment and lubricate bearings using SPECIAL PURPOSE GREASE at proper intervals. Refer to Regular Service Intervals: 2016 Sportster Models.
With motorcycle front end raised off the floor, be sure front fork turns freely without any binding or interference and that there is no appreciable front to rear fork movement indicating excessive bearing looseness. Steering head bearings should be adjusted according to service manual procedure, if necessary.
See also:
 Harley-Davidson Sportster XL1200X Forty-Eight - Owner's Manual > Transmission Lubrication
NOTE: When checking the transmission lubricant level, motorcycle should be standing STRAIGHT UP, not leaning on the jiffy stand. Keep motorcycle upright for a short time to equalize lubricant level in the transmission compartments.
Harley-Davidson Sportster XL1200X Forty-Eight - Owner's Manual > Brakes
Brake Fluid Clean reservoir filler cap or cover before removing. Use only DOT 4 brake fluid from a sealed container. Contaminated fluid can adversely affect braking or clutch disengagement, which could result in death or serious injury.
 Rider's Manual BMW R 1250 GS GSA
 Owner's Manual Harley-Davidson Sportster XL1200X Forty-Eight
 Owner's Manual Honda CBR650R
 Service manual Honda CBR650
 Owner's Manual Honda PCX125
 Owner's Manual Kawasaki Z1000SX
 Service manual Kawasaki Z1000SX
 Owner's Manual Lexmoto Echo
 Owner's Manual Royal Enfield Interceptor 650
 Service manual Royal Enfield Interceptor 650
 Owner's Manual Yamaha MT-07