 Lexmoto Echo - Owner's Manual > Changing the Bulb, Adjusting the Headlight
Changing the bulb
 NOTE
NOTE
Use only tested, incandescent bulbs with the  designation.
Use of non-approved bulbs will void the operating license. Do not touch the
bulbs with bare fingers. Hold bulbs with a clean, dry cloth when installing or
removing them.
designation.
Use of non-approved bulbs will void the operating license. Do not touch the
bulbs with bare fingers. Hold bulbs with a clean, dry cloth when installing or
removing them.
Low beam-high beam bulb: 12V 35W/35W
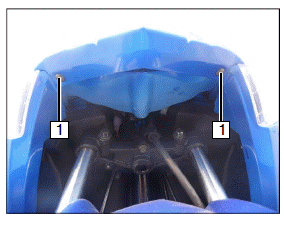
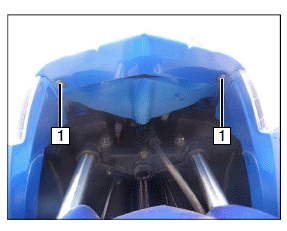
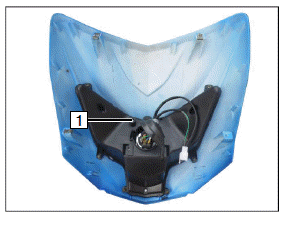
- Turn off the ignition.
- Remove the screw and bolts (1).
- Take off the headlight cover (2).
- Disconnect the plug (3).
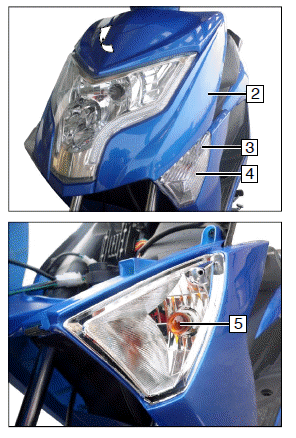
- Turn the indicator bulb holder (4) clockwised, take off the bulb holder.
- Press the indicator bulb and turn counterclockwised, take off the bulb (5).
Installation takes place in reverse order to disassembly.
NOTE
While installation, align A to B.
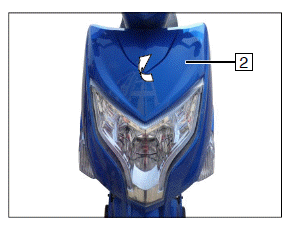

Front indicator
Changing the bulbs
NOTE
Do not touch the bulbs with bare fingers.
Hold bulbs with a clean, dry cloth when installing or removing them.
Front indicator
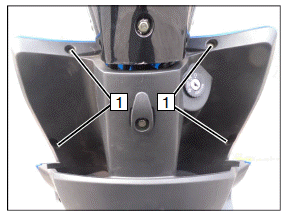
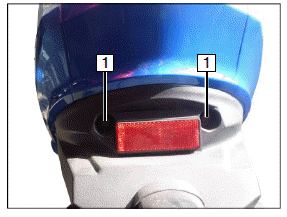
- Remove the screw and bolts (1).
- Take off the headlight cover (2).
Bulbs:
- Remove the screw (3).
- Take off the cover (4).
- Press the indicator bulb and turn counterclockwised, take off the bulb (5).
Installation takes place in reverse order to disassembly.
Bulbs: 12V 10W
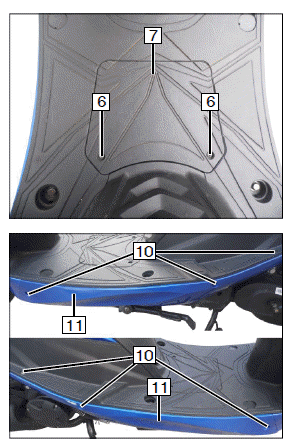
Rear indicator and Tail / brake light
Rear indicator
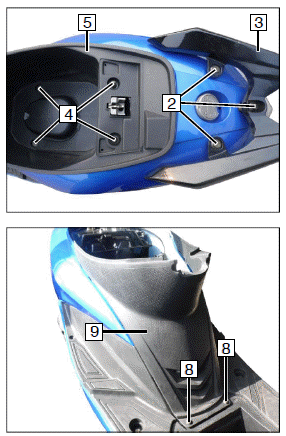
- Remove two nuts with washers (1).
- Remove three nuts with washers (2) and take off the handle holder (3).
- Open the seat.
Remove four nuts (4) with washers from the storage.
- Take off the storage box (5) with the seat.
Remove the screw (6) and open the battery cover (7).
- Remove the screws (8) and take off cener cover (9).
- Remove the screws (10) and take off left/ right side cover (11).
NOTE
Do not touch the bulbs with bare fingers.
Hold bulbs with a clean, dry cloth when installing or removing them.
Rear indicator and Tail / brake light
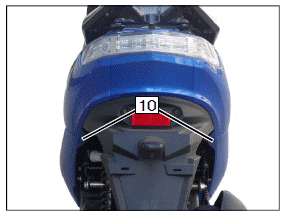
Rear indicator
- Insert ignition key (12).turn to direction OPEN and open the tank cap (13).
- Remove the screws (14), take off the seat cable (15) and cover (16)
- Remove the screws (17) and take off rear indicator (18).
Installation takes place in reverse order to disassembly.
NOTE
Do not touch the bulb with bare fingers.
Hold bulbs with a clean, dry cloth when installing or removing them.
bulbs: 12V 1.2/0.28/1.3W
Check the headlamps
 WARNING
Do not run the engine in an enclosed space (risk of asphyxiation).
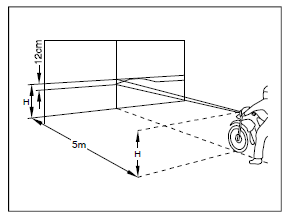
Position the motorcycle on a level floor 5 m (measured from the headlamp) from a light coloured wall with a rider seated on the motorcycle and the tyres filled at the correct pressure.
- Measure the distance from the floor to the centre of the headlamp and mark the height on the wall with a cross. Draw a second cross 12 cm beneath the first cross.
Adjusting the headlamps
- Start the scooter and run the engine.
- Activate the dipped beam.
- Use a screwdriver to adjust the screws (1) for the vertical and horizontal angle of the illuminated surface area of the road top for the headlamp.
NOTE
If you have problems adjusting the headlamps, see a specialised dealer.
An incorrect adjustment is punishable by law. Remember, you are responsible for the correct adjustment of the motorbike's headlamp.
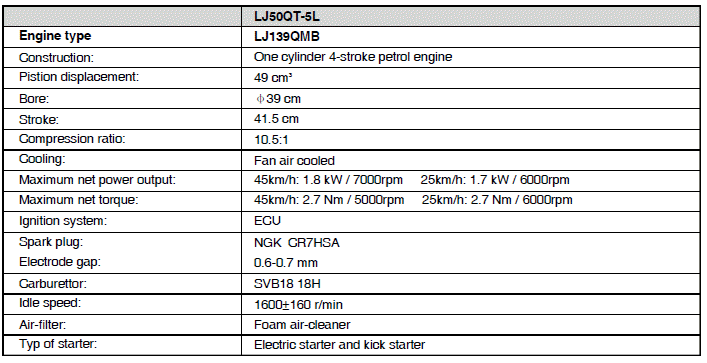
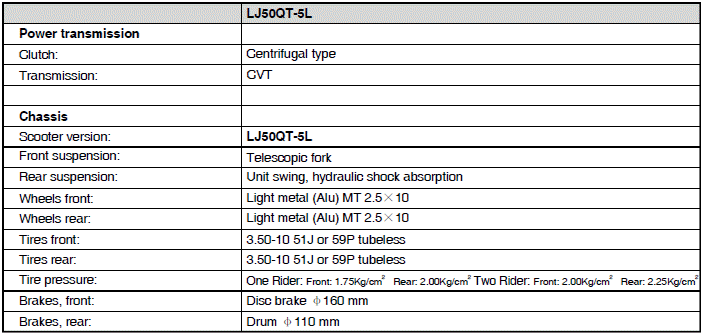
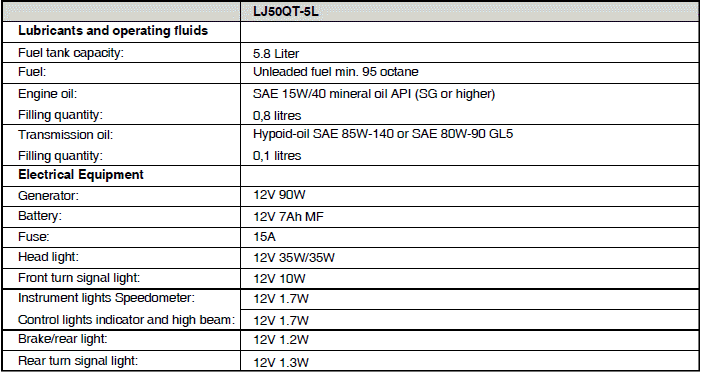
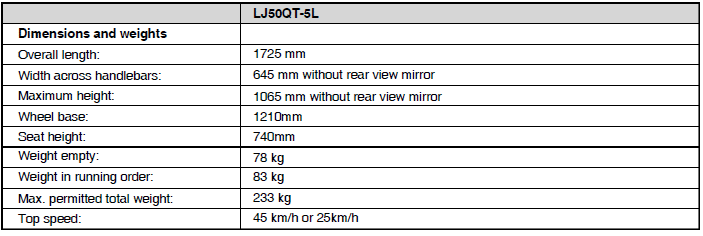
Technical Data
See also:
 Lexmoto Echo - Owner's Manual > Battery
WARNING Always wear safety glasses. Keep children away from acids and batteries. EXPLOSION DANGER A battery being charged produces a highly explosive gas, which is why fire, sparks, naked flames and smoking are prohibited. FIRE HAZARD Avoid generating sparks and electrostatic discharges when handling cables and electrical devices.
 Rider's Manual BMW R 1250 GS GSA
 Owner's Manual Harley-Davidson Sportster XL1200X Forty-Eight
 Owner's Manual Honda CBR650R
 Service manual Honda CBR650
 Owner's Manual Honda PCX125
 Owner's Manual Kawasaki Z1000SX
 Service manual Kawasaki Z1000SX
 Owner's Manual Lexmoto Echo
 Owner's Manual Royal Enfield Interceptor 650
 Service manual Royal Enfield Interceptor 650
 Owner's Manual Yamaha MT-07