 Kawasaki Z1000SX - Service manual > Clean Air System
Air Suction Valve Removal
- Remove:
Lower Fairing (see Lower Fairing Removal in the Frame chapter)
Air Switching Valve (see Air Switching Valve Removal)
Stick Coil Connector (see Stick Coil Removal in the Electrical System chapter)
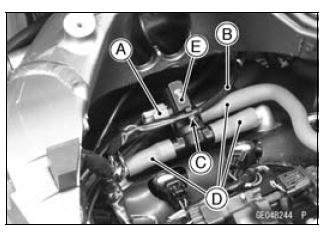
Connector [A] (from Bracket [B] at Left Side)
Air Suction Valve Cover Bolts [C] and Bracket
Air Suction Valve Covers [D] (Both Sides)
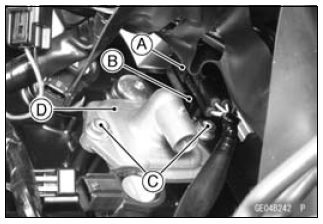
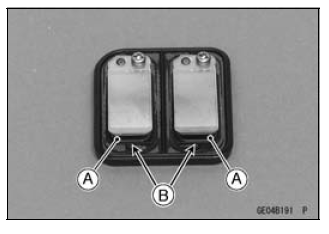
- Remove the air suction valves [A] on both sides.
Air Suction Valve Installation
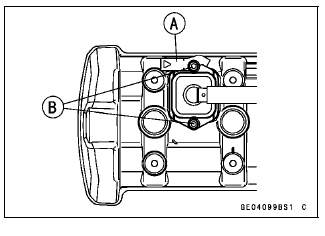
- Install the air suction valve so that opening [A] of the reed faces the front and downward.
- Install the bracket [A] as shown in the figure.
- Apply a non-permanent locking agent to the threads of the air suction
valve cover bolts [B], and tighten them.
Torque - Air Suction Valve Cover Bolts: 9.8 N*m (1.0 kgf*m, 87 in*lb)
Air Suction Valve Inspection
- Remove the air suction valve (see Air Suction Valve Removal).
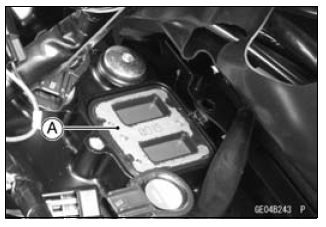
- Visually inspect the reeds [A] for cracks, folds, warps, heat damage or
other damage.
If there is any doubt as to the condition of the reeds, replace the air suction valve as an assembly.
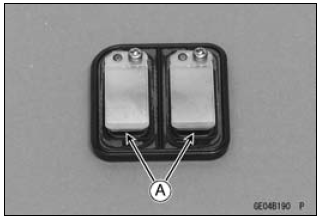
- Check the reed contact areas [B] of the valve holder for grooves,
scratches, any signs of separation from the holder or heat damage.
If there is any doubt as to the condition of the reed contact areas, replace the air suction valve as an assembly.
If any carbon or other foreign particles have accumulated between the reed and the reed contact area, wash the valve assembly clean with a high-flash point solvent.
NOTICE Do not scrape off the deposits with a scraper as this could damage the rubber, requiring replacement of the suction valve assembly.
Air Switching Valve Removal
NOTICE Never drop the air switching valve especially on a hard surface. Such a shock to the air switching valve can damaged it.
- Remove the stick coils (see Stick Coil Removal in the Electrical System chapter).
- Disconnect the connector [A].
- Clear the harness [B] from the clamp [C].
- Separate the hoses [D] from the air switching valve [E] to remove the air switching valve.
Air Switching Valve Installation
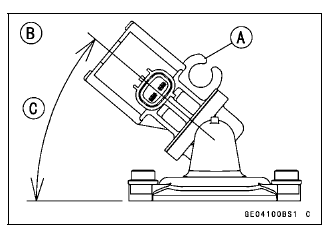
- Install the air switching valve [A] as shown in the figure.
[B] Viewed Left Side
[C] About 40º
Air Switching Valve Operation Test
- Refer to the Air Suction System Damage Inspection in the Periodic Maintenance chapter.
Air Switching Valve Unit Test
- Refer to the Air Switching Valve Unit Test in the Electrical System chapter.
Clean Air System Hose Inspection
- Be certain that all the hoses are routed without being flattened or
kinked, and are connected correctly to the air cleaner housing, air
switching valve and air suction valve covers.
If they are not, correct them. Replace them if they are damaged.
See also:
 Kawasaki Z1000SX - Service manual > Cylinder Head Cover
Remove: Lower Fairing (see Lower Fairing Removal in the Frame chapter) Air Cleaner Housing (see Air Cleaner Housing Removal in the Fuel System (DFI) chapter) Drain the coolant (see Coolant Change in the Periodic Maintenance chapter). Remove: Radiator Cap Mounting Bolt [A] Clamp [B] Water Hose [C] Remove: Bolts [A] Quick Rivets [B] Brackets [C] Right Side [D] Left Side [E] Remove: Air Switching Valve (see Air Switching Valve Removal) Stick Coils (see Stick Coil Removal in the Electrical System chapter) Quick Rivets [A] Pull up the rubber cover [B] forward. Remove: Air Suction Valves [A] (see Air Suction Valve Removal) Hot Windshield [B] and Air Suction Valve Cover Bracket [C] Remove: Cylinder Head Cover Bolts [A] Cylinder Head Cover
 Rider's Manual BMW R 1250 GS GSA
 Owner's Manual Harley-Davidson Sportster XL1200X Forty-Eight
 Owner's Manual Honda CBR650R
 Service manual Honda CBR650
 Owner's Manual Honda PCX125
 Owner's Manual Kawasaki Z1000SX
 Service manual Kawasaki Z1000SX
 Owner's Manual Lexmoto Echo
 Owner's Manual Royal Enfield Interceptor 650
 Service manual Royal Enfield Interceptor 650
 Owner's Manual Yamaha MT-07