 Honda CBR650R - Owner's Manual > Clutch
Checking the Clutch
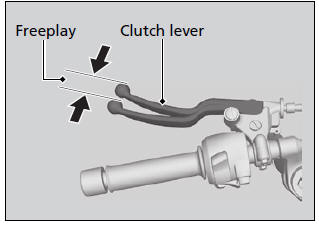
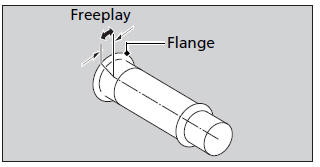
Checking the Clutch Lever Freeplay
Check the clutch lever freeplay.
Freeplay at the clutch lever: 10 to 20 mm (0.4 to 0.8 in)
Check the clutch cable for kinks or signs of wear. If necessary have it replaced by your dealer.
Lubricate the clutch cable with a commercially available cable lubricant to prevent premature wear and corrosion.
Adjusting the Clutch Lever Freeplay
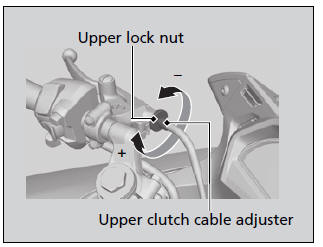
Upper Adjustment
Attempt adjustment with the upper clutch cable adjuster first.
1. Loosen the upper lock nut.
2. Turn the upper clutch cable adjuster until the freeplay is 10 to 20 mm (0.4 to 0.8 in).
3. Tighten the upper lock nut and check the freeplay again.
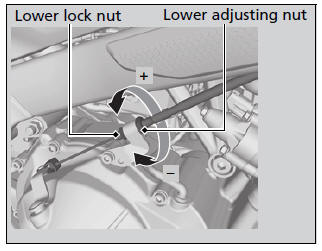
Lower Adjustment
If the upper clutch cable adjuster is threaded out near its limit, or the correct freeplay cannot be obtained, attempt adjustment with the lower adjusting nut.
1. Loosen the upper lock nut and turn the upper clutch cable adjuster all the way in (to provide maximum freeplay). Tighten the upper lock nut.
2. Loosen the lower lock nut.
3. Turn the lower adjusting nut until the clutch lever freeplay is 10 to 20 mm (0.4 to 0.8 in).
4. Tighten the lower lock nut and check the clutch lever freeplay.
5. Start the engine, pull the clutch lever in, and shift into gear. Make sure the engine does not stall and the motorcycle does not creep. Gradually release the clutch lever and open the throttle. Your motorcycle should move smoothly and accelerate gradually.
If proper adjustment cannot be obtained or the clutch does not work correctly, see your dealer.
Throttle
Checking the Throttle
With the engine off, check that the throttle rotates smoothly from fully closed to fully open in all steering positions and throttle freeplay is correct. If the throttle does not move smoothly, close automatically, or if the cable is damaged, have the motorcycle inspected by your dealer.
Freeplay at the throttle grip flange: 2 to 6 mm (0.1 to 0.2 in).
Other Adjustments
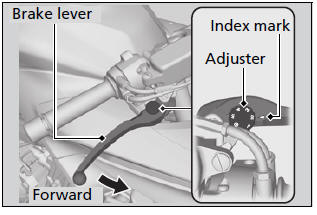
Adjusting the Brake Lever
You can adjust the distance between the tip of the brake lever and handle grip.
Adjustment method
Turn the adjuster until the numbers align with the index mark while pushing the lever forward in the desired position.
After adjustment, check that the lever operates correctly before riding.
NOTICE Do not turn the adjuster beyond its natural limit.
Adjusting the Rear Suspension
Spring Preload
You can adjust the spring preload by the adjuster to suit the load or the road surface.
Turn the adjuster using the pin spanner and extension bar provided in the tool kit.
Use the pin spanner and extension bar to turn the adjuster. Position 1 is for a decrease spring preload (soft), or turn the position 3 to 7 increase spring preload (hard). The standard position is 2.
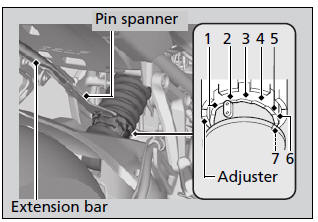
Attempting to adjust directly from 1 to 7 or 7 to 1 may damage the shock absorber.
NOTICE Do not attempt to disassemble, service, or improperly dispose of the damper. See your dealer.
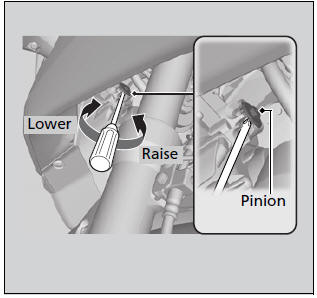
Adjusting the Headlight Aim
You can adjust vertical aim of the headlight for proper alignment. Turn the pinion using a Phillips screwdriver provided in the tool kit in or out as necessary.
Obey local laws and regulations.
See also:
 Honda CBR650R - Owner's Manual > Drive Chain
Inspecting the Drive Chain Slack Check the drive chain slack at several points along the chain. If the slack is not constant at all points, some links may be kinked and binding.
 Rider's Manual BMW R 1250 GS GSA
 Owner's Manual Harley-Davidson Sportster XL1200X Forty-Eight
 Owner's Manual Honda CBR650R
 Service manual Honda CBR650
 Owner's Manual Honda PCX125
 Owner's Manual Kawasaki Z1000SX
 Service manual Kawasaki Z1000SX
 Owner's Manual Lexmoto Echo
 Owner's Manual Royal Enfield Interceptor 650
 Service manual Royal Enfield Interceptor 650
 Owner's Manual Yamaha MT-07