 Honda CBR650R - Owner's Manual > Drive Chain
Inspecting the Drive Chain Slack
Check the drive chain slack at several points along the chain. If the slack is not constant at all points, some links may be kinked and binding.
Have the chain inspected by your dealer.
1. Stop the engine. Place the transmission in Neutral.
2. Place your motorcycle on the side stand on a level surface.
3. Check the slack in the lower half of the drive chain midway between the sprockets.
Drive chain slack: 25 to 35 mm (1.0 to 1.4 in)
- Do not ride your motorcycle if the slack exceeds 50 mm (2.0 in).
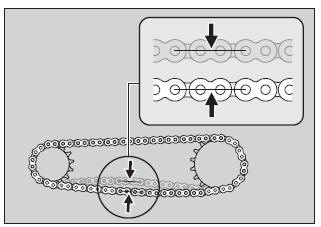
4. Roll the motorcycle forward and check that the chain moves smoothly.
5. Inspect the sprockets.
6. Clean and lubricate the drive chain.
Adjusting the Drive Chain Slack
Adjusting the chain requires special tools.
Have the drive chain slack adjusted by your dealer.
CBR650FA only
When adjusting the drive chain slack, be careful not to damage the wheel speed sensor and pulser ring.
1. Stop the engine place the gear in Neutral.
2. Place your motorcycle on the side stand on a level surface.
3. Loosen the rear axle nut.
4. Loosen the lock nuts on both adjusting bolts.
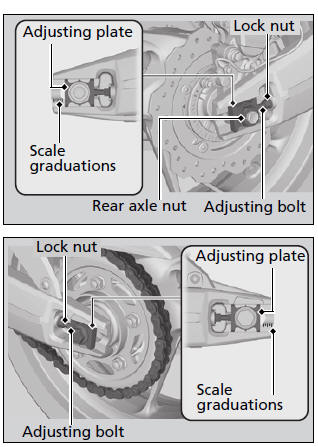
5. Turn both adjusting bolts an equal number of turns until the correct drive chain slack is obtained. Turn the adjusting bolts counterclockwise to tighten the chain. Turn the adjusting bolts clockwise and push the rear wheel toward the front to provide more slack.
Adjust the slack at a point midway between the front sprocket and the rear wheel sprocket.
Check the drive chain slack.
6. Check rear axle alignment by making sure the end of the chain adjusting plate aligns with the scale graduations on both sides of the swingarm.
Both marks should correspond. If the axle is misaligned, turn the right or left adjusting bolt until the marks are aligned and recheck chain slack.
7. Tighten the rear axle nut.
Torque: 98 N*m (10.0 kgf*m, 72 lbf*ft).
8. Hold the adjusting bolts and tighten the lock nuts.
Torque: 27 N*m (2.8 kgf*m, 20 lbf*ft).
9. Recheck drive chain slack.
If a torque wrench was not used for installation, see your dealer as soon as possible to verify proper assembly.
Improper assembly may lead to loss of braking capacity.
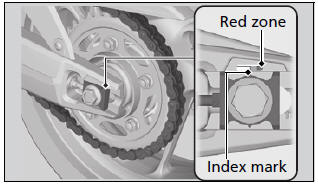
Checking the Drive Chain Wear
Check the chain wear label when adjusting the drive chain. If the index mark on the adjusting plate enters the red zone on the label after the chain has been adjusted to the proper slack, the chain is excessively worn and must be replaced.
Chain: DID 525V11 or RK 525KRW
If necessary have the drive chain replaced by your dealer.
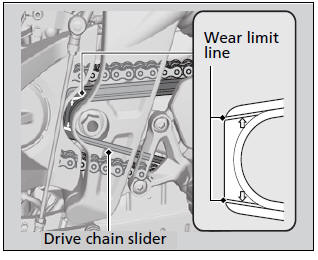
Checking the Drive Chain Slider
Check the condition of the drive chain slider.
The drive chain slider need to be replaced if it is worn to the wear limit line.
If necessary have the drive chain slider replaced by your dealer.
See also:
 Honda CBR650R - Owner's Manual > Brakes
Checking Brake Fluid 1. Place your motorcycle in an upright position on a firm, level surface. 2. Front Check that the brake fluid reservoir is horizontal and that the fluid level is above the LOWER level mark.
Honda CBR650R - Owner's Manual > Clutch
Checking the Clutch Checking the Clutch Lever Freeplay Check the clutch lever freeplay. Freeplay at the clutch lever: 10 to 20 mm (0.4 to 0.8 in)
 Rider's Manual BMW R 1250 GS GSA
 Owner's Manual Harley-Davidson Sportster XL1200X Forty-Eight
 Owner's Manual Honda CBR650R
 Service manual Honda CBR650
 Owner's Manual Honda PCX125
 Owner's Manual Kawasaki Z1000SX
 Service manual Kawasaki Z1000SX
 Owner's Manual Lexmoto Echo
 Owner's Manual Royal Enfield Interceptor 650
 Service manual Royal Enfield Interceptor 650
 Owner's Manual Yamaha MT-07