 Honda PCX125 - Owner's Manual > Coolant
Your scooter's liquid cooling system dissipates engine heat through the coolant jacket that surrounds the cylinder and cylinder head.
Maintaining the coolant will allow the cooling system to work properly and prevent freezing, overheating, and corrosion.
Coolant Recommendation
Use Pro Honda HP coolant or an equivalent high quality ethylene glycol antifreeze containing corrosion protection inhibitors specifically recommended for use in aluminum engines. Check the antifreeze container label.
Use only distilled water as a part of the coolant solution. Water that is high in mineral content or salt may be harmful to the aluminum engine.

Using coolant with silicate inhibitors may cause premature wear of water pump seals or blockage of radiator passages.
Using tap water may cause engine damage.
The factory provides a 50/50 solution of antifreeze and water in this scooter. This coolant solution is recommended for most operating temperatures and provides good corrosion protection.
Decreasing the concentration of antifreeze to less than 40% will not provide proper corrosion protection.
Increasing the concentration of antifreeze is not recommended because it decreases cooling system performance. Higher concentrations of antifreeze (up to 60%) should only be used to provide additional protection against freezing. Check the cooling system frequently during freezing weather.
Checking & Adding Coolant
UNDER SEAT
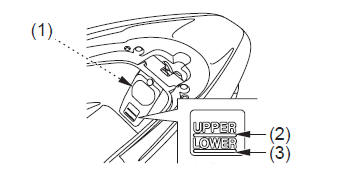
- reserve tank
- UPPER level mark
- LOWER level mark
1. Park the scooter on its center stand on a firm, level surface.
2. Open the seat.
3. With the engine at normal operating temperature, check the coolant level in the reserve tank (1). It should be between the UPPER (2) and LOWER (3 level marks.
If the reserve tank is empty, or if coolant loss is excessive, check for leaks and see your Honda dealer for repair.
4. Remove the clip (4) and reserve tank lid (5).
5. Remove the reserve tank cap (6).
Always add coolant to the reserve tank.
Do not attempt to add coolant by removing the radiator cap.
UNDER SEAT
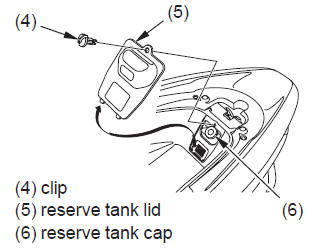
- clip
- reserve tank lid
- reserve tank cap
6. Add coolant to the reserve tank as required to bring the coolant level to the UPPER level mark.
7. Reinstall the reserve tank cap and reserve tank lid.
8. Lower and push down on the seat until it locks.
Coolant Replacement
Coolant should be replaced by your Honda dealer, unless you have the proper tools and service data and are mechanically qualified. Refer to the official Honda Service Manual.
 Removing the radiator cap
while the engine is hot can cause the coolant to spray out, seriously scalding
you.
Removing the radiator cap
while the engine is hot can cause the coolant to spray out, seriously scalding
you.
Always let the engine and radiator cool down before removing the radiator cap.
To properly dispose of drained coolant, refer to You & the Environment.
Improper disposal of drained fluids is harmful to the environment.
Clip Removal
Clip removal and installation:
Removal
- Press down on the center pin to release the lock.
- Pull the clip out of the hole.
Installation
- Slightly open the retaining pawls and then push them out.
- Insert the clip into the hole.
- Lightly press down on the center pin to lock the clip.
Air Cleaner
Service the air cleaner more frequently if you ride in unusually wet or dusty areas.
Your Honda dealer can help you determine the correct service interval for your riding conditions.
Your scooter's air cleaner has very specific performance requirements. Use a new Honda Genuine air cleaner specified for your model or an air cleaner of equivalent quality.
Using the wrong air cleaner may result in premature engine wear.
Proper air cleaner maintenance can prevent premature engine wear or damage, expensive repairs, low engine power, poor gas mileage, and spark plug fouling.
Improper or lack of proper air cleaner maintenance can cause poor performance and premature engine wear.
Replacement
1. Remove the screws (2) and air cleaner housing cover (2).
2. Remove the air cleaner element (3).
3. Discard the air cleaner element.
Thoroughly clean the inside of the air cleaner housing (4).
4. Install a new air cleaner element.
5. Install the removed parts in reverse order of removal.
LEFT SIDE
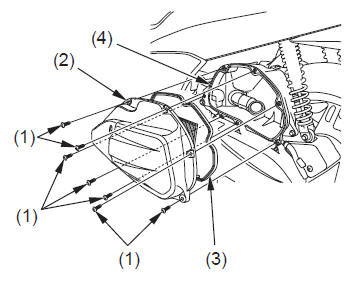
- screws
- air cleaner housing cover
- air cleaner element
- air cleaner housing
Crankcase Breather
Service the crankcase breather more frequently if your scooter is ridden in the rain or often at full throttle. Service the breather if you can see deposits in the transparent section of the drain tube.
Draining
LEFT SIDE
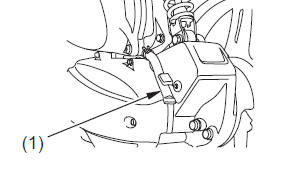
- crankcase breather tube
1. Place a drain pan under the crankcase breather tube (1).
2. Remove the tube to drain the deposits in it.
3. Reinstall the crankcase breather tube.
See also:
 Honda PCX125 - Owner's Manual > Fluids & Filters
Fuel Fuel Recommendation Use only unleaded fuel in your Honda.
Honda PCX125 - Owner's Manual > Engine
Throttle Throttle Inspection 1. Check that the throttle assembly is positioned properly and the securing bolts are tight. 2. Check for smooth rotation of the throttle from fully open to fully closed in all steering positions. If there is a problem, see your Honda dealer.
 Rider's Manual BMW R 1250 GS GSA
 Owner's Manual Harley-Davidson Sportster XL1200X Forty-Eight
 Owner's Manual Honda CBR650R
 Service manual Honda CBR650
 Owner's Manual Honda PCX125
 Owner's Manual Kawasaki Z1000SX
 Service manual Kawasaki Z1000SX
 Owner's Manual Lexmoto Echo
 Owner's Manual Royal Enfield Interceptor 650
 Service manual Royal Enfield Interceptor 650
 Owner's Manual Yamaha MT-07