 Honda PCX125 - Owner's Manual > Fluids & Filters
Fuel
Fuel Recommendation
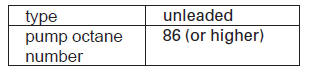
Use only unleaded fuel in your Honda.
The use of leaded fuel will damage the catalytic converter(s). If you ride your Honda in a country where leaded fuel might be available, take precautions to use only unleaded fuel.
Your engine is designed to use any unleaded gasoline that has a pump octane number of 86 or higher. Gasoline pumps at service stations normally display the pump octane number. For information on the use of oxygenated fuels.
Use of lower octane gasoline can cause persistent ''pinging'' or ''spark knock'' (a loud rapping noise) which, if severe, can lead to engine damage. Light pinging experienced while operating under a heavy load, such as climbing a hill, is no cause for concern.
If pinging or spark knock occurs at a steady engine speed under normal load, change brands of gasoline. If pinging or spark knock persists, consult your Honda dealer.
Never use stale or contaminated gasoline or an oil/gasoline mixture. Avoid getting dirt, dust, or water in the fuel tank.
Fuel Capacity
Fuel tank capacity: 1.64 US gal (6.2  )
)
When there is only one segment left, fuel will be low and you should refuel as soon as possible.
This segment flashes when the fuel decreases further.
Refueling Procedure
UNDER CENTER COVER
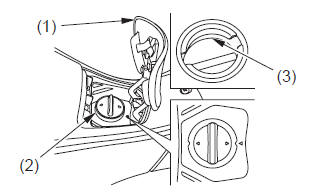
- fuel lid
- fuel fill cap
- filler neck
1. Open the fuel lid (1).
2. Remove the fuel fill cap (2) by turning it counterclockwise.
3. Add fuel until the level reaches the bottom of the filler neck (3). Avoid overfilling the tank. There should be no fuel in the filler neck.
4. After refueling, install the fuel fill cap by turning it clockwise.
5. Close the fuel lid.
 Gasoline is highly
flammable and explosive. You can be burned or seriously injured when handling
fuel.
Gasoline is highly
flammable and explosive. You can be burned or seriously injured when handling
fuel.
- Stop the engine and keep heat, sparks and flame away.
- Handle fuel only outdoors.
- Wipe up spills immediately.
Engine oil quality is a major factor that affects both the performance and the service life of the engine.
Using the proper oil and filter, and regularly checking, adding, and changing oil will help extend your engine's life. Even the best oil wears out.
Changing oil helps get rid of dirt and deposits in the engine. Operating the engine with old or dirty oil can damage your engine. Running the engine with insufficient oil can cause serious damage to the engine and transmission.
Change the engine oil as specified in the maintenance schedule.
When running in very dusty conditions, oil changes should be performed more frequently than specified in the maintenance schedule.
Engine Oil & Strainer Screen
Oil Recommendation
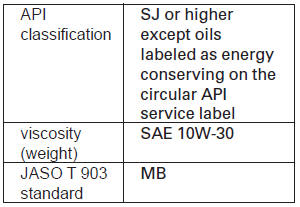
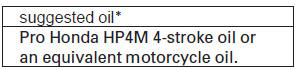
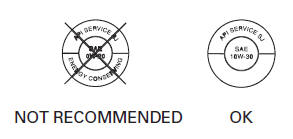
* Suggested oils are equal in performance to SJ oils that are not labeled as energy conserving on the circular API service label.
- Your scooter does not need oil additives.
Use the recommended oil.
- Do not use API SH or higher oils displaying a circular API ''energy conserving'' service label on the container. They may affect lubrication.
- Do not use non-detergent, vegetable, or castor based racing oils.
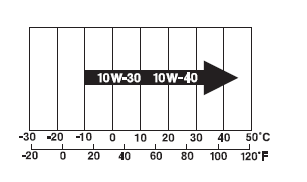
Other viscosities shown in the following chart may be used when the average temperature in your riding area is within the indicated range.
JASO T 903 standard
The JASO T 903 standard is an index for engine oils for 4-stroke motorcycle engines.
There are two classes: MA and MB.
Oil conforming to the standard is labeled on the oil container. For example, the following label shows the MB classification.
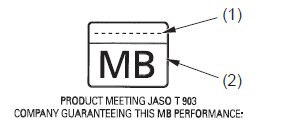
- code number of the sales company of the oil
- oil classification
Checking & Adding Oil
RIGHT SIDE
- oil fill cap/dipstick
- upper level mark
- lower level mark
1. Park your scooter on its center stand on a firm, level surface.
2. Start the engine and let it idle for 3 - 5 minutes.
3. Stop the engine and wait 2 - 3 minutes.
4. Remove the oil fill cap/dipstick (1) and wipe it clean.
5. Insert the oil fill cap/dipstick until it seats, but don't screw it in.
6. Remove the oil fill cap/dipstick and check the oil level.
- If the oil is at or near the upper level mark (2) - you do not have to add oil.
- If the oil is below or near the lower level mark (3) - add the recommended oil until it reaches the upper level mark. (Do not overfill.)
7. Reinstall the oil fill cap/dipstick.
8. Check for oil leaks.
Changing Engine Oil
This procedure requires mechanical skill and professional tools such as a torque wrench, as well as a means for disposing of the drained fluid. If you do not have the skills or the tools, see your Honda dealer.
Drain the Engine Oil:
1. Park the scooter on its center stand on a firm, level surface.
2. If the engine is cold, start it and let it idle for 3-5 minutes. Turn the engine off. Wait 2-3 minutes for the oil to settle.
3. Place a drain pan under the engine oil drain bolt (1).
4. To drain the oil, remove the oil fill cap/ dipstick, engine oil drain bolt, and sealing washer (2).
UNDER ENGINE
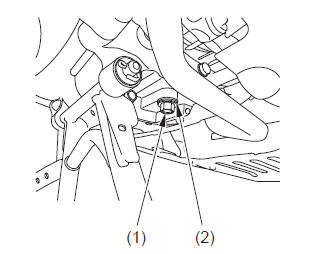
- engine oil drain bolt
- sealing washer
5. Pour the drained oil into a suitable container and dispose of it in an approved manner.

Improper disposal of drained fluids is harmful to the environment.
6. Check the condition of the sealing washer on the engine oil drain bolt.
Replace the washer every other time the oil is changed.
Install the engine oil drain bolt and tighten it to the specified torque: 18 lbf*ft (24 N*m , 2.4 kgf*m)
7. Fill the crankcase with the recommended oil, approximately: 0.8 US qt (0.8 )
8. Install the oil fill cap/dipstick securely.
9. Lock the rear wheel.
10. Start the engine and let it idle for 3-5 minutes.
11. Stop the engine and wait 2-3 minutes.
12. Check that the oil level is at the upper level mark on the oil fill cap/dipstick.
13. Check that there are no oil leaks.
If a torque wrench is not used for installation, see your Honda dealer as soon as possible to verify proper assembly.
Engine Oil Strainer Screen
1. Drain the engine oil
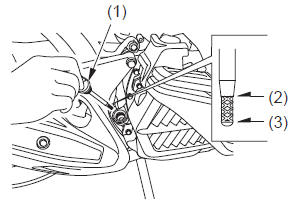
2. Remove the oil strainer screen cap (1), spring (2), oil strainer screen (3 and O-ring (4).
LEFT SIDE
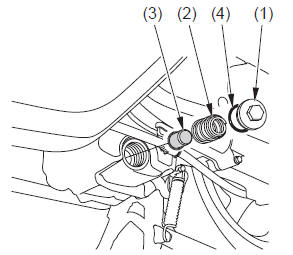
- oil strainer screen cap
- spring
- oil strainer screen
- O-ring
3. Pour the drained oil into a suitable container and dispose of it in an approved manner.
Improper disposal of drained fluids is harmful to the environment.
4. Clean the oil strainer screen.
5. Check the oil strainer screen, sealing rubber, and oil plug O-ring are in good condition.
6. Install the oil strainer screen, spring, and oil strainer screen cap. Tighten the oil strainer screen cap to the specified torque: 15 lbf*ft (20 N*m , 2.0 kgf*m)
7. Check the condition of the sealing washer on the engine oil drain bolt.
Replace the washer every other time the oil is changed.
Install the engine oil drain bolt and tighten it to the specified torque: 18 lbf*ft (24 N*m , 2.4 kgf*m)
8. Fill the crankcase with the recommended oil, approximately: 1.0 US qt (0.9 )
9. Install the oil fill cap/dipstick securely.
10. Lock the rear wheel.
11. Start the engine and let it idle for 3-5 minutes.
12. Stop the engine and wait 2-3 minutes.
13. Check that the oil level is at the upper level mark on the oil fill cap/dipstick.
14. Make sure there are no oil leaks.
If a torque wrench is not used for installation, see your Honda dealer as soon as possible to verify proper assembly.
See also:
 Honda PCX125 - Owner's Manual > Coolant
Your scooter's liquid cooling system dissipates engine heat through the coolant jacket that surrounds the cylinder and cylinder head. Maintaining the coolant will allow the cooling system to work properly and prevent freezing, overheating, and corrosion.
 Rider's Manual BMW R 1250 GS GSA
 Owner's Manual Harley-Davidson Sportster XL1200X Forty-Eight
 Owner's Manual Honda CBR650R
 Service manual Honda CBR650
 Owner's Manual Honda PCX125
 Owner's Manual Kawasaki Z1000SX
 Service manual Kawasaki Z1000SX
 Owner's Manual Lexmoto Echo
 Owner's Manual Royal Enfield Interceptor 650
 Service manual Royal Enfield Interceptor 650
 Owner's Manual Yamaha MT-07