 Kawasaki Z1000SX - Service manual > Coolant
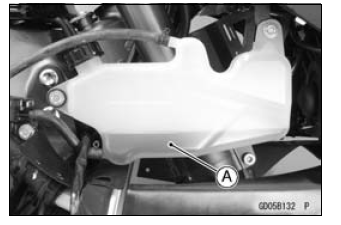
Coolant Deterioration Inspection
- Remove the right lower fairing (see Lower Fairing Removal in the Frame chapter).
- Visually inspect the coolant [A] in the reserve tank.
If whitish cotton-like wafts are observed, aluminum parts in the cooling system are corroded. If the coolant is brown, iron or steel parts are rusting. In either case, flush the cooling system.
If the coolant gives off an abnormal smell, check for a cooling system leak. It may be caused by exhaust gas leaking into the cooling system.
Coolant Level Inspection
- Refer to the Coolant Level in the Periodic Maintenance chapter.
Coolant Draining
- Refer to the Coolant Change in the Periodic Maintenance chapter.
Coolant Filling
- Refer to the Coolant Change in the Periodic Maintenance chapter.
Pressure Testing
- Remove the right lower fairing (see Lower Fairing Removal in the Frame chapter).
- Remove the radiator cap, and install a cooling system pressure tester [A] on the filler neck [B].
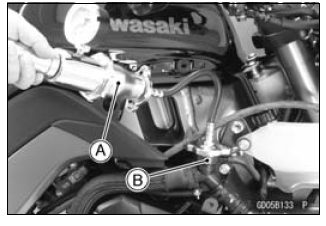
NOTE
- Wet the cap sealing surfaces with water or coolant to prevent pressure leaks.
- Build up pressure in the system carefully until the pressure reaches 123 kPa (1.25 kgf/cm², 18 psi).
NOTICE During pressure testing, do not exceed the pressure for which the system is designed. The maximum pressure is 123 kPa (1.25 kgf/cm², 18 psi).
- Watch the gauge for at least 6 seconds.
If the pressure holds steady, the system is all right.
If the pressure drops and no external source is found, check for internal leaks. Droplets in the engine oil indicate internal leakage. Check the cylinder head gasket and the water pump.
- Remove the pressure tester, replenish the coolant, and install the radiator cap.
Cooling System Flushing
Over a period of time, the cooling system accumulates rust, scale, and lime in the water jacket and radiator. When this accumulation is suspected or observed, flush the cooling system. If this accumulation is not removed, it will clog up the water passage and considerable reduce the efficiency of the cooling system.
- Drain the cooling system (see Coolant Change in the Periodic Maintenance chapter).
- Fill the cooling system with fresh water mixed with a flushing compound.
NOTICE Do not use a flushing compound which is harmful to the aluminum engine and radiator. Carefully follow the instructions supplied by the manufacturer of the cleaning product.
- Warm up the engine, and run it at normal operating temperature for about ten minutes.
- Stop the engine, and drain the cooling system.
- Fill the system with fresh water.
- Warm up the engine and drain the system.
- Repeat the previous two steps once more.
- Fill the system with a permanent type coolant and bleed the air from the system (see Coolant Change in the Periodic Maintenance chapter).
Coolant Reserve Tank Removal/Installation
- The coolant reserve tank is removed and installed during coolant change (see Coolant Change in the Periodic Maintenance chapter).
See also:
 Kawasaki Z1000SX - Service manual > Water Pump
Water Pump Removal Drain: Coolant (see Coolant Change in the Periodic Maintenance chapter) Engine Oil (see Engine Oil Change in the Periodic Maintenance chapter) Remove: Left Lower Fairing (see Lower Fairing Removal in the Frame chapter) Engine Sprocket Cover (see Engine Sprocket Cover Removal in the Final Drive chapter) Remove the water pipe bolts [A] to pull out the water pipes [B] from the water pump cover. Disconnect the neutral switch connector [C]. Loosen the clamp bolt [D] to remove the water hose [E]. Remove: Water Pump Cover Bolts [A] Water Pump Cover [B] Remove: Water Pump Impeller Bolt [A] and Washer Water Pump Impeller [B] Water Pump Housing [C]
 Rider's Manual BMW R 1250 GS GSA
 Owner's Manual Harley-Davidson Sportster XL1200X Forty-Eight
 Owner's Manual Honda CBR650R
 Service manual Honda CBR650
 Owner's Manual Honda PCX125
 Owner's Manual Kawasaki Z1000SX
 Service manual Kawasaki Z1000SX
 Owner's Manual Lexmoto Echo
 Owner's Manual Royal Enfield Interceptor 650
 Service manual Royal Enfield Interceptor 650
 Owner's Manual Yamaha MT-07