 Kawasaki Z1000SX - Service manual > Coupling Bearing Installation
- Replace the bearing with a new one.
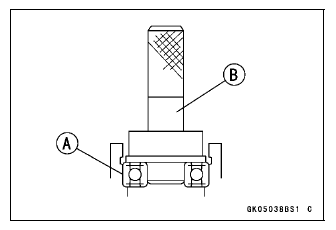
- Press in the bearing [A] until it is bottomed.
Special Tool - Bearing Driver Set [B]: 57001-1129
- Pack the bearing with high-temperature grease.
- Replace the circlip with a new one.
Special Tool - Inside Circlip Pliers: 57001-143
- Replace the grease seal with a new one.
- Press in the grease seal so that the seal surface is flush with the end
of the hole.
- Apply high-temperature grease to the grease seal lip.
Special Tool - Bearing Driver Set: 57001-1129
Coupling Bearing Inspection
Since the coupling bearing is made to extremely close tolerances, the clearance can not normally be measured.
NOTE
- It is not necessary to remove the coupling bearing for inspection. If the bearing is removed, it will need to be replaced with a new one.
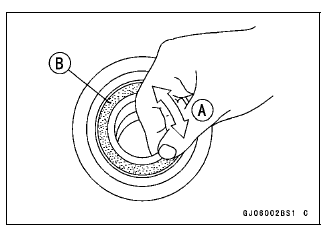
- Turn the bearing in the coupling back and forth [A] while checking for
plays, roughness or binding.
If the bearing play, roughness or binding is found, replace the bearing.
- Examine the bearing seal [B] for tears or leakage.
If the seal is torn ot is leaking, replace the bearing.
Coupling Bearing Lubrication
NOTE
- Since the coupling bearing is packed with grease and sealed, lubrication is not required.
Coupling Damper Inspection
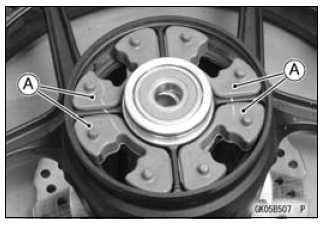
- Remove the rear wheel coupling, and inspect the rubber dampers [A].
- Replace the damper if it appears damaged or deteriorated.
Sprocket Wear Inspection
- Visually inspect the engine and rear sprocket teeth for wear and damage.
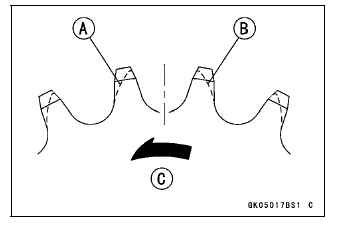
If the teeth are worn as illustrated, replace the sprocket, and inspect the drive chain wear (see Drive Chain Wear Inspection in the Periodic Maintenance chapter).
Worn Tooth (Engine Sprocket) [A]
Worn Tooth (Rear Sprocket) [B]
Direction of Rotation [C]
NOTE
- If a sprocket requires replacement, the chain is probably worn also. When replacing a sprocket, inspect the chain.
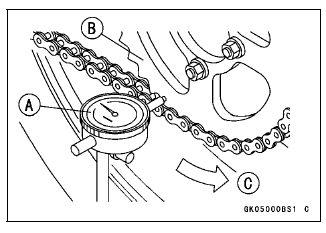
Rear Sprocket Warp Inspection
- Raise the rear wheel off the ground with the stand so that it will turn freely.
- Set a dial gauge [A] against the rear sprocket [B] near the teeth as
shown in the figure, and rotate [C] the rear wheel to measure the sprocket
runout (warp). The difference between the highest and lowest dial gauge
readings is the amount of runout (warp).
If the runout exceeds the service limit, replace the rear sprocket.
Rear Sprocket Warp
Standard: 0.4 mm (0.016 in.) or less
Service Limit: 0.5 mm (0.020 in.)
See also:
 Kawasaki Z1000SX - Service manual > Engine Sprocket Installation
Replace the sprocket washer. Install the engine sprocket so that "OUT SIDE" letters [A] face outward. Apply molybdenum disulfide oil solution to the threads and the seating surface of the engine sprocket nut. Tighten: Torque - Engine Sprocket Nut: 125 N*m (12.7 kgf*m, 92.2 ft*lb)
 Rider's Manual BMW R 1250 GS GSA
 Owner's Manual Harley-Davidson Sportster XL1200X Forty-Eight
 Owner's Manual Honda CBR650R
 Service manual Honda CBR650
 Owner's Manual Honda PCX125
 Owner's Manual Kawasaki Z1000SX
 Service manual Kawasaki Z1000SX
 Owner's Manual Lexmoto Echo
 Owner's Manual Royal Enfield Interceptor 650
 Service manual Royal Enfield Interceptor 650
 Owner's Manual Yamaha MT-07