 Kawasaki Z1000SX - Service manual > Final Drive
Drive Chain Lubrication Condition Inspection
- If a special lubricant is not available, a heavy oil such as SAE 90 is preferred to a lighter oil because it will stay on the chain longer and provide better lubrication.
- If the chain appears especially dirty, clean it before lubrication.
NOTICE The O-rings between the side plates seal in the lubricant between the pin and the bushing. To avoid damaging the O-rings and resultant loss of lubricant, observe the following rules.
Use only kerosene or diesel oil for cleaning of the O-ring of the drive chain. Any other cleaning solution such as gasoline or trichloroethylene will cause deterioration and swelling of the O-ring. Immediately blow the chain dry with compressed air after cleaning.
Complete cleaning and drying the chain within 10 minutes.
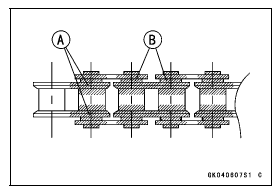
- Apply oil to the sides of the rollers so that oil will penetrate to the rollers and bushings. Apply the oil to the O-rings so that the O-rings will be coated with oil.
- Wipe off any excess oil.
Oil Applied Areas [A]
O-rings [B]
Drive Chain Slack Inspection
NOTE
- Check the slack with the motorcycle setting on its sidestand.
- Clean the chain if it is dirty, and lubricate it if it appears dry.
- Check the wheel alignment (see Wheel Alignment Inspection).
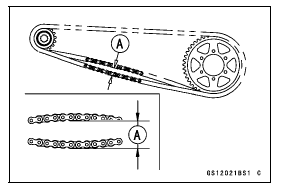
- Rotate the rear wheel to find the position where the chain is tightest.
- Measure the vertical movement (chain slack) [A] midway between the
sprockets.
If the chain slack exceeds the standard, adjust it.
Chain Slack
Standard: 20 - 30 mm (0.8 - 1.2 in.)
Drive Chain Slack Adjustment
- Loosen the left and right chain adjuster clamp bolts [A].
- Using an Allen wrench [B], turn the adjusters [C] forward or rearward until the drive chain has the correct amount of chain slack.
- Tighten:
Torque - Chain Adjuster Clamp Bolts: 64 N*m (6.5 kgf*m, 47 ft*lb)
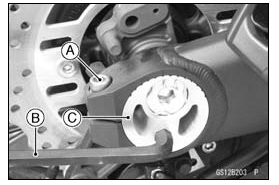
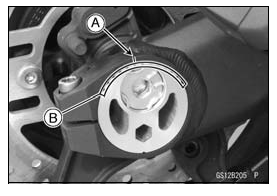
Wheel Alignment Inspection
- Check that the left and right notches [A] the swingarm should point to
the same marks or positions [B] on the left and right adjuster.
If they do not, adjust the chain slack (see Drive Chain Slack Adjustment) and align the wheel alignment.
WARNING Misalignment of the wheel will result in abnormal wear and may result in an unsafe riding condition.
Be sure the wheel is properly aligned.
Wheel Alignment Adjustment
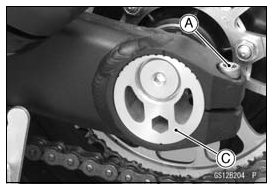
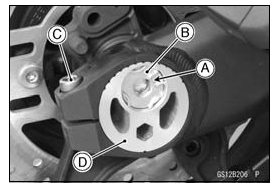
- Remove the right retaining ring [A] from the axle shaft.
- Loosen the axle nut [B].
- Loosen the right chain adjuster clamp bolt [C], and turn the right chain adjuster [D] so that the left and right notches on the swingarm may point to the same marks or positions on the left and right adjusters.
- Tighten:
Torque -
Chain Adjuster Clamp Bolt: 64 N*m (6.5 kgf*m, 47 ft*lb)
Rear Axle Nut: 98 N*m (10 kgf*m, 72 ft*lb)
Drive Chain Wear Inspection
- Remove the chain cover (see Drive Chain Removal in the Final Drive chapter).
- Rotate the rear wheel to inspect the drive chain for damaged rollers,
and loose pins and links.
If there is any irregularity, replace the drive chain.
Lubricate the drive chain if it appears dry.
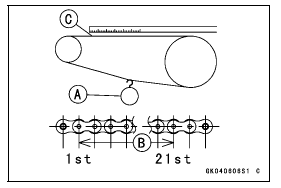
- Stretch the chain taut by hanging a 98 N (10 kg, 20 lb) weight [A] on the chain.
- Measure the length of 20 links [B] on the straight part [C] of the chain
from the pin center of the 1st pin to the pin center of the 21st pin. Since
the chain may wear unevenly, take measurements at several places.
If any measurements exceed the service limit, replace the chain. Also, replace the front and rear sprockets when the drive chain is replaced.
Drive Chain 20-link Length
Standard: 317.5 - 318.2 mm (12.50 - 12.53 in.)
Service Limit: 319 mm (12.56 in.)
WARNING A chain that breaks or jumps off the sprockets could snag on the engine sprocket or lock the rear wheel, severely damaging the motorcycle and causing it to go out of control. Inspect the chain for damage and proper adjustment before each ride.
If chain wear exceeds the service limit, replace it with the standard chain.
Standard Chain
Make: ENUMA
Type: EK525ZX
Link: 112 Links
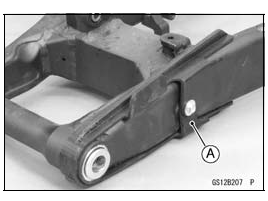
Chain Guide Wear Inspection
- Remove the swingarm (see Swingarm Removal in the Suspension chapter).
- Visually inspect the chain guide [A].
Replace the chain guide if it shows any signs of abnormal wear or damage.
See also:
 Kawasaki Z1000SX - Service manual > Wheels/Tires
Air Pressure Inspection Remove the air valve cap. Measure the tire air pressure with an air pressure gauge [A] when the tires are cold (that is, when the motorcycle has not been ridden more than a mile during the past 3 hours). Install the air valve cap.
Kawasaki Z1000SX - Service manual > Brakes
Brake Fluid Leak (Brake Hose and Pipe) Inspection For ABS equipped models, remove the fuel tank (see Fuel Tank Removal in the Fuel System (DFI) chapter). Apply the brake lever or pedal and inspect the brake fluid leak from the brake hoses [A], pipes (ABS equipped models) [B] and fittings [C].
 Rider's Manual BMW R 1250 GS GSA
 Owner's Manual Harley-Davidson Sportster XL1200X Forty-Eight
 Owner's Manual Honda CBR650R
 Service manual Honda CBR650
 Owner's Manual Honda PCX125
 Owner's Manual Kawasaki Z1000SX
 Service manual Kawasaki Z1000SX
 Owner's Manual Lexmoto Echo
 Owner's Manual Royal Enfield Interceptor 650
 Service manual Royal Enfield Interceptor 650
 Owner's Manual Yamaha MT-07