 Kawasaki Z1000SX - Service manual > Front Fork Assembly
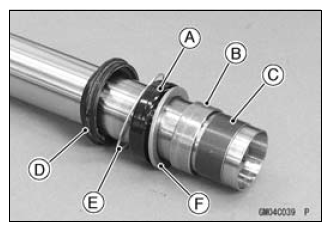
- Replace the following parts with new one.
Oil Seal [A]
Outer Tube Guide Bushing [B]
Inner Tube Guide Bushing [C]
Dust Seal [D]
Retaining Ring [E]
Bottom Allen Bolt Gasket - Install the following parts onto the inner tube.
Dust Seal
Retaining Ring
Oil Seal
Washer [F]
Outer Tube Guide Bushing
Inner Tube Guide Bushing
- Insert the inner tube to the outer tube.
- Fit the new outer tube guide bushing [A] into the outer tube.
NOTE
- When assembling the new outer tube guide bushing, hold the washer against the new outer tube guide bushing and tap the washer with the fork oil seal driver [B] until it stops.
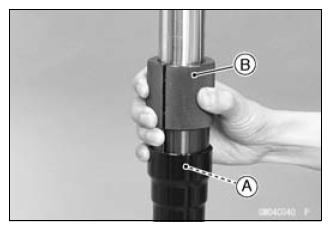
Special Tool - Fork Oil Seal Driver,
41: 57001-1288
- Install the oil seal by using the fork oil seal driver.
Special Tool - Fork Oil Seal Driver,
- Install the retaining ring and dust seal into the outer tube.
- Install the center ring plate [A] on the cylinder unit.
- Insert the center ring plate and cylinder unit as a set into the inner tube.
- Insert the suitable pipe into the cylinder unit.
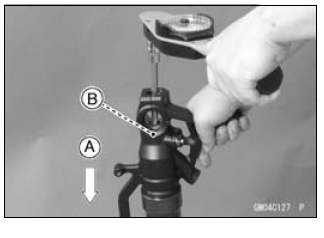
- While pushing down [A] the fork leg, tighten the front fork bottom Allen bolt [B].
- Tighten:
Torque - Front Fork Bottom Allen Bolts: 35 N*m (3.6 kgf*m, 26 ft*lb) - Pour in the specified type of oil (see Fork Oil Change).
Inner Tube, Outer Tube Inspection
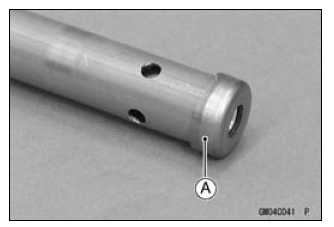
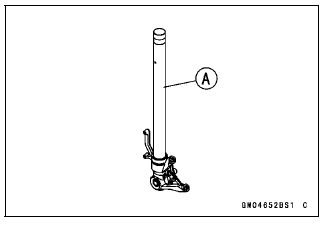
- Visually inspect the inner tube [A], and repair any damage.
- Nick or rust damage can sometimes be repaired by using a wet-stone to
remove sharp edges or raised areas which cause seal damage.
If the damage is not repairable, replace the inner tube.
Since damage to the inner tube damages the oil seal, replace the oil seal whenever the inner tube is repaired or replaced.
NOTICE If the inner tube is badly bent or creased, replace it. Excessive bending, followed by subsequent straightening, can weaken the inner tube.
- Temporarily assemble the inner tube [A] and outer tube [B], and pump [C]
them back and forth manually to check for smooth operation.
If you feel binding or catching, the inner and outer tubes must be replaced.

WARNING A straightened inner or outer fork tube may fall in use, possibly causing an accident resulting in serious injury or death. Replace a badly bent or damaged inner or outer tube and inspect the other tube carefully before reusing it.
Dust Seal Inspection
- Inspect the dust seal [A] for any signs of deterioration or damage.
Replace it if necessary.

Spring Tension Inspection
- Since a spring becomes shorter as it weakens, check its free length [A]
to determine its condition.
If the spring of either fork leg is shorter than the service limit, it must be replaced. If the length of a replacement spring and that of the remaining spring vary greatly, the remaining spring should also be replaced in order to keep the fork legs balanced for motorcycle stability.
Spring Free Length
Standard: 313 mm (12.3 in.)
Service Limit: 307 mm (12.1 in.)

See also:
 Kawasaki Z1000SX - Service manual > Front Fork Removal (Each Fork Leg)
Remove: Upper Fairing (see Upper Fairing Removal in the Frame chapter) Front Wheel (see Front Wheel Removal in the Wheels/Tires chapter) Remove the handle bar holder bolt [A]. Loosen the upper front fork clamp bolts [B] and lower front clamp bolts [C]. If fork leg is to be disassembled, loosen the upper and lower front fork clamp bolts to lower the fork leg [A] as shown. And retighten the lower front fork clamp bolts.
Kawasaki Z1000SX - Service manual > Rear Shock Absorber
Rebound Damping Force Adjustment To adjust the rebound damping force, turn the lower damping adjuster [A] to the desired position, until you feel a click. The standard adjuster setting is the 1 1/4 turns out from the fully clockwise position.
 Rider's Manual BMW R 1250 GS GSA
 Owner's Manual Harley-Davidson Sportster XL1200X Forty-Eight
 Owner's Manual Honda CBR650R
 Service manual Honda CBR650
 Owner's Manual Honda PCX125
 Owner's Manual Kawasaki Z1000SX
 Service manual Kawasaki Z1000SX
 Owner's Manual Lexmoto Echo
 Owner's Manual Royal Enfield Interceptor 650
 Service manual Royal Enfield Interceptor 650
 Owner's Manual Yamaha MT-07