 Kawasaki Z1000SX - Service manual > Rear Shock Absorber
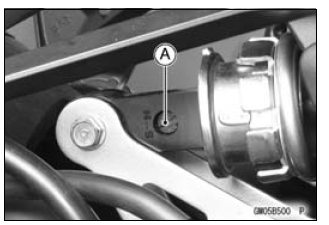
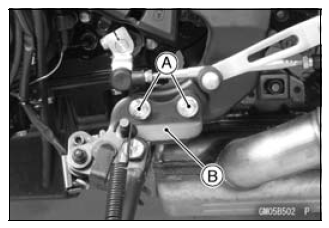
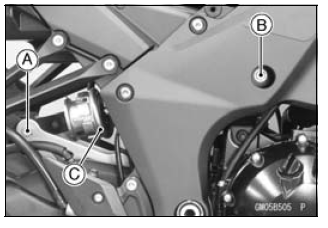
Rebound Damping Force Adjustment
- To adjust the rebound damping force, turn the lower damping adjuster [A]
to the desired position, until you feel a click.
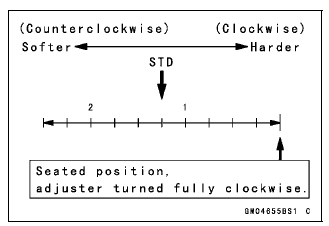
- The standard adjuster setting is the 1 1/4 turns out from the fully clockwise position.
Rebound Damping Force Adjustment
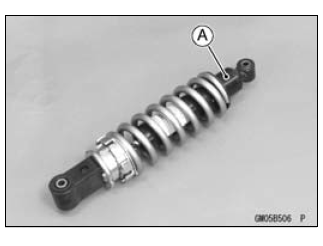
Spring Preload Adjustment
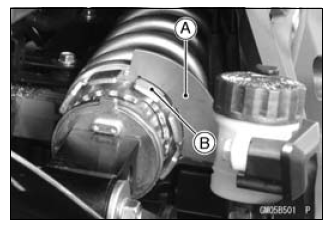
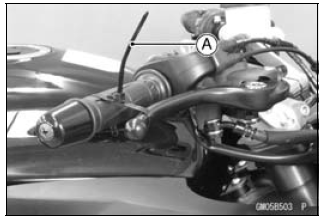
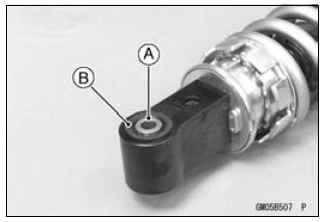
- Using the hook wrench [A], turn the adjusting ring [B] to adjust the spring preload.
Special Tool - Hook Wrench T = 3.2 R37: 57001-1539
- The standard adjusting ring is 4th step from the weakest position.
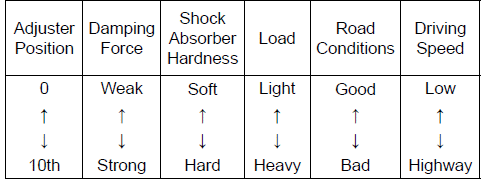
Spring Preload Setting
Standard Position: 4th position
Adjustable Range: 0 - 10th position
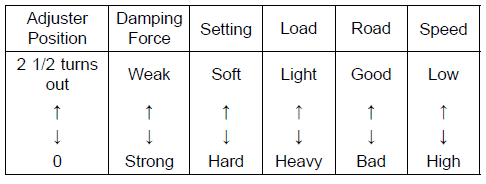
If the compression of the spring is not suited to the operating conditions, adjust it to an appropriate position by referring to the table below.
Spring Preload Adjustment
Rear Shock Absorber Removal
- Support the motorcycle with the stand.
- Remove:
Bolts [A]
Sidestand Bracket [B] with the Sidestand
- Squeeze the brake lever slowly and hold it with a band [A].
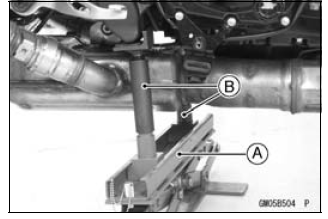
- Raise the rear wheel off the ground with the jack.
Special Tools -
Jack [A]: 57001-1238
Jack Attachment [B]: 57001-1608
WARNING Be sure to hold the front brake when removing the shock absorber, or the motorcycle may fall over. It could cause an accident and injury.
- Remove:
Lower Rear Shock Absorber Nut and Bolt [A]
Upper Rear Shock Absorber Bolt [B] - Remove the rear shock absorber [C] from rearside.
Rear Shock Absorber Installation
- Tighten:
Torque - Rear Shock Absorber Bolt and Nut (Upper and Lower ): 34 N*m (3.5 kgf*m, 25 ft*lb)
Rear Shock Absorber Inspection
- Remove the rear shock absorber (see Rear Shock Absorber Removal).
- Visually inspect the following items.
Smooth Stroke
Oil Leakage
Crack or Dent
If there is any damage to the rear shock absorber, replace it.
- Visually inspect the rubber bushing.
If it show any signs of damage, replace it.
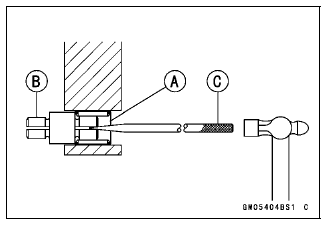
Rear Shock Absorber Scrapping
WARNING Since the rear shock absorber contains nitrogen gas, do not incinerate the rear shock absorber without first releasing the gas or it may explode. Before a rear shock absorber is scrapped, drill a hole at the point [A] shown to release the nitrogen gas completely.
Wear safety glasses when drilling the hole, as the gas may blow out bits of drilled metal when the hole opens.
Rear Shock Absorber Bearing Removal
- Remove:
Rear Shock Absorber (see Rear Shock Absorber Removal)
Sleeve [A]
Grease Seals [B]
- Remove the needle bearing [A], using the bearing remover head [B] and
bearing remover shaft [C].
Special Tools -
Bearing Remover Head, 15 × 17:
57001 -1267
15 × 17:
57001 -1267
Bearing Remover Shaft13:
57001-1377
Rear Shock Absorber Bearing Installation
- Replace the needle bearing [A] and grease seals [B] with new ones.
- Apply plenty of grease to the lips of the grease seals.
- Install the needle bearing position as shown.
[C] 7.5 mm (0.30 in.)
- Install the grease seals and sleeve [D].

See also:
 Kawasaki Z1000SX - Service manual > Front Fork Assembly
Replace the following parts with new one. Oil Seal [A] Outer Tube Guide Bushing [B] Inner Tube Guide Bushing [C] Dust Seal [D] Retaining Ring [E] Bottom Allen Bolt Gasket Install the following parts onto the inner tube. Dust Seal Retaining Ring Oil Seal Washer [F] Outer Tube Guide Bushing Inner Tube Guide Bushing Insert the inner tube to the outer tube. Fit the new outer tube guide bushing [A] into the outer tube.
Kawasaki Z1000SX - Service manual > Swingarm
Swingarm Removal Remove: Rear Brake Hose Lower End (see Rear Caliper Removal in the Brakes chapter) Rear Wheel (see Rear Wheel Removal in the Wheels/Tires chapter) Mud Guard (see Mad Guard Removal in the Frame chapter) Rocker Arm (see Rocker Arm Removal) Remove: Cotter Pin [A] Bolt and Nut [B] Move the torque link [C] downward. Remove: Brake Hose Clamp Bolt [A] Clear the brake hose [B] from the guide [C] on the swingarm. Unscrew the swingarm pivot shaft nut [A]. Using the swingarm pivot nut wrench [A], loosen the swingarm pivot adjusting collar locknut [B].
 Rider's Manual BMW R 1250 GS GSA
 Owner's Manual Harley-Davidson Sportster XL1200X Forty-Eight
 Owner's Manual Honda CBR650R
 Service manual Honda CBR650
 Owner's Manual Honda PCX125
 Owner's Manual Kawasaki Z1000SX
 Service manual Kawasaki Z1000SX
 Owner's Manual Lexmoto Echo
 Owner's Manual Royal Enfield Interceptor 650
 Service manual Royal Enfield Interceptor 650
 Owner's Manual Yamaha MT-07