 Kawasaki Z1000SX - Service manual > Front Wheel Removal
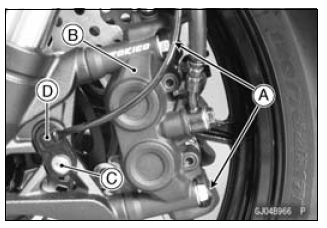
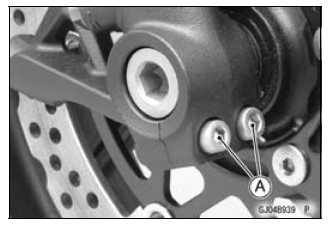
- Remove:
Front Caliper Mounting Bolts [A] (Both Sides)
Front Calipers [B] (Both Sides)
Lower Fairing (see Lower Fairing Removal in the Frame chapter)
Front Fender (see Front Fender Removal in the Frame chapter) - For the ABS equipped Models, remove the bolt [C] and front wheel rotation sensor [D].
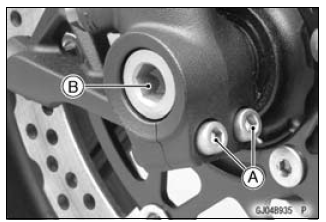
- Loosen:
Front Axle Clamp Bolts [A] (Loosen)
Front Axle [B]
- For the oxygen sensor equipped Models, remove the oxygen sensor (see Oxygen Sensor Removal (Equipped Models) in the Electrical System chapter).
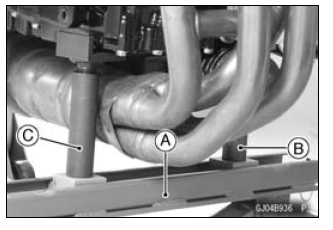
- Raise the front wheel off the ground.
Special Tools -
Jack [A]: 57001-1238
Attachment Jack [B]: 57001-1252
Jack Attachment [C]: 57001-1608 - Pull out the axle to the right and drop the front wheel out of the forks.
NOTICE Do not lay the wheel down on one of the discs. This can damage or warp the disc. Place blocks under the wheel so that the disc does not touch the ground.
Front Wheel Installation
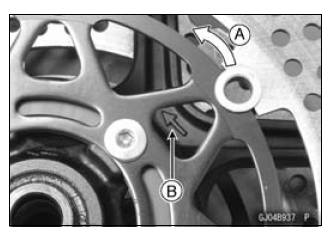
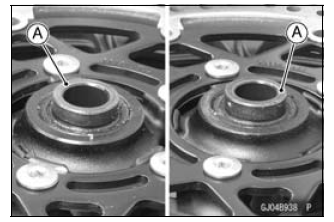
NOTE
- The direction of the wheel rotation [A] is shown by an arrow [B] on the wheel spoke.
- Check the wheel rotation mark on the front wheel and install it.
- Apply high-temperature grease to the grease seal lips.
- Fit the collars [A] on the both sides of the hub.
- The collars are identical. -Insert the front axle.
- Tighten:
Torque - Front Axle: 108 N*m (11.0 kgf*m, 79.7 ft*lb)
- Before tightening the axle clamp bolts [A] on the right front fork leg, pump the front fork up and down 4 or 5 times to allow the right front fork leg to seat on the front axle.
NOTE
- Put a block in front of the front wheel to stop moving.
- Tighten:
Torque - Front Axle Clamp Bolts: 20 N*m (2.0 kgf*m, 15 ft*lb)
NOTE
- Tighten the two clamp bolts alternately two times to ensure even tightening torque.
- Install the removed parts (see appropriate chapters).
- Check the front brake effectiveness (see Brake Operation Inspection in the Periodic Maintenance chapter).
WARNING After servicing, it takes several applications of the brake lever before the brake pads contact the disc, which could result in increased stopping distance and cause an accident resulting in injury or death.
Do not attempt to ride the motorcycle until a firm brake lever is obtained by pumping the lever until the pads are against the disc.
See also:
 Kawasaki Z1000SX - Service manual > Rear Wheel Removal
Raise the rear wheel off the ground with the stand [A]. Loosen the torque link nuts [A] lightly for chain adjuster turn easily. Remove: Rear Caliper Mounting Bolts [A] Rear Caliper [B] For ABS equipped Models, remove the bolt [A], clamp [B] and rear wheel rotation sensor [C]. Loosen the chain adjuster clamp bolts [A] (Both Sides). Turn the chain adjuster [B] to make the chain slack. Remove: Retaining Rings [C] (Both Sides) Rear Axle Nut [D] Washer Remove: Rear Axle [A] (from Left Side) Remove the drive chain [A] from the rear sprocket toward the left. Move the rear wheel back and remove it.
 Rider's Manual BMW R 1250 GS GSA
 Owner's Manual Harley-Davidson Sportster XL1200X Forty-Eight
 Owner's Manual Honda CBR650R
 Service manual Honda CBR650
 Owner's Manual Honda PCX125
 Owner's Manual Kawasaki Z1000SX
 Service manual Kawasaki Z1000SX
 Owner's Manual Lexmoto Echo
 Owner's Manual Royal Enfield Interceptor 650
 Service manual Royal Enfield Interceptor 650
 Owner's Manual Yamaha MT-07