 Honda CBR650 - Service manual > Headlight
BULB REMOVAL/INSTALLATION
NOTICE
Avoid touching the halogen bulb. Finger prints can create hot spots that cause a bulb to break.
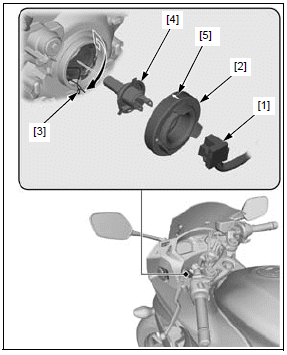
CBR650F/FA
Disconnect the headlight 3P (Black) connector [1] and remove the dust cover [2].
Unhook the bulb retainer [3] and remove the headlight bulb [4].
Installation is in the reverse order of removal.
NOTE:
- Align the bulb tab with the groove properly.
- Install the dust cover with its arrow mark [5] facing up.
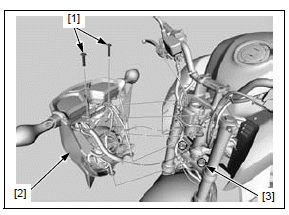
CB650F/FA
Remove the two bolts [1].
Remove the headlight assembly [2] by releasing it from the holes [3] of the bottom bridge and support it securely, being careful not to damage the front sub wire harness.
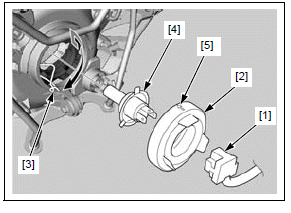
Disconnect the headlight 3P (Black) connector [1].
Remove the dust cover [2].
Unhook the bulb retainer [3] and remove the headlight bulb [4].
Installation is in the reverse order of removal.
NOTE:
- Align the bulb tabs with the grooves properly.
- Install the dust cover with its arrow mark [5] facing up.
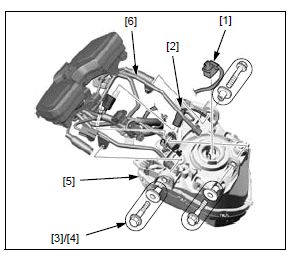
HEADLIGHT UNIT REMOVAL/ INSTALLATION
CB650F/FA:
Remove the headlight stay assembly from the headlight cover assembly.
Disconnect the headlight 3P (Black) connector [1] and position light 4P (Black) connector [2].
Remove the three bolts [3], collars [4] and headlight unit [5] from the headlight stay [6].
Installation is in the reverse order of removal.
Position light
INSPECTION
Turn the ignition switch ON and engine stop switch " ".
".
Check the position light operation.
Check that LEDs in the headlight unit illuminate with the ignition switch ON.
If any LED does not turn on, replace the headlight unit.
Turn signal light
BULB REMOVAL/INSTALLATION
Remove the screw [1] and collar [2].
Remove the turn signal light lens [3] by releasing the tab [4].
While pushing the bulb [5] in, turn it counterclockwise to remove it.
Make sure the rubber seal [6] in the light housing is installed in position and is in good condition, and replace it with a new one if necessary.
Installation is in the reverse order of removal.
TORQUE:
Turn signal light lens screw:
1.5 N*m (0.2 kgf*m, 1.1 lbf*ft)

FRONT TURN SIGNAL LIGHT UNIT REMOVAL/INSTALLATION
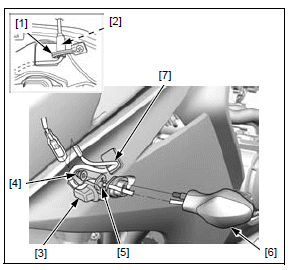
CBR650F/FA
Open the wire clamp [1] and disconnect the front turn signal light 3P connector [2] (left: Orange, right: Light blue).
Release the rubber cap [3].
Remove the following:
- Cap nut [4]
- SettIng plate [5]
Remove the front turn signal light unit [6] by pulling the wire [7] out from the rubber cap and cowl.
Installation is in the reverse order of removal.
TORQUE:
Front turn signal light mounting nut:
10 N*m (1.0 kgf*m, 7 lbf*ft)
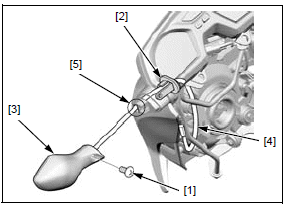
CB650F/FA
Remove the headlight assembly from the bottom bridge.
Remove the turn signal light mounting screw [1] and plate [2].
Remove the turn signal light unit [3] by pulling the wire [4] out from the hole [5] of the mounting rubber.
Installation is in the reverse order of removal.
TORQUE:
Rear turn signal light mounting screw:
2.5 N*m (0.3 kgf*m, 1.8 lbf*ft)
REAR TURN SIGNAL LIGHT REMOVAL/INSTALLATION
Remove the following:
- Rear fender A
- Seat
Disconnect the turn signal light 2P connector [1] (left: Orange, right: Light blue).
Remove the turn signal light mounting screw [2] and plate [3].
Remove the turn signal light unit [4] by pulling the wire [5] out from the holes [6] of the rear fender B and mounting rubber.
Installation is in the reverse order of removal.
TORQUE:
Rear turn signal light mounting screw:
2.5 N*m (0.3 kgf*m, 1.8 lbf*ft)

Brake/tail light
INSPECTION
Turn the ignition switch ON and engine stop switch "".
Check the brake/tail light operation.
Check that tail light LEDs in the brake/tail light unit illuminate with the ignition switch ON.
Check that brake light LEDs in the brake/tail light unit illuminate with the front brake lever and/or rear brake pedal applied.
If any LED does not turn on, replace the rear combination light unit.
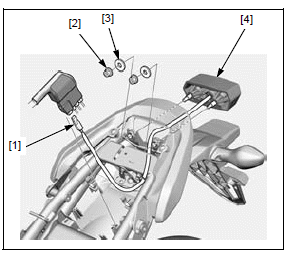
BRAKE/TAIL LIGHT UNIT REMOVAL/ INSTALLATION
Remove the following:
- Rear fender A
- Seat
Disconnect the brake/tail light 3P (White) connector [1].
Remove the two nuts [2], washers [3] and brake/tail light unit [4].
Installation is in the reverse order of removal.
License light
BULB REMOVAL/INSTALLATION
Remove the two tapping screws [1] and license light lens [2].
Pull the bulb [3] out of the socket without turning it.
Make sure the rubber seal [4] on the license light base is installed in position and is in good condition, and replace it with a new one if necessary.
Installation is in the reverse order of removal.
TORQUE:
Tail light lens screw:
1.0 N*m (0.1 kgf*m, 0.7 lbf*ft)

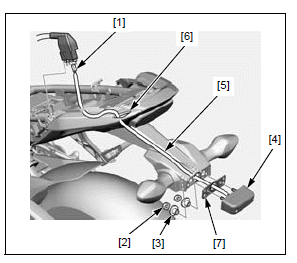
LICENSE LIGHT REMOVAL/ INSTALLATION
Remove the following:
- Rear fender A
- Seat
Disconnect the license light 2P (White) connector [1].
Remove the two nuts [2] and collars [3].
Remove the license light unit [4] by pulling the wire [5] out from the hole [6] of the rear fender B.
Remove the packing [7] from the license light unit and replace it with new one if necessary.
Installation is in the reverse order of removal.
See also:
 Honda CBR650 - Service manual > Service information/system location
Service information GENERAL NOTICE Note the following when replacing the halogen headlight bulb. Wear clean gloves while replacing the bulb. Do not put fingerprints on the headlight bulb, as they may create hot spots on the bulb and cause it to fail. If you touch the bulb with your bare hands, clean it with a cloth moistened with alcohol to prevent its early failure.
Honda CBR650 - Service manual > Combination meter
INITIAL OPERATION CHECK When the ignition switch is turned ON with the engine stop switch "", the combination meter will show the entire digital display and the tachometer segments [1] will increase to full scale, then reduce from full scale to zero.
 Rider's Manual BMW R 1250 GS GSA
 Owner's Manual Harley-Davidson Sportster XL1200X Forty-Eight
 Owner's Manual Honda CBR650R
 Service manual Honda CBR650
 Owner's Manual Honda PCX125
 Owner's Manual Kawasaki Z1000SX
 Service manual Kawasaki Z1000SX
 Owner's Manual Lexmoto Echo
 Owner's Manual Royal Enfield Interceptor 650
 Service manual Royal Enfield Interceptor 650
 Owner's Manual Yamaha MT-07