 Honda CBR650 - Service manual > Maintenance schedule
SERVICE INFORMATION
GENERAL
- Place the motorcycle on a level surface before starting any work.
Maintenance schedule
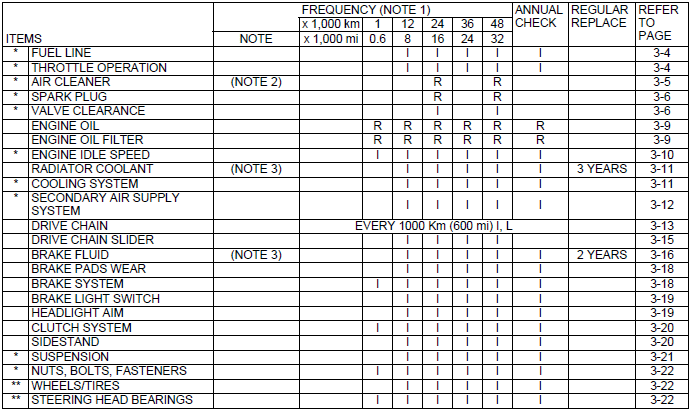
ED, KO, RU, U MODEL
Perform the Pre-ride inspection in the Owner's Manual at each scheduled maintenance period.
I: Inspect and Clean, Adjust, Lubricate or Replace if necessary.
C: Clean.
R: Replace.
A: Adjust.
L: Lubricate.
The following items require some mechanical knowledge. Certain items (particularly those marked * and **) may require more technical information and tools. Consult a dealer.
* Should be serviced by a dealer, unless the owner has proper tools and
service data and is mechanically qualified.
** In the interest of safety, we recommend these items be serviced only by a
dealer.
Honda recommends that a dealer should road test the motorcycle after each periodic maintenance is carried out.
NOTES:
1. At higher odometer readings, repeat at the frequency interval established here.
2. Service more frequently when riding in unusually wet or dusty areas.
3. Replacement requires mechanical skill.
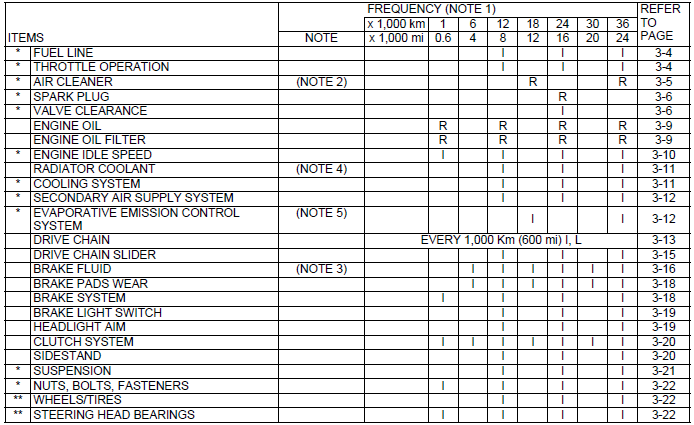
TH, MA, BR MODEL
Perform the Pre-ride inspection in the Owner's Manual at each scheduled maintenance period.
I: Inspect and Clean, Adjust, Lubricate or Replace if necessary.
C: Clean.
R: Replace.
A: Adjust.
L: Lubricate.
The following items require some mechanical knowledge. Certain items (particularly those marked * and **) may require more technical information and tools. Consult a dealer.
* Should be serviced by a dealer, unless the owner has proper tools and
service data and is mechanically qualified.
** In the interest of safety, we recommend these items be serviced only by a
dealer.
Honda recommends that a dealer should road test the motorcycle after each periodic maintenance is carried out.
NOTES:
1. At higher odometer readings, repeat at the frequency interval established here.
2. Service more frequently when riding in unusually wet or dusty areas.
3. Replace every 2 years. Replacement requires mechanical skill.
4. Replace every 3 years. Replacement requires mechanical skill.
5. TH model only
FUEL LINE
FUEL TANK LIFTING/LOWERING
Remove the following:
- Upper cowl B (CBR650F/FA)
- Tank shroud B (CB650F/FA)
- Body cover
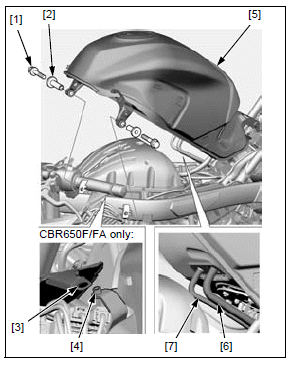
Remove the two bolts [1] and collars [2].
CBR650F/FA only:
Release the meter panel holes [3] from the tank bosses [4].
Lift the front side of the fuel tank [5] slightly.
Disconnect the following:
- Fuel tank drain hose [6]
- Fuel tank breather hose [7] (Except TH model)
- Fuel tank-to-EVAP canister hose [7] (TH model)
Support the fuel tank by placing a suitable support block between the frame (flat surface area) and tank.
Installation is in the reverse order of removal.
NOTE:
- Check that the fuel tank hoses are not bent or pinched.
INSPECTION
Lift the fuel tank and support it.
Check the fuel feed hose for deterioration, damage or leakage.
Also, check the hose fittings for damage or looseness.
Replace the fuel feed hose if necessary.
THROTTLE OPERATION
Check for any deterioration or damage to the throttle cable. Check the throttle grip for smooth operation.
Check that the throttle opens and automatically closes in all steering positions.
If the throttle grip does not return properly, lubricate and overhaul the throttle grip housing.
- CBR650F/FA
- CB650F/FA
If the throttle grip still do not return properly, replace the throttle cables.
With the engine idling, turn the handlebar all the way to the right and left to ensure that the idle speed does not change.
If idle speed increases, check the throttle grip freeplay and throttle cable routing.
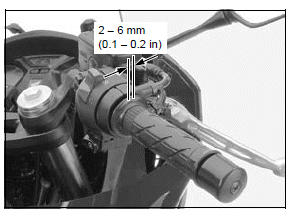
Measure the throttle grip freeplay at the throttle grip flange.
FREEPLAY: 2 - 6 mm (0.1 - 0.2 in)
Throttle grip freeplay can be adjusted at either end of the throttle cable.
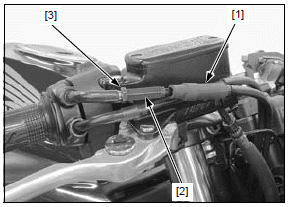
Minor adjustment is made with the upper adjuster of the throttle grip side.
Slide the boot [1] to remove it from the adjuster [2].
Loosen the lock nut [3] and turn the adjuster as required.
Tighten the lock nut to the specified torque while holding the adjuster.
TORQUE: 3.8 N*m (0.4 kgf*m, 2.8 lbf*ft)
Install the boot over the adjuster properly.
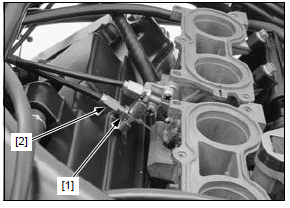
Major adjustment is made with the lower adjuster on the throttle body.
Remove the air cleaner housing.
Loosen the lock nut [1] and turn the adjuster [2] as required.
Tighten the lock nut to the specified torque while holding the adjuster.
TORQUE: 5.5 N*m (0.6 kgf*m, 4.1 lbf*ft)
After adjustment, recheck the throttle operation.
Install the air cleaner housing.
See also:
 Honda CBR650 - Service manual > Air cleaner
NOTE: The viscous paper element type air cleaner cannot be cleaned because the element contains a dust adhesive. If the motorcycle is used in unusually wet or dusty areas, more frequent inspections are required.
 Rider's Manual BMW R 1250 GS GSA
 Owner's Manual Harley-Davidson Sportster XL1200X Forty-Eight
 Owner's Manual Honda CBR650R
 Service manual Honda CBR650
 Owner's Manual Honda PCX125
 Owner's Manual Kawasaki Z1000SX
 Service manual Kawasaki Z1000SX
 Owner's Manual Lexmoto Echo
 Owner's Manual Royal Enfield Interceptor 650
 Service manual Royal Enfield Interceptor 650
 Owner's Manual Yamaha MT-07