 Kawasaki Z1000SX - Service manual > Master Cylinder
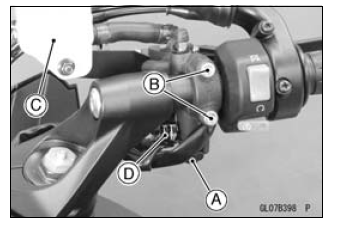
Front Master Cylinder Removal
- Remove the rear view mirror (see Rear View Mirror Removal in the Frame chapter).
- Remove the banjo bolt [A] to disconnect the brake hose from the master cylinder (see Brake Hose Removal/Installation).
- Unscrew the clamp bolts [B], and take off themaster cylinder [C] as an assembly with the reservoir, brake lever, and brake switch installed.
- Disconnect the front brake light switch connector [D].
NOTICE Immediately wash away any brake fluid that spills.
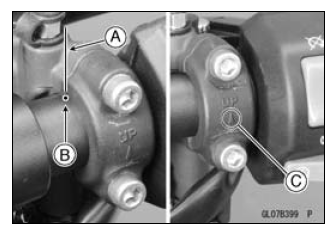
Front Master Cylinder Installation
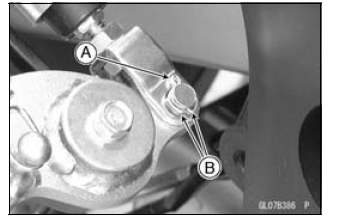
- Set the front master cylinder to match its mating surface [A] to the punch mark [B] of the handlebar.
- The master cylinder clamp must be installed with the arrow mark [C] upward.
- Tighten the upper clamp bolt first, and then the lower clamp bolt.
Torque - Front Master Cylinder Clamp Bolts: 11 N*m (1.1 kgf*m, 97 in*lb)
- Replace the washers that are on each side of the hose fitting with new ones.
- Tighten:
Torque - Brake Hose Banjo Bolts: 25 N*m (2.5 kgf*m, 18 ft*lb) - Bleed the brake line (see Brake Line Bleeding).
- Check the brake for good braking power, no brake drag, and no fluid leakage.
Rear Master Cylinder Removal
- Remove the rear lower fairing (see Rear Lower Fairing Removal in the Frame chapter).
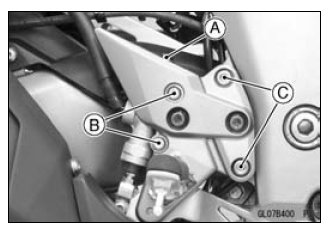
- Looen:
Brake Hose Banjo Bolt [A]
Rear Master Cylinder Mounting Bolts [B] - Remove the footpeg bracket bolts [C].
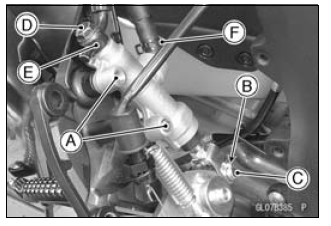
- Remove:
Rear Master Cylinder Mounting Bolts [A]
Cotter Pin [B]
Joint Pin [C]
Brake Hose Banjo Bolt [D]
Brake Hose [E] - Slide out the clamp [F].
- Pull off the reservoir hose lower end, and drain the brake fluid into a container.
Rear Master Cylinder Installation
- Replace the cotter pin [A] with a new one.
- Insert the cotter pin and bend the pin ends [B].
- Replace the washers on each side of hose fitting with new ones.
- Depress the brake pedal [A] to align the holes of the master cylinder, then install the master cylinder mounting bolts [B].
- Tighten the following bolts.
Torque -
Front Footpeg Bracket Bolts: 25 N*m (2.5 kgf*m, 18 ft*lb)
Rear Master Cylinder Mounting Bolts: 25 N*m (2.5 kgf*m, 18 ft*lb)
Brake Hose Banjo Bolts: 25 N*m (2.5 kgf*m, 18 ft*lb)

NOTE
- After installation, check that the rear brake light switch spring is hooked on the return spring.
- Bleed the brake line (see Brake Line Bleeding).
- Check the brake for good braking power, no brake drag, and no fluid leakage.
Front Master Cylinder Disassembly
- Refer to the Master Cylinder Rubber Parts Replacement in the Periodic Maintenance chapter.
Rear Master Cylinder Disassembly
- Refer to the Master Cylinder Rubber Parts Replacement in the Periodic Maintenance chapter.
Master Cylinder Assembly
- Refer to the Master Cylinder Rubber Parts Replacement in the Periodic Maintenance chapter.
Master Cylinder Inspection (Visual Inspection)
- Remove the master cylinders (see Front/Rear Master Cylinder Removal).
- Disassemble the front and rear master cylinders (see Master Cylinder Rubber Parts Replacement in the Periodic Maintenance chapter).
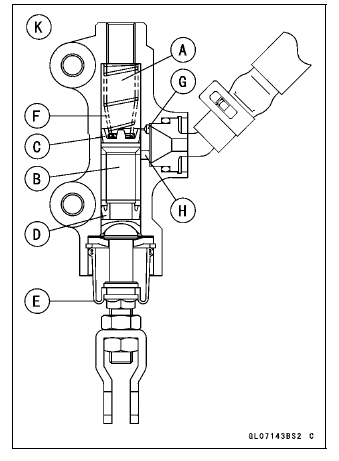
- Check that there are no scratches, rust or pitting on the inner wall [A] of each master cylinder and on the outside of each piston [B].
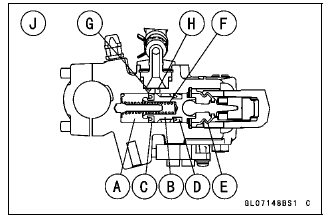
If a master cylinder or piston shows any damage, replace them.
- Inspect the primary cup [C] and secondary cup [D].
If a cup is worn, damaged softened (rotted), or swollen, the piston assembly should be replaced to renew the cups.
If fluid leakage is noted at the brake lever, the piston assembly should be replaced to renew the cups.
- Check the dust covers [E] for damage.
If they are damaged, replace them.
- Check the piston return springs [F] for any damage.
If the springs are damaged, replace them.
- Check that relief port [G] and supply port [H] are not plugged.
If the relief port becomes plugged, the brake pads will drag on the disc. Blow the ports clean with compressed air.
Front Master Cylinder [J]
Rear Master Cylinder [K]
See also:
 Kawasaki Z1000SX - Service manual > Brake Pads
Front Brake Pad Removal Loosen the pad pins [A]. Remove the front caliper with the hose installed (see Front Caliper Removal). Remove: Pad Pins [A] Brake Pads [B]
Kawasaki Z1000SX - Service manual > Brake Disc
Brake Disc Removal Remove the wheels (see Front/Rear Wheel Removal in the Wheels/Tires chapter). Unscrew the mounting bolts [A], and take off the disc [B]. Remove the gaskets.
 Rider's Manual BMW R 1250 GS GSA
 Owner's Manual Harley-Davidson Sportster XL1200X Forty-Eight
 Owner's Manual Honda CBR650R
 Service manual Honda CBR650
 Owner's Manual Honda PCX125
 Owner's Manual Kawasaki Z1000SX
 Service manual Kawasaki Z1000SX
 Owner's Manual Lexmoto Echo
 Owner's Manual Royal Enfield Interceptor 650
 Service manual Royal Enfield Interceptor 650
 Owner's Manual Yamaha MT-07