 Kawasaki Z1000SX - Service manual > Brake Pads
Front Brake Pad Removal
- Loosen the pad pins [A].
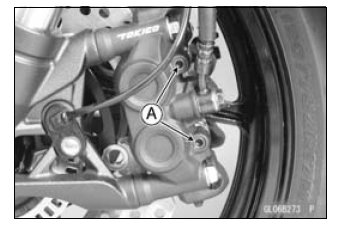
- Remove the front caliper with the hose installed (see Front Caliper Removal).
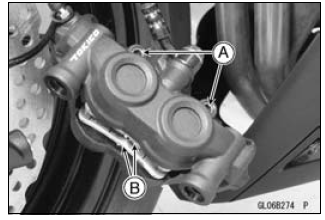
- Remove:
Pad Pins [A]
Brake Pads [B]
Front Brake Pad Installation
- Check that the pad spring [A] is in place on the caliper.
- Push the caliper pistons in by hand as far as they will go.
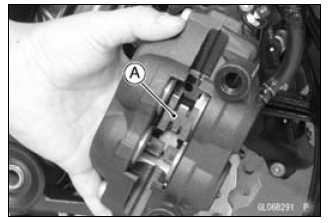
- Install the brake pads [A] on the pad spring correctly.
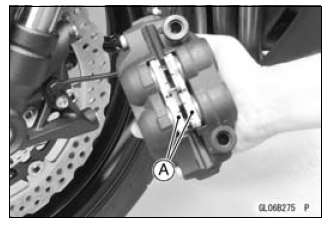
- Fit the pad into the groove of the caliper as shown in the figure.
- Install the pad pins while pushing the brake pads lightly.
- Tighten the pad pins temporarily.
- Install the front caliper (see Caliper Installation).
- Tighten:
Torque - Front Brake Pad Pins: 15 N*m (1.5 kgf*m, 11 ft*lb)
WARNING After servicing, it takes several applications of the brake lever before the brake pads contact the disc, which could result in increased stopping distance and cause an accident resulting in injury or death.
Do not attempt to ride the motorcycle until a firm brake lever is obtained by pumping the lever until the pads are against the disc.
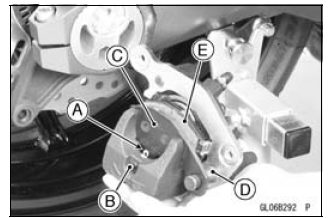
Rear Brake Pad Removal
- Remove the rear caliper with the hose installed (see Rear Caliper Removal).
- Remove:
Clip [A]
Pad Pin [B] - Remove the brake pad [C] of the jaw side from the holder shaft [D], then remove the other pad [E].
Rear Brake Pad Installation
- Check that the pad spring [A], guide [B] and insulator [C] are in place on the caliper and holder.
- Push the caliper piston in by hand as far as it will go.
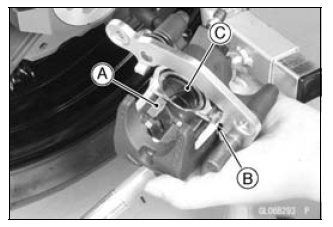
- Install the brake pad [A] on the piston side first, then install the
other pad on the holder shaft.
- Fit the projections [B] of the piston side pad into the recesses [C] of the caliper holder.
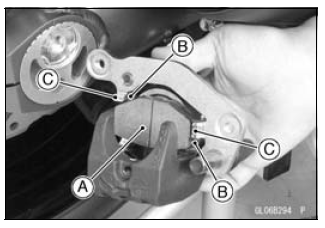
- Install the pad pin while pushing the brake pad of the jaw side lightly.
- Install a new clip.
- The clip must be "outside" of the pad.
- Install the rear caliper (see Rear Caliper Installation).
WARNING After servicing, it takes several applications of the brake pedal before the brake pads contact the disc, which could result in increased stopping distance and cause an accident resulting in injury or death.
Do not attempt to ride the motorcycle until a firm brake pedal is obtained by pumping the pedal until the pads are against the disc.
Brake Pad Wear Inspection
- Refer to the Brake Pad Wear Inspection in the Periodic Maintenance chapter.
See also:
 Kawasaki Z1000SX - Service manual > Caliper Fluid Seal Damage
The fluid seal (piston seal) [A] is placed around the piston to maintain clearance between the pad and the disc. If the seal is in a poor condition, it could lead the pad to wear excessively or the brake to drag, which may cause the temperature of the discs or the brake fluid to increase. Replace the fluid seal if it exhibits any of the conditions listed below. Brake fluid leakage around the pad. Brakes overheat. Considerable difference in inner and outer pad wear. Seal and piston are stuck together.
Kawasaki Z1000SX - Service manual > Master Cylinder
Front Master Cylinder Removal Remove the rear view mirror (see Rear View Mirror Removal in the Frame chapter). Remove the banjo bolt [A] to disconnect the brake hose from the master cylinder (see Brake Hose Removal/Installation). Unscrew the clamp bolts [B], and take off themaster cylinder [C] as an assembly with the reservoir, brake lever, and brake switch installed. Disconnect the front brake light switch connector [D].
 Rider's Manual BMW R 1250 GS GSA
 Owner's Manual Harley-Davidson Sportster XL1200X Forty-Eight
 Owner's Manual Honda CBR650R
 Service manual Honda CBR650
 Owner's Manual Honda PCX125
 Owner's Manual Kawasaki Z1000SX
 Service manual Kawasaki Z1000SX
 Owner's Manual Lexmoto Echo
 Owner's Manual Royal Enfield Interceptor 650
 Service manual Royal Enfield Interceptor 650
 Owner's Manual Yamaha MT-07