 Kawasaki Z1000SX - Service manual > Oil Pressure Switch
Engine Lubrication System / Oil Pressure Switch
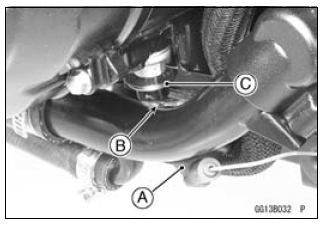
Oil Pressure Switch Removal
- Remove:
Left Lower Fairing Assembly (see Lower Fairing Assembly Removal in the Frame chapter)
Engine Oil (Drain, see Engine Oil Change in the Periodic Maintenance chapter)
Switch Cover [A]
Switch Terminal Bolt [B]
Oil Pressure Switch [C]
Oil Pressure Switch Installation
- Apply silicone sealant to the threads of the oil pressure switch and
tighten it.
- Using a high-flash point solvent, clean off any oil or dirt that may be on the liquid gasket coating area. Dry them with a clean cloth.
Sealant - Liquid Gasket, TB1211: 56019-120
Torque - Oil Pressure Switch: 15 N*m (1.5 kgf*m, 11 ft*lb)
- Install the switch lead.
- Tighten:
Torque - Oil Pressure Switch Terminal Bolt: 2.0 N*m (0.20 kgf*m, 18 in*lb) - Apply grease to the terminal.
Oil Pipe
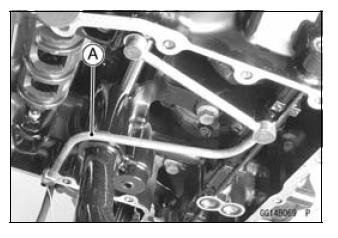
Oil Pipe Removal
- Remove:
Oil Pan (see Oil Pan Removal)
Oil Pipe [A]
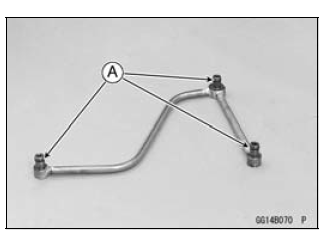
Oil Pipe Installation
- Replace the O-rings [A] with new ones.
- Apply grease to the O-rings, and install them.
See also:
 Kawasaki Z1000SX - Service manual > Oil Cooler
Oil Cooler Removal Remove: Left Lower Fairing Assembly (see Lower Fairing Assembly Removal in the Frame chapter) Coolant (Drain, see Coolant Change in the Periodic Maintenance chapter) Engine Oil (Drain, see Engine Oil Change in the Periodic Maintenance chapter) Water Hose Clamp Screws (Loosen) [A] Water Hoses [B] Oil Cooler Bolts [C] Oil Cooler [D]
 Rider's Manual BMW R 1250 GS GSA
 Owner's Manual Harley-Davidson Sportster XL1200X Forty-Eight
 Owner's Manual Honda CBR650R
 Service manual Honda CBR650
 Owner's Manual Honda PCX125
 Owner's Manual Kawasaki Z1000SX
 Service manual Kawasaki Z1000SX
 Owner's Manual Lexmoto Echo
 Owner's Manual Royal Enfield Interceptor 650
 Service manual Royal Enfield Interceptor 650
 Owner's Manual Yamaha MT-07