 Kawasaki Z1000SX - Service manual > Others
Chassis Parts Lubrication
- Before lubricating each part, clean off any rusty spots with rust remover and wipe off any grease, oil, dirt, or grime.
- Lubricate the points listed below with indicated lubricant.
NOTE
- Whenever the vehicle has been operated under wet or rainy conditions, or especially after using a high-pressure water spray, perform the general lubrication.
Pivots: Lubricate with Grease.
Brake Lever
Brake Pedal
Clutch Lever
Rear Brake Joint Pin
Sidestand
Points: Lubricate with Grease.
Clutch Inner Cable Upper and Lower Ends [A]
Throttle Inner Cable Upper and Lower Ends
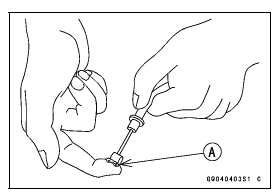
Cables: Lubricate with Rust Inhibitor.
Clutch Cable
Throttle Cables
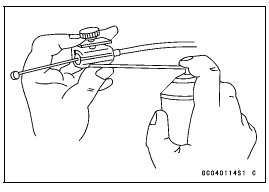
- Lubricate the cables by seeping the oil between the cable and housing.
- The cable may be lubricated by using a commercially available pressure cable lubricator with an aerosol cable lubricant.
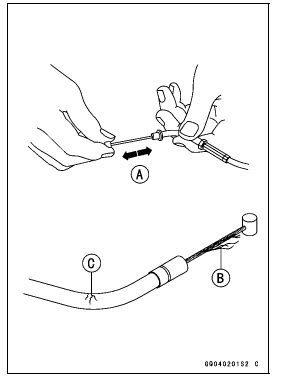
- With the cable disconnected at both ends, the cable should move freely
[A] within the cable housing.
If cable movement is not free after lubricating, if the cable is frayed [B], or if the cable housing is kinked [C], replace the cable.
Bolts, Nuts and Fasteners Tightness Inspection
- Check the tightness of the bolts and nuts listed here. Also, check to see that each cotter pin is in place and in good condition.
NOTE
- For the engine fasteners, check the tightness of them when the engine is cold (at room temperature).
If there are loose fasteners, retighten them to the specified torque following the specified tightening sequence.
Refer to the appropriate chapter for torque specifications.
If torque specifications are not in the appropriate chapter, see the Standard Torque Table. For each fastener, first loosen it by 1/2 turn, then tighten it.
If cotter pins are removed, replace them with new ones.
Bolt, Nut and Fastener to be checked
Engine:
Clutch Lever Pivot Bolt Locknut
Engine Mounting Bolts and Nuts
Exhaust Pipe Manifold Holder Nuts
Exhaust Pipe Mounting Bolt
Muffler Body Clamp Bolts
Muffler Body Mounting Bolt and Nuts
Radiator Upper and Lower Bolts
Subframe Bolts
Wheels:
Front Axle
Front Axle Clamp Bolt
Rear Axle Nut
Brakes:
Brake Lever Pivot Nut
Brake Pedal Bolt
Brake Rod Joint Cotter Pin
Caliper Mounting Bolts
Front Master Cylinder Clamp Bolts
Rear Master Cylinder Mounting Bolts
Suspension:
Front Fork Clamp Bolts
Rear Shock Absorber Bolt and Nut
Swingarm Pivot Shaft Locknut
Swingarm Pivot Shaft Nut
Tie-Rod Nuts
Rocker Arm Nut
Steering:
Handlebar Holder Bolts
Steering Stem Head Bolt
Others:
Footpeg Bracket Bolts
Front Fender Bolts
Sidestand Bolt
See also:
 Kawasaki Z1000SX - Service manual > Electrical System
Lights and Switches Operation Inspection First Step Turn on the ignition switch. The following lights should go on according to below table.
Kawasaki Z1000SX - Service manual > Replacement Parts
Air Cleaner Element Replacement NOTE In dusty areas, the element should be replaced more frequently than the recommended interval.
 Rider's Manual BMW R 1250 GS GSA
 Owner's Manual Harley-Davidson Sportster XL1200X Forty-Eight
 Owner's Manual Honda CBR650R
 Service manual Honda CBR650
 Owner's Manual Honda PCX125
 Owner's Manual Kawasaki Z1000SX
 Service manual Kawasaki Z1000SX
 Owner's Manual Lexmoto Echo
 Owner's Manual Royal Enfield Interceptor 650
 Service manual Royal Enfield Interceptor 650
 Owner's Manual Yamaha MT-07