 Kawasaki Z1000SX - Service manual > Radiator
Radiator and Radiator Fan Removal
- Remove:
Lower Fairing (see Lower Fairing Removal in the Frame chapter)
Coolant (Drain, see Coolant Change in the Periodic Maintenance chapter) - Remove:
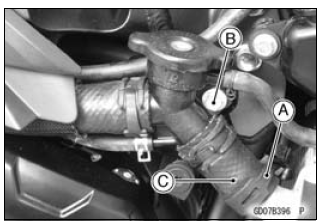
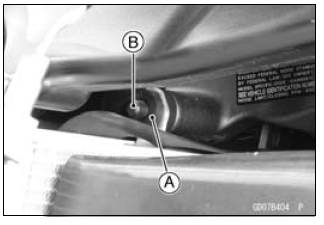
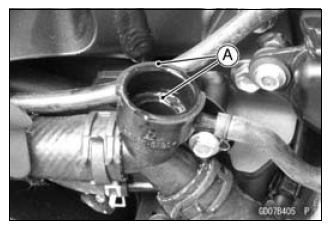
Radiator Hose Clamp [A]
Radiator Cap Mounting Bolt [B]
Radiator Hose [C]
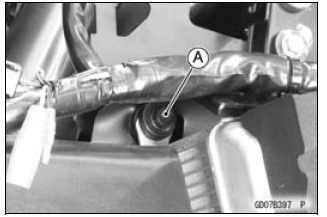
- Remove:
Radiator Upper Bolt [A]
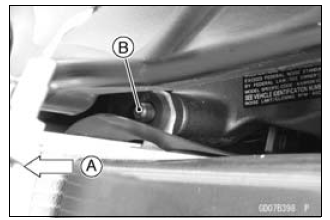
- Move the radiator right ward [A] to clear the frame projection [B].
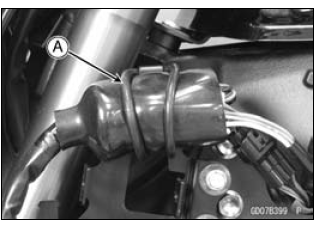
- Remove:
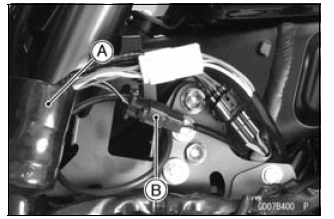
Rubber Band [A]
- Slide the connector cover [A] to disconnect the radiator fan motor lead connector [B].
- Remove:
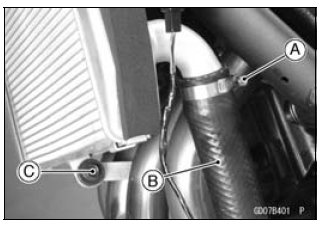
Radiator Hose Clamp Screw [A] (Loosen)
Radiator Hose [B]
Radiator Lower Bolt [C]
NOTICE Do not touch the radiator core. This could damage the radiator fins, resulting in loss of cooling efficiency.
- Remove:
Radiator Fan Mounting Bolts [A]
Radiator Fan [B]

Radiator and Radiator Fan Installation
- Installation is the reverse of removal.
- Install the rubber dampers [A] and radiator bracket collars [B] as shown
in the figure.
[C] Larger
[D] Smaller
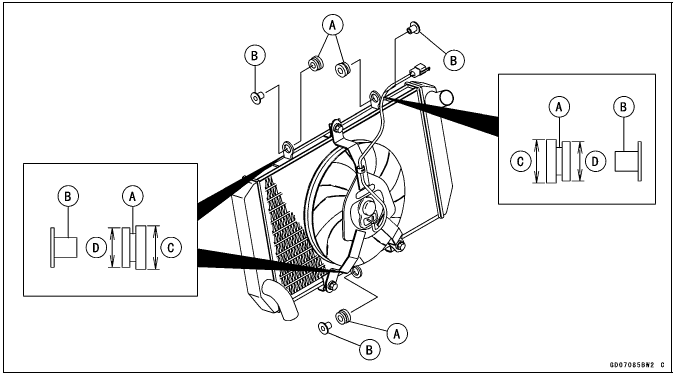
- Fit the slits [A] of the heat insulation rubber plate to the upper mounting brackets [B] and fan bracket [C] as shown.
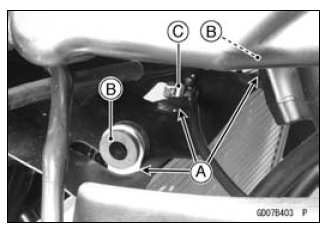
- Insert the upper right mounting bracket [A] to the frame projection [B].
- Tighten the radiator bolts securely.
- Connect the radiator fan connector.
- Install the removed parts (see appropriate chapter).
Radiator Inspection
- Check the radiator core.
If there are obstructions to air flow, remove them.
If the corrugated fins [A] are deformed, carefully straighten them.
If the air passages of the radiator core are blocked more than 20% by unremovable obstructions or irreparably deformed fins, replace the radiator with a new one.

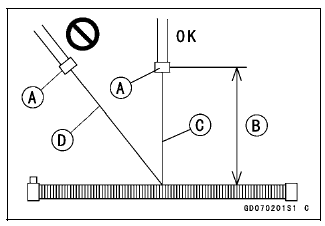
NOTICE When cleaning the radiator with steam cleaner, be careful of the following to prevent radiator damage: Keep the steam gun [A] away more than 0.5 m (1.6 ft) [B] from the radiator core.
Hold the steam gun perpendicular [C] (not oblique [D]) to the core surface.
Run the steam gun, following the core fin direction.
Radiator Cap Inspection
- Remove:
Right Lower Fairing (see Lower Fairing Removal in the Frame chapter)
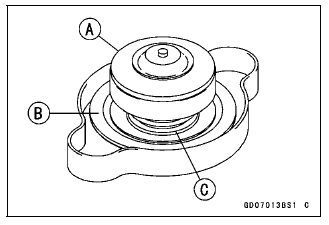
Radiator Cap - Check the condition of the bottom [A] and top [B] valve seals and valve
spring [C].
If any one of them shows visible damage, replace the cap with a new one.
- Install the cap [A] on a cooling system pressure tester [B].
NOTE
- Wet the cap sealing surfaces with water or coolant to prevent pressure leaks.
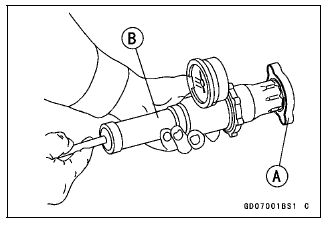
- Watching the pressure gauge, pump the pressure tester to build up the
pressure until the relief valve opens: the gauge needle flicks downward.
Stop pumping and measure leak time at once. The relief valve must open
within the specified range in the table below and the gauge hand must remain
within the same range at least 6 seconds.
Radiator Cap Relief Pressure
Standard: 93 - 123 kPa (0.95 - 1.25 kgf/cm², 13 - 18 psi)
If the cap can not hold the specified pressure or if it holds too much pressure, replace it with a new one.
Radiator Filler Neck Inspection
- Remove:
Right Lower Fairing (see Lower Fairing Removal in the Frame chapter)
Radiator Cap - Check the radiator filler neck for signs of damage.
- Check the condition of the top and bottom sealing seats [A] in the filler neck. They must be smooth and clean for the radiator cap to function properly.
See also:
 Kawasaki Z1000SX - Service manual > Water Pump
Water Pump Removal Drain: Coolant (see Coolant Change in the Periodic Maintenance chapter) Engine Oil (see Engine Oil Change in the Periodic Maintenance chapter) Remove: Left Lower Fairing (see Lower Fairing Removal in the Frame chapter) Engine Sprocket Cover (see Engine Sprocket Cover Removal in the Final Drive chapter) Remove the water pipe bolts [A] to pull out the water pipes [B] from the water pump cover. Disconnect the neutral switch connector [C]. Loosen the clamp bolt [D] to remove the water hose [E]. Remove: Water Pump Cover Bolts [A] Water Pump Cover [B] Remove: Water Pump Impeller Bolt [A] and Washer Water Pump Impeller [B] Water Pump Housing [C]
Kawasaki Z1000SX - Service manual > Thermostat
Thermostat Removal Remove: Coolant (Drain, see Coolant Change in the Periodic Maintenance chapter) Engine Sprocket Cover (see Engine Sprocket Removal in the Final Drive chapter) Harness Holder Clamp [A] Water Hose Clamp [B] Water Hose [C] Water Pipe Bolts [D] Water Pipe [E] Loosen the water hose clamp screw [A]. Clear the starter motor cable from the holder [B]. Remove: Thermostat Housing Bolts [A] Thermostat Housing Cover [B] Thermostat
 Rider's Manual BMW R 1250 GS GSA
 Owner's Manual Harley-Davidson Sportster XL1200X Forty-Eight
 Owner's Manual Honda CBR650R
 Service manual Honda CBR650
 Owner's Manual Honda PCX125
 Owner's Manual Kawasaki Z1000SX
 Service manual Kawasaki Z1000SX
 Owner's Manual Lexmoto Echo
 Owner's Manual Royal Enfield Interceptor 650
 Service manual Royal Enfield Interceptor 650
 Owner's Manual Yamaha MT-07