 Harley-Davidson Sportster XL1200X Forty-Eight - Owner's Manual > Rear View Mirrors
 Objects in mirrors are
closer than they appear. Use caution when judging distance of objects in
mirrors. Failure to judge correct distances could result in death or serious
injury.
Objects in mirrors are
closer than they appear. Use caution when judging distance of objects in
mirrors. Failure to judge correct distances could result in death or serious
injury.
Your motorcycle has two convex rear view mirrors.
This type of mirror is designed to give a much wider view to the rear than a flat mirror. However, cars and other objects seen in this type of mirror look smaller and farther away than they actually are.
- Use caution when judging the size or relative distance of objects seen in rear view mirrors.
- Always adjust the rear view mirrors to reflect the area behind the motorcycle before riding.
NOTE: Adjust mirrors so you can see a small portion of your shoulders in each mirror. This will help you establish the relative distance of vehicles to the rear of your motorcycle.
Rear View Mirrors: XL1200X
 Improperly aligned
handlebars or components can contact the fuel tank when turned to the left or
right. Contact with the fuel tank can cause cosmetic damage.
Improperly aligned
handlebars or components can contact the fuel tank when turned to the left or
right. Contact with the fuel tank can cause cosmetic damage.
See Rear View Mirror: XL1200X. When adjusting mirrors, slowly turn handlebars to the full right and full left positions to make sure the mirrors do not contact the fuel tank.
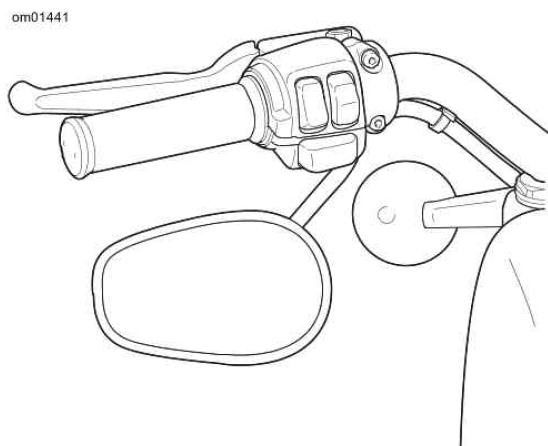 Rear View Mirror: XL1200X
Fuel Filler Cap
See SAFE OPERATING RULES section and review the following safety procedures.
Do not store motorcycle
with gasoline in tank within the home or garage where open flames, pilot lights,
sparks or electric motors are present. Gasoline is extremely flammable and
highly explosive, which could result in death or serious injury.
Avoid spills. Slowly
remove filler cap. Do not fill above bottom of filler neck insert, leaving air
space for fuel expansion. Secure filler cap after refueling. Gasoline is
extremely flammable and highly explosive, which could result in death or serious
injury.
Do not use aftermarket
fuel caps. Aftermarket fuel caps may fit improperly and leak, which could lead
to death or serious injury. See a Harley-Davidson dealer for approved fuel caps.
Do not spill fuel
onto the motorcycle while refueling. Immediately wipe up fuel spills on your
motorcycle. Fuel can cause damage to cosmetic surfaces.
Use only unleaded fuel in
catalytic converter-equipped motorcycles. Using leaded fuel will damage the
emission control system.
NOTE: Fuel filler cap rotates approximately a three-quarter turn before it starts unscrewing.
See Fuel Filler Cap. To open, turn fuel filler cap counterclockwise and lift. To close, turn fuel filler cap clockwise until it clicks. The ratchet action of the cap prevents over-tightening.
Sportsters sold in some countries are equipped with a locking fuel cap.
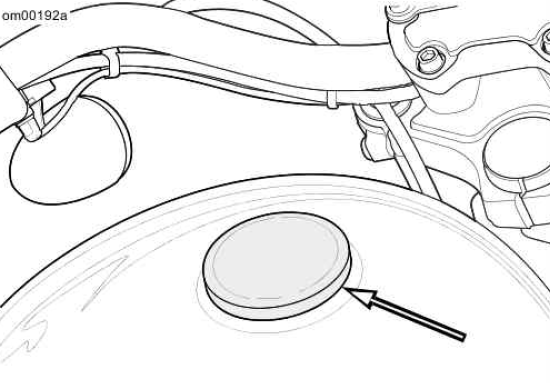 Fuel Filler Cap
Locking Fuel Filler Cap (Japan and Asia Pacific)
Replacement Keys
Find the four-digit key number stamped on the back of the key opposite the H-D logo. Write the ignition key number in the space provided at the front of this manual. With that number, your Harley-Davidson dealer can order a replacement.
Removal
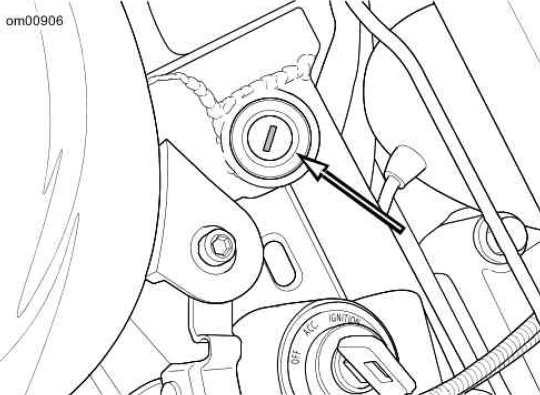
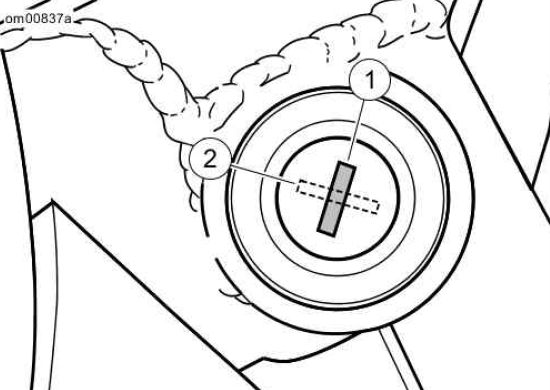
1. See Locking Fuel Filler Cap. Rotate the lock cover to access the key lock.
2. Insert the key.
3. Hold the fuel filler cap in place. Turn the key counterclockwise until it stops.
4. Turn key back to its original position. Remove the key.
5. Turn cap counterclockwise until resistance is felt. Continue to turn cap counterclockwise to remove cap.
Installation
1. See Locking Fuel Filler Cap. Insert the key into the lock.
2. To make sure that the cap is unlocked, firmly, hold the cap. Turn the key counterclockwise until it stops.
3. Allow the key to return to a neutral position. Remove the key.
NOTE: When installing the fuel cap, rotate the cap one full turn past the audible click.
4. Turn the cap clockwise to install the fuel cap.
5. Close the lock cover.
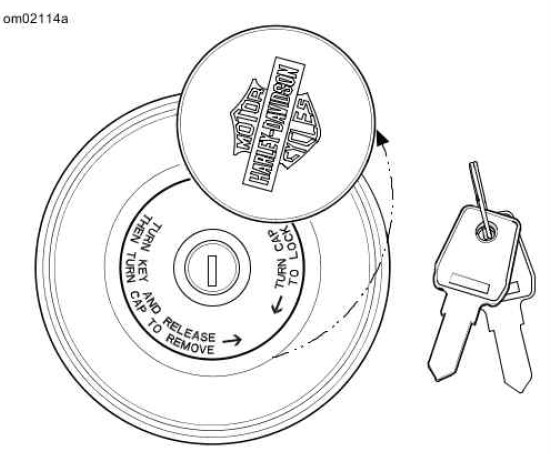 Locking Fuel Filler Cap
Fork Lock
Protect your vehicle
against theft. Failure to lock the motorcycle after parking could result in
theft and/or equipment damage.
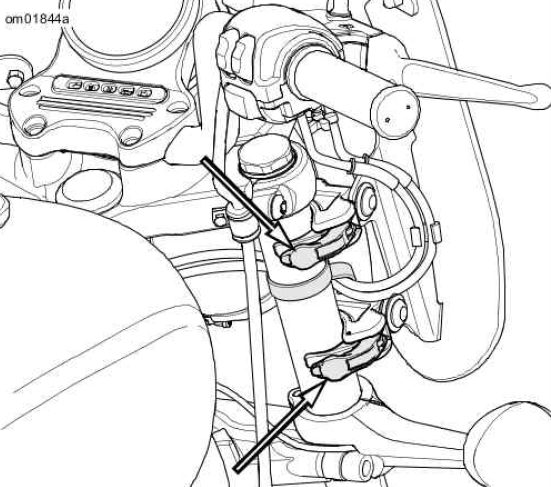
See Fork Lock Location: Sportster Models. Sportster models have the fork lock on the right side of the steering head. Using the fork lock immediately after parking your motorcycle will discourage unauthorized use or theft.
Do not operate vehicle
with forks locked. Locking the forks restricts the vehicle's turning ability,
which could result in death or serious injury.
See Fork Lock Positions: Sportster Models. Lock the fork.
1. Turn fork to full left position.
2. Insert key into fork lock.
3. Turn to right position (clockwise).
4. Remove lock key.
 Fork Lock Location: Sportster Models
 Fork Lock Positions: Sportster Models
- Fork locked
- Fork unlocked
Windshield: XL1200T
Removal
Polycarbonate
windscreens/windshields require proper attention and care to maintain. Failure
to maintain polycarbonate properly can result in damage to the
windscreen/windshield.
Use only Harley-Davidson
recommended products on Harley-Davidson windshields. Do not use harsh chemicals
or rain sheeting products, which can cause windshield surface damage, such as
dulling or hazing.
NOTE: Windshields require special care. Do not use ammonia-based or gas station window cleaners. These cleaners can damage the windshield. For proper windshield maintenance, see Windshield Care.
1. See Windshield Clamp Levers. While supporting the windshield, open the clamp levers.
2. Lift the windshield forward off the front forks.
Installation
Be sure that steering is
smooth and free without interference. Interference with steering could result in
loss of vehicle control and death or serious injury.
Pinched throttle cables
can restrict throttle response, which could result in loss of control and death
or serious injury.
1. Verify that rubber gaskets are in place in the clamp saddles.
2. To check operation, cycle the clamps open and close.
3. Straddle the front fender. Hold the windshield with both hands.
4. Fit the clamps to the fork slider tubes between the upper and lower fork brackets. If any of the four clamps do not align to the fork slider tubes:
- Loosen the clamp shoulder bolt.
- Rotate the clamp to align with the slider tube.
- Repeat until all four clamps align to the slider tube.
- Seat each clamp bolt in the windshield bracket. Tighten to 48-72 in-lbs (5.4-8.1 Nm).
5. Align the windshield:
- Center the windshield to the fork tubes, headlamp and speedometer.
- Align the height to not block turn signals, pinch turn signal wire harnesses or interfere with clutch cable.
6. Lock the clamps with the levers.
7. Check that all four clamps are in the locked position and the windshield is secure.
Check the windshield mounting hardware periodically. Never ride with loose mounts. A loose mount causes extra stress on the remaining mounts, as well as the windshield itself, and could cause premature failure of components.
 Windshield Clamp Levers
See also:
 Harley-Davidson Sportster XL1200X Forty-Eight - Owner's Manual > Gear Shift Lever
Location See Shift Lever and Shift Pattern. The gear shift lever is located on the left side of the motorcycle and is operated with the left foot. The shift lever changes gears in a sequential five-speed transmission.
Harley-Davidson Sportster XL1200X Forty-Eight - Owner's Manual > Shock Absorber Preload: All But XL1200T
Identify Length of Shock Different Sportster models in various markets have either a low, medium or tall shock absorber. 1. Park your motorcycle on the jiffy stand without any luggage or load.
 Rider's Manual BMW R 1250 GS GSA
 Owner's Manual Harley-Davidson Sportster XL1200X Forty-Eight
 Owner's Manual Honda CBR650R
 Service manual Honda CBR650
 Owner's Manual Honda PCX125
 Owner's Manual Kawasaki Z1000SX
 Service manual Kawasaki Z1000SX
 Owner's Manual Lexmoto Echo
 Owner's Manual Royal Enfield Interceptor 650
 Service manual Royal Enfield Interceptor 650
 Owner's Manual Yamaha MT-07