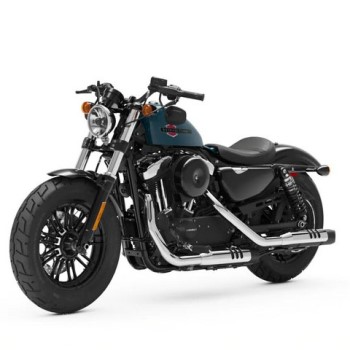
 Harley-Davidson Sportster XL1200X Forty-Eight - Owner's Manual > Shock Absorber Preload: All But XL1200T
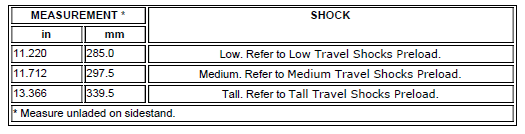
Identify Length of Shock
Different Sportster models in various markets have either a low, medium or tall shock absorber.
1. Park your motorcycle on the jiffy stand without any luggage or load.
2. See Shock Absorber Length. Measure from the center of the lower shock mounting bolt to the center of the upper mounting bolt.
3. Compare the measurement to the identification table to determine if your motorcycle has low, medium or tall shock absorbers. Refer to Shock Absorber Length.
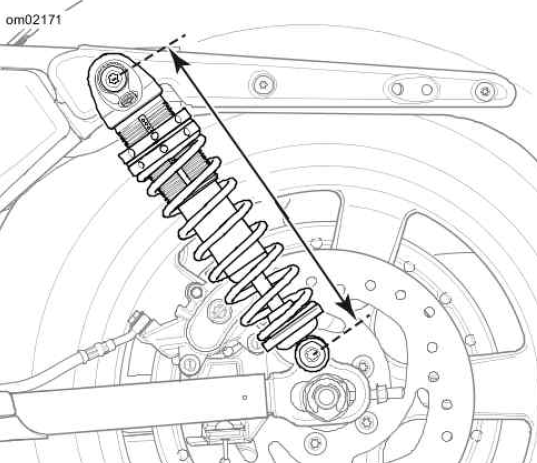 Shock Absorber Length
Shock Absorber Length
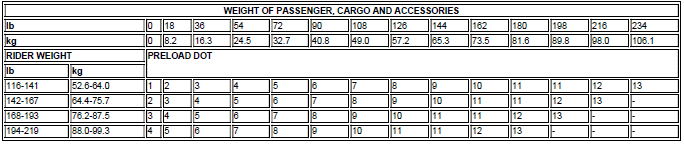
Identify the Preload Dot
1. Add the weight of the rider and riding gear to get the rider weight.
2. Separately, add the weight of the passenger, their riding gear, intended cargo and any accessories.
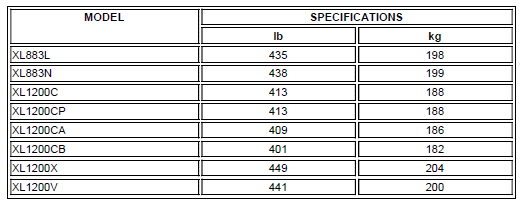
NOTE: The total of rider weight and passenger plus cargo and accessories cannot exceed the maximum added weight allowed. Refer to Maximum Added Weight Allowed: All except XL1200T.
Maximum Added Weight Allowed: All except XL1200T
3. In the table corresponding to the shock length (low, medium, tall) on your motorcycle, identify the preload dot.
- Under RIDER WEIGHT, identify the row that includes the total weight of the rider
- In the row of PASSENGER, CARGO AND ACCESSORIES, identify the total weight column for any passenger, cargo and accessories.
- The number at the intersection of the RIDER WEIGHT row and the PASSENGER, CARGO AND ACCESSORIES column is the recommended preload dot.
Low Travel Shocks Preload


Medium Travel Shocks Preload

Tall Travel Shocks Preload
Shock Adjustment
 Adjust both shock
absorbers equally. Improper adjustment can adversely affect stability and Adjust
both shock absorbers equally. Improper adjustment can adversely affect stability
and handling, which could result in death or serious injury.
Adjust both shock
absorbers equally. Improper adjustment can adversely affect stability and Adjust
both shock absorbers equally. Improper adjustment can adversely affect stability
and handling, which could result in death or serious injury.
NOTE: To prevent damage to the adjustment and locking rings, do not use any other wrench than the one supplied with your motorcycle.
1. Remove seat. See Seat.
2. See Spanner Wrench Retention Pocket. Lift the latch (2) and slide the spanner wrench (1) from the retention pocket.
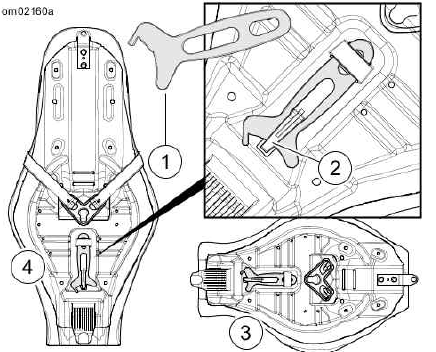 Spanner Wrench Retention Pocket
- Spanner wrench
- Latch
- Solo seat
- Two-up seat
 Avoid shock damage. Make
sure shock threads are clean and free of debris before loosening or tightening
shock adjusting nuts.
Avoid shock damage. Make
sure shock threads are clean and free of debris before loosening or tightening
shock adjusting nuts.
3. If necessary, clean the threads on the shock absorber.
4. See Preload Adjustment. Use the spanner wrench to turn the upper locking ring counterclockwise (1) to unlock the ring.
NOTE: Count down from the top of the shock to locate the recommended preload dot.
5. Use the spanner wrench to turn (2) the lower adjustment ring below the recommended dot.
6. Rotate the upper locking ring to align with the recommended preload dot (3).
7. Cover one-half the recommended preload dot (4) with the upper locking ring.
8. Use the wrench to hand tighten the lower adjustment ring against the locking ring (5).
9. Return the spanner wrench to the retention pocket under the seat.
10. Install seat. See Seat.
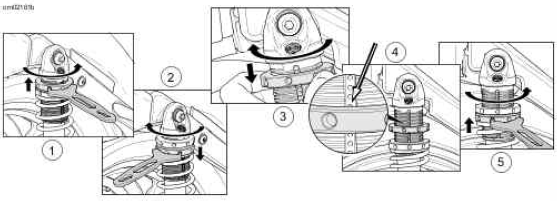 Preload Adjustment
- Loosen locking ring
- Turn adjustment ring below recommended dot
- Rotate locking ring to dot
- Align locking ring to dot
- Tighten adjustment ring
Shock Absorber Preload: XL1200T
Adjust rear shock before
riding. Distractions can lead to loss of control, resulting in death or serious
injury.
Do not adjust suspension
while riding. Adjustment knob is located near spinning rear tire/wheel, which
could be inadvertently contacted, resulting in serious injury.
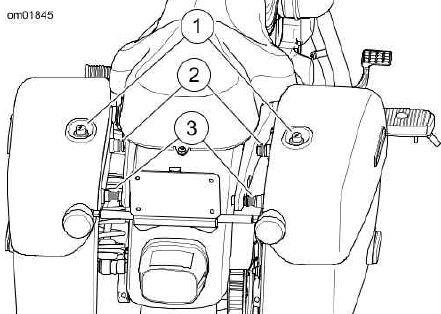
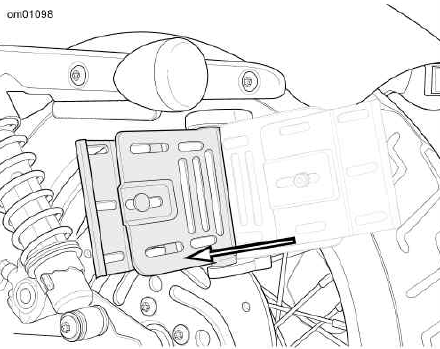
1. See Preload Adjustment Knob: XL1200T. Locate the preload adjustment knob behind the left saddlebag.
2. Rotate the preload adjustment knob counterclockwise until it stops aligned with the LOW mark. The LOW setting is the minimum preload position.
NOTES:
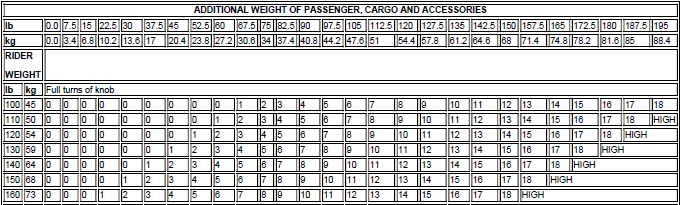
- Example: For a rider weighing 160 lb 73 kg riding with a passenger weighing 125 lb 56.7 kg and 10 lb 4.5 kg of cargo in the saddlebags, the recommended preload setting is 16 turns (32 clicks) from the LOW setting.
- The HIGH setting is the maximum preload position.
3. Rotate the preload adjustment knob clockwise the recommended number of turns for the weight of the rider and the combined weight of a passenger and cargo.
Two clicks of the knob are a turn. Refer to Recommended Turns: XL1200T Shock Preload Knob (two clicks equal one turn).
Do not exceed the
motorcycle's Gross Vehicle Weight Rating (GVWR) or Gross Axle Weight Rating (GAWR).
Exceeding these weight ratings can lead to component failure and adversely
affect stability, handling and performance, which could result in death or
serious injury.
NOTES:
- GVWR: GVWR is the sum of the weight of the motorcycle, accessories and the maximum weight of the rider, passenger and cargo that can be safely carried.
- GAWR: GAWR is the maximum amount of weight that can be safely carried on each axle.
- See information label on frame downtube for GVWR, front axle GAWR and rear axle GAWR. Refer to Weights: XL883 Models or Weights: XL1200 Models.
- Maximum additional weight allowed cannot exceed specifications. Refer to Maximum Added Weight Allowed: XL1200T.
Maximum Added Weight Allowed: XL1200T

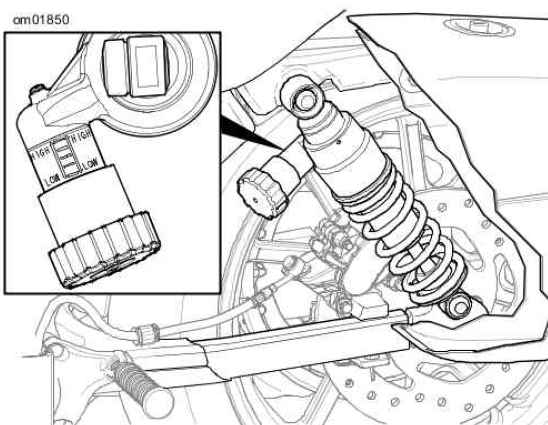 Preload Adjustment Knob: XL1200T
Recommended Turns: XL1200T Shock Preload Knob (two clicks equal one turn)

Luggage
See the Accessories and
Cargo section in your owner's manual. Improper cargo loading or accessory
installation can cause component failure and adversely affect stability,
handling and performance, which could result in death or serious injury.
Do not exceed the
motorcycle's Gross Vehicle Weight Rating (GVWR) or Gross Axle Weight Rating (GAWR).
Exceeding these weight ratings can lead to component failure and adversely
affect stability, handling and performance, which could result in death or
serious injury.
- GAWR is the sum of the weight of the motorcycle, accessories and the maximum weight of the rider, passenger and cargo that can be safely carried.
- GAWR is the maximum amount of weight that can be safely carried on each axle.
- The GVWR and GAWR are shown on the information label which is on the frame downtube in some destinations.
Improper loading of cargo
or installation of accessories can affect motorcycle stability and handling,
which could result in death or serious injury.
- Keep cargo weight concentrated close to the motorcycle and as low as possible to minimize the change in the motorcycle's center of gravity. Distribute weight evenly on both sides of the vehicle. Do not load bulky items too far behind the rider or add weight to the handlebars or front forks. Do not exceed maximum load on the label within the luggage.
- Check that cargo is secure and does not shift while riding. Periodically recheck load.
- Close and lock luggage before riding or leaving the vehicle unattended.
Saddlebags: XL1200T
Do not exceed saddlebag
weight capacity. Put equal weight in each bag. Too much weight in saddlebags can
cause loss of control, which could result in death or serious injury.
Do not allow passenger to
use saddlebags as grab handles. Failure to use a grab strap, designed for
passengers to hold onto when riding, could result in death or serious injury.
NOTE: Maximum saddlebag weight capacity is 7 lb 3.2 kg in each saddlebag.
Open
1. See Saddlebags: XL1200T. Unlock saddlebag with the key.
2. Press and release the latch button (1).
3. Lift the lid from the inner side of the saddlebag.
NOTE: The docking points (2, 3) on the saddlebag mounts fit several P&A accessories (backrest, luggage rack, and so on). Follow all installation and usage instructions that include P&A accessories.
Close
1. See Saddlebags: XL1200T. Close the saddlebag lid.
2. Lock the saddlebag.
 Saddlebags: XL1200T
- Latch button (2)
- Front docking bushing (2)
- Rear docking bushing (2)
Side-Mounted License Plate
See Side-Mounted License Plate Assembly. Some models have a side-mounted license plate assembly. The license plate must be in the extended position during operation. This feature may not be available in all markets.
The side-mounted license plate assembly includes an LED lamp module. If the LED lamp fails, see a Harley-Davidson dealer for assembly replacement.
 Side-Mounted License Plate Assembly
See also:
 Harley-Davidson Sportster XL1200X Forty-Eight - Owner's Manual > Rear View Mirrors
Objects in mirrors are closer than they appear. Use caution when judging distance of objects in mirrors. Failure to judge correct distances could result in death or serious injury.
Harley-Davidson Sportster XL1200X Forty-Eight - Owner's Manual > Security System
Security System Components The security system consists of a control module, a hands-free antenna mounted on the motorcycle and a hands-free fob carried by the rider.
 Rider's Manual BMW R 1250 GS GSA
 Owner's Manual Harley-Davidson Sportster XL1200X Forty-Eight
 Owner's Manual Honda CBR650R
 Service manual Honda CBR650
 Owner's Manual Honda PCX125
 Owner's Manual Kawasaki Z1000SX
 Service manual Kawasaki Z1000SX
 Owner's Manual Lexmoto Echo
 Owner's Manual Royal Enfield Interceptor 650
 Service manual Royal Enfield Interceptor 650
 Owner's Manual Yamaha MT-07