 Yamaha MT-07 - Owner's Manual > Replacing the headlight bulb
This model is equipped with a halogen bulb headlight. If the headlight bulb burns out, replace it as follows.
NOTICE
Take care not to damage the following parts:
- Headlight bulb
Do not touch the glass part of the headlight bulb to keep it free from oil, otherwise the transparency of the glass, the luminosity of the bulb, and the bulb life will be adversely affected. Thoroughly clean off any dirt and fingerprints on the headlight bulb using a cloth moistened with alcohol or thinner. - Headlight lens
Do not affix any type of tinted film or stickers to the headlight lens.Do not use a headlight bulb of a wattage higher than specified.
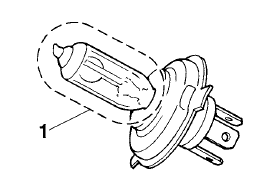
- Do not touch the glass part of the bulb.
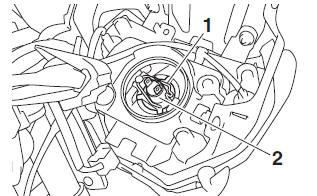
1. Remove the headlight unit by removing the bolt and washer on each side.
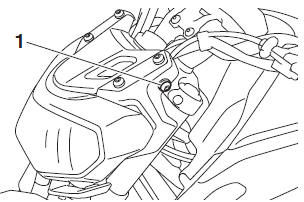
- Bolt and washer
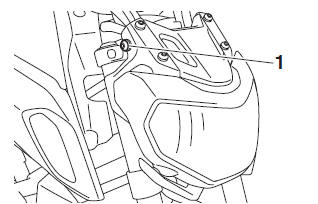
- Bolt and washer
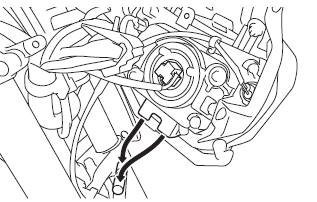
2. Disconnect the headlight coupler, and then remove the headlight bulb cover.
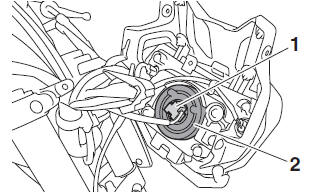
- Headlight coupler
- Headlight bulb cover
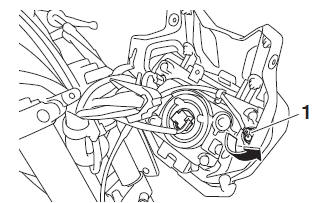
3. Unhook the headlight bulb holder, then remove the burnt-out bulb.
- Headlight bulb holder
- Headlight bulb
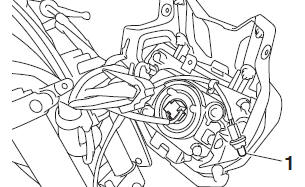
4. Place a new headlight bulb into position, then secure it with the bulb holder.
5. Install the headlight bulb cover, then connect the coupler.
6. Install the headlight unit as shown, and then install the washer and bolt on each side.
7. Have a Yamaha dealer adjust the headlight beam if necessary.
Replacing an auxiliary light bulb
This model is equipped with two auxiliary lights. If an auxiliary light bulb burns out, replace it as follows.
1. Remove the headlight unit.
2. Remove the auxiliary light bulb socket (together with the bulb) by turning it counterclockwise.
- Auxiliary light bulb socket
3. Remove the burnt-out bulb by pulling it out of the socket.
- Auxiliary light bulb
4. Insert a new bulb into the socket.
5. Install the socket (together with the bulb) by turning it clockwise.
6. Install the headlight unit.
See also:
 Yamaha MT-07 - Owner's Manual > Replacing the fuses
The main fuse and the fuse boxes, which contain the fuses for the individual circuits, are located under the rider seat. TIP To access the main fuse, remove the starter relay cover as shown. Starter relay cover Fuse box Spare main fuse Main fuse Ignition fuse Signaling system fuse Headlight fuse Backup fuse 2 (for ECU) Backup fuse (for clock and immobilizer system) Radiator fan motor fuse ABS solenoid fuse ABS motor fuse Parking lighting fuse Auxiliary fuse ABS control unit fuse Spare fuse
Yamaha MT-07 - Owner's Manual > Brake/tail light
This model is equipped with an LED-type brake/tail light. If the brake/tail light does not come on, have a Yamaha dealer check it. Replacing a turn signal light bulb
 Rider's Manual BMW R 1250 GS GSA
 Owner's Manual Harley-Davidson Sportster XL1200X Forty-Eight
 Owner's Manual Honda CBR650R
 Service manual Honda CBR650
 Owner's Manual Honda PCX125
 Owner's Manual Kawasaki Z1000SX
 Service manual Kawasaki Z1000SX
 Owner's Manual Lexmoto Echo
 Owner's Manual Royal Enfield Interceptor 650
 Service manual Royal Enfield Interceptor 650
 Owner's Manual Yamaha MT-07