 Honda CBR650 - Service manual > Service information
GENERAL
WARNING
Removing the radiator cap while the engine is hot can allow the coolant to spray out, seriously scalding you.
Always let the engine and radiator cool down before removing the radiator cap.
NOTICE
Except TH model:
- Using coolant with silicate corrosion inhibitors may cause premature wear of water pump seals or blockage of radiator passages. Using tap water may cause engine damage.
TH model:
- Use only genuine Honda PRE-MIX COOLANT containing corrosion
inhibitors, specifically recommended for aluminium engines when adding or
replacing the coolant.
Genuine Honda PRE-MIX COOLANT is excellent at preventing corrosion and overheating. The effects last for up to 2 years.
- The coolant should be inspected and replaced properly by following the maintenance schedule.
- Use any genuine Honda PRE-MIX COOLANT without diluting with water.
- DO NOT use non-ethylene glycol coolant, tap water, nor mineral water
when adding or replacing the coolant.
Use of improper coolant may cause damage, such as corrosion in the engine, blockage of the cooling passage or the radiator and premature wear of the water pump seal.
- Add cooling system at the reserve tank. Do not remove the radiator cap except to refill or drain the system.
- All cooling system services can be done with the engine in the frame.
- Avoid spilling coolant on painted surfaces.
- After servicing the system, check for leaks with a cooling system tester.
- For high coolant temperature indicator/ECT sensor inspection.
- For fan control relay inspection.
Troubleshooting
Engine temperature too high
- Faulty high coolant temperature indicator or ECT sensor
- Thermostat stuck closed
- Faulty radiator cap
- Insufficient coolant
- Passage blocked in radiator, hoses or water jacket
- Air in system
- Faulty cooling fan motor
- Faulty fan control relay
- Faulty water pump
Engine temperature too low
- Faulty high coolant temperature indicator or ECT sensor
- Thermostat stuck open
- Faulty fan control relay
Coolant leak
- Faulty water pump mechanical seal
- Deteriorated O-rings
- Faulty radiator cap
- Damaged or deteriorated cylinder head gasket
- Loose hose connection or clamp
- Damaged or deteriorated hose
- Damaged radiator
System flow pattern
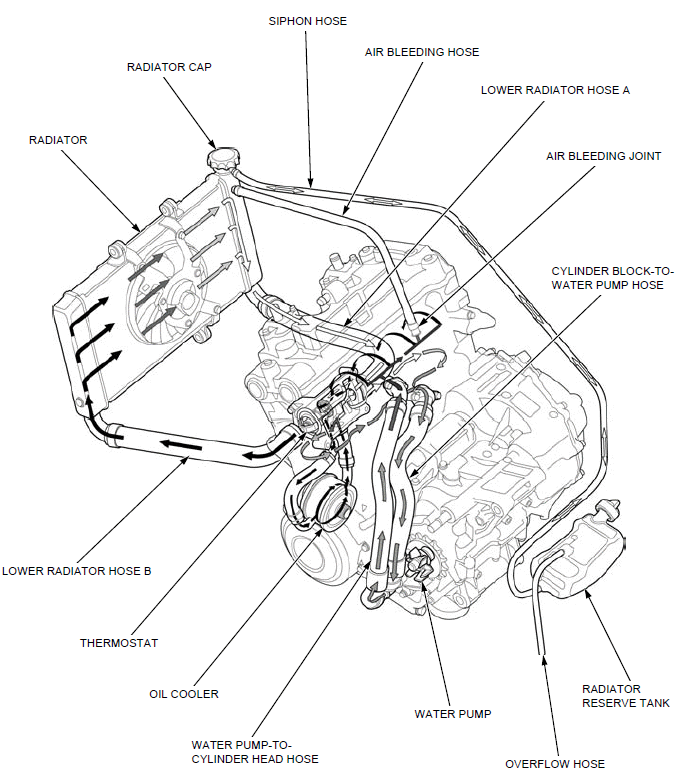
- RADIATOR
- RADIATOR CAP
- SIPHON HOSE
- AIR BLEEDING HOSE
- LOWER RADIATOR HOSE A
- AIR BLEEDING JOINT
- CYLINDER BLOCK-TO-WATER PUMP HOSE
- RADIATOR RESERVE TANK
- OVERFLOW HOSE
- WATER PUMP
- WATER PUMP-TO-CYLINDER HEAD HOSE
- OIL COOLER
- THERMOSTAT
- LOWER RADIATOR HOSE B
System testing
RADIATOR CAP/SYSTEM PRESSURE INSPECTION
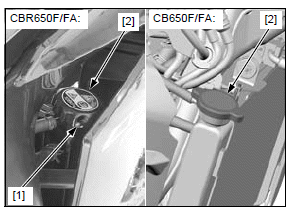
Remove the following:
- Right tank shroud A (CB650F/FA)
- Screw [1] (CBR650F/FA only)
- Radiator cap [2]
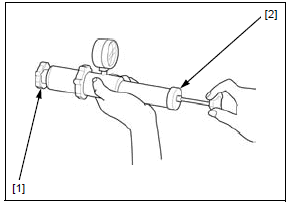
Wet the sealing surfaces of the cap [1], then install the cap onto the tester [2].
Pressurize the radiator cap using the tester.
Replace the radiator cap if it does not hold pressure, or if relief pressure is too high or too low.
The cap must hold the specified pressure for at least 6 seconds.
RADIATOR CAP RELIEF PRESSURE:
108 - 137 kPa (1.1 - 1.4 kgf/cm2, 16 - 20 psi)
Connect the tester to the radiator.
Pressurize the radiator, engine and hoses using the tester, and check for leaks.
NOTICE
Excessive pressure can damage the cooling system components. Do not exceed 137 kPa (1.4 kgf/cm2, 20 psi).
Repair or replace components if the system will not hold the specified pressure for at least 6 seconds.
Coolant replacement
REPLACEMENT/AIR BLEEDING
NOTE:
- When filling the system or reserve tank with coolant, or checking the coolant level, place the motorcycle in an upright position on a flat, level surface.
Remove the following:
- Under cowl (CBR650F/FA)
- Tank shroud A (CB650F/FA)
- Screw [1] (CBR650F/FA only)
- Radiator cap [2]
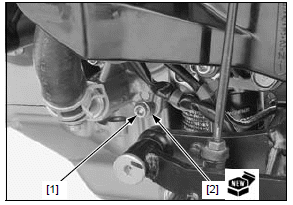
Remove the water pump drain bolt [1] and sealing washer [2], then drain the coolant.
Reinstall the drain bolt with new sealing washer.
Tighten the drain bolt to the specified torque.
TORQUE:
Water pump drain bolt:
13 N*m (1.3 kgf*m, 10 lbf*ft)
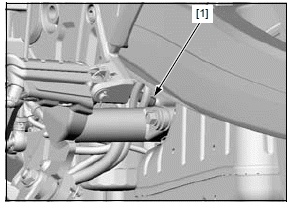
Disconnect the siphon hose [1] from the radiator reserve tank.
Empty the coolant and rinse the inside of the reserve tank with water.
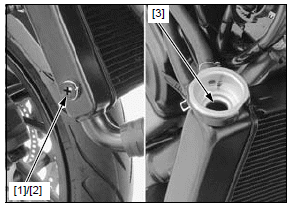
Remove the air bleed bolt [1].
Do not apply engine oil to the bleed bolt O-ring.
Check the bleed bolt O-ring [2] is in good condition, replace it if necessary.
Fill the system with the recommended coolant through the filler opening.
RECOMMENDED ANTIFREEZE:
EXCEPT TH MODEL:
High quality ethylene glycol antifreeze containing silicate-free
corrosion inhibitors (Mix the distilled water and antifreeze in the ratio of
1:1)
TH MODEL:
HONDA PRE-MIX COOLANT or equivalent
When coolant comes out of the bleeding hole, install and tighten the air bleed bolt to the specified torque.
TORQUE:1.6 N*m (0.2 kgf*m, 1.2 lbf*ft)
Fill the coolant through the filler opening up to filler neck [3].
Bleed air from the system as follow:
1. Shift the transmission into neutral.
Start the engine and let it idle for 2 - 3 minutes.
2. Snap the throttle 3 - 4 times to bleed air from the system.
3. Stop the engine and add coolant up to the filler neck if necessary.
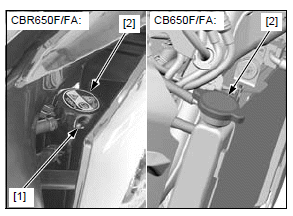
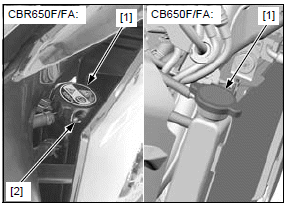
Install the radiator cap [1] and screw [2] (CB650F/FA only).
Fill the reserve tank with the recommended coolant.
Install the removed parts in the reverse order of removal.
See also:
 Honda CBR650 - Service manual > Thermostat
REMOVAL/INSTALLATION Drain the coolant. Remove the bolts [1] and thermostat cover [2]. Remove the thermostat [3] from the thermostat housing. Installation is in the reverse order of removal.
 Rider's Manual BMW R 1250 GS GSA
 Owner's Manual Harley-Davidson Sportster XL1200X Forty-Eight
 Owner's Manual Honda CBR650R
 Service manual Honda CBR650
 Owner's Manual Honda PCX125
 Owner's Manual Kawasaki Z1000SX
 Service manual Kawasaki Z1000SX
 Owner's Manual Lexmoto Echo
 Owner's Manual Royal Enfield Interceptor 650
 Service manual Royal Enfield Interceptor 650
 Owner's Manual Yamaha MT-07