 Honda CBR650 - Service manual > Thermostat
REMOVAL/INSTALLATION
Drain the coolant.
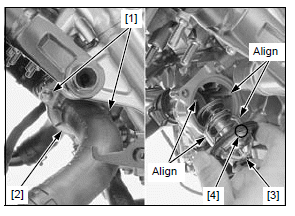
Remove the bolts [1] and thermostat cover [2].
Remove the thermostat [3] from the thermostat housing.
Installation is in the reverse order of removal.
TORQUE:
Thermostat cover bolt:
12 N*m (1.2 kgf*m, 9 lbf*ft)
NOTE:
- Install the thermostat with the air bleed hole [4] facing up, aligning the body ribs with the grooves of the thermostat housing.
Fill and bleed the cooling system.
INSPECTION
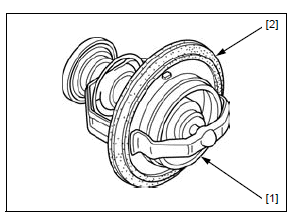
Visually inspect the thermostat [1] for damage.
Replace the thermostat if the valve stays open at room temperature.
Check the seal ring [2] for damage and replace if necessary.
Wear insulated gloves and adequate eye protection. Keep flammable materials away from the electric heating element.
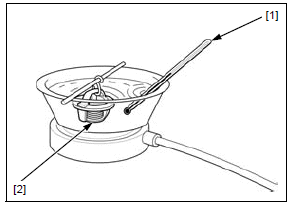
Do not let the thermostat or thermometer [1] touch the pan, or you will get false reading.
Heat the water with an electric heating element to operating temperature for 5 minutes.
Suspend the thermostat [2] in heated water to check its operation.
THERMOSTAT BEGIN TO OPEN:
80 - 84ºC (176 - 183ºF)
VALVE LIFT:
8 mm (0.3 in) minimum at 95ºC (203ºF)
Replace the thermostat if it responds at temperatures other than those specified.
Radiator/cooling fan
PULL DOWN THE RADIATOR
- Perform this procedure, before removing the following:
- Radiator
- Exhaust pipe/muffler
Remove the following:
- Middle cowls (CBR650F/FA)
- Tank shroud A (CB650F/FA)
Remove the following:
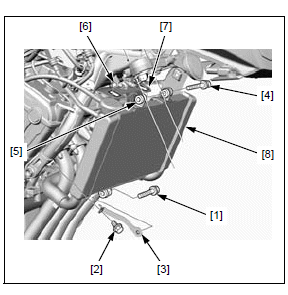
- Radiator lower mounting bolt [1]
- Radiator lower stay mounting bolt [2]
- Radiator lower stay [3]
Remove the radiator upper mounting bolt [4] and release the radiator mounting rubber [5] from the boss [6] of the frame.
Pull off the heat guard rubber [7] and pull down the radiator [8].
Installation is in the reverse order of removal.
REMOVAL/INSTALLATION
Drain the coolant.
Pull down the radiator.
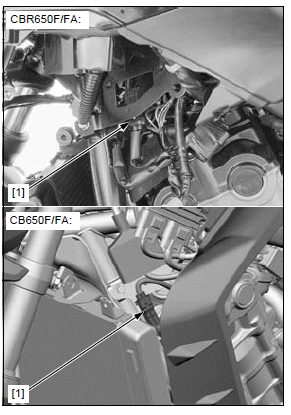
Release the fan motor 2P (Black) connector [1] from the stay and disconnect it.
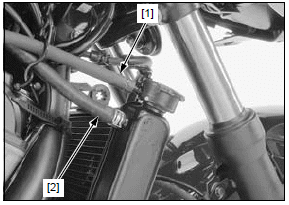
Disconnect the siphon hose [1] and air breeding hose [2] from the radiator.
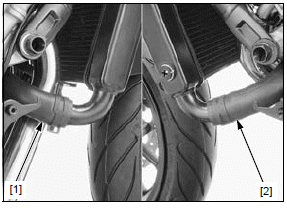
Disconnect lower radiator hose A [1] and lower hose B [2], then remove the radiator.
Installation is in the reverse order of removal.
Fill and bleed the cooling system.
DISASSEMBLY/ASSEMBLY
Disassemble and assemble the radiator as following illustration.

Radiator reserve tank
REMOVAL/INSTALLATION
Remove the exhaust pipe/muffler.
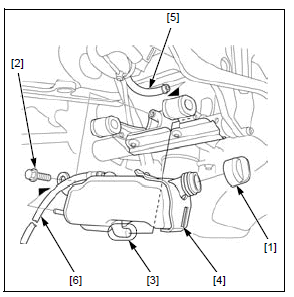
Remove the radiator reserve tank cap [1].
Remove the bolt [2] and release the boss [3] of the reserve tank [4] from the frame.
Disconnect the siphon hose [5] and drain the coolant.
Remove the reserve tank by pulling the overflow hose [6] out from the frame.
Installation is in the reverse order of removal.
TORQUE:
Radiator reserve tank mounting bolt:
12 N*m (1.2 kgf*m, 9 lbf*ft)
Fill the reserve tank with the recommended coolant.
See also:
 Honda CBR650 - Service manual > Service information
GENERAL WARNING Removing the radiator cap while the engine is hot can allow the coolant to spray out, seriously scalding you. Always let the engine and radiator cool down before removing the radiator cap.
Honda CBR650 - Service manual > Water pump
MECHANICAL SEAL INSPECTION Remove the under cowl (CBR650F/FA only). Check the bleed hole [1] of the water pump for signs of coolant leakage. A small amount of coolant weeping from the bleed hole is normal. Make sure that there are no continuous coolant leakage [2] from the bleed hole while operating the engine.
 Rider's Manual BMW R 1250 GS GSA
 Owner's Manual Harley-Davidson Sportster XL1200X Forty-Eight
 Owner's Manual Honda CBR650R
 Service manual Honda CBR650
 Owner's Manual Honda PCX125
 Owner's Manual Kawasaki Z1000SX
 Service manual Kawasaki Z1000SX
 Owner's Manual Lexmoto Echo
 Owner's Manual Royal Enfield Interceptor 650
 Service manual Royal Enfield Interceptor 650
 Owner's Manual Yamaha MT-07