 Honda CBR650 - Service manual > Water pump
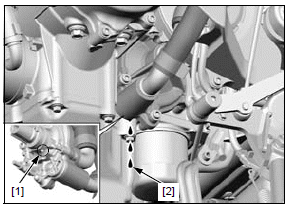
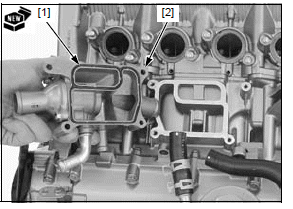
MECHANICAL SEAL INSPECTION
Remove the under cowl (CBR650F/FA only).
Check the bleed hole [1] of the water pump for signs of coolant leakage.
- A small amount of coolant weeping from the bleed hole is normal.
- Make sure that there are no continuous coolant leakage [2] from the bleed hole while operating the engine.
Replace the water pump body if necessary.
REMOVAL/INSTALLATION
NOTE:
- Place a clean oil pan under the engine because engine oil will flow out when removing the water pump body. Add the recommended engine oil to the specified level after installation.
Drain the coolant.
Remove the drive sprocket cover.
Support the motorcycle in an upright position on a level surface.
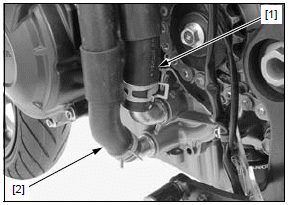
Disconnect the following from the water pump cover:
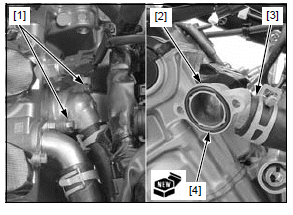
- Cylinder block-to-water pump hose [1]
- Water pump-to-cylinder head hose [2]
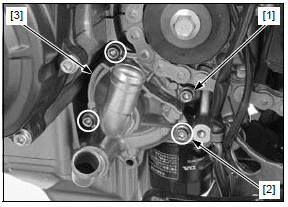
Loosen the cover bolt [1].
Remove the three mounting bolts [2] and water pump assembly [3].
Remove the thrust washer [1] and O-ring [2].
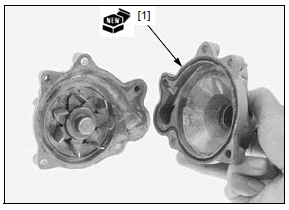
Remove the cover bolt [3], then separate the water pump cover [4] and water pump body [5].
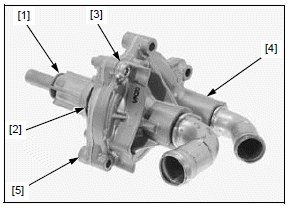
Remove the O-ring [1] from the water pump cover groove and replace it a new one.
- Do not apply engine oil to the cover O-ring.
Installation is in the reverse order of removal.
TORQUE:
Water pump mounting bolt:
12 N*m (1.2 kgf*m, 9 lbf*ft)
Water pump cover bolt:
13 N*m (1.3 kgf*m, 10 lbf*ft)
NOTE:
- Do not disassemble the water pump body.
- Replace the O-rings with new ones.
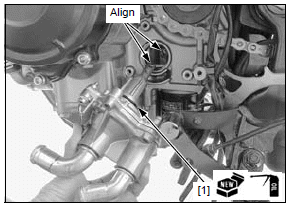
- Apply engine oil to the water pump body O-ring [1].
- Align the water pump shaft groove with the oil pump shaft end by turning the water pump impeller.
Check the oil level.
Fill and bleed the cooling system.
Water hose joint B
REMOVAL/INSTALLATION
Drain the coolant.
Remove the throttle body.
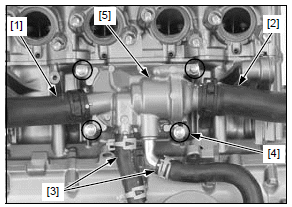
Remove the bolts [1].
Remove the water hose joint B [2] from the cylinder block-to-water pump hose [3] Remove the O-ring [4].
Installation is in the reverse order of removal.
NOTE:
- Replace the O-ring with a new one.
- Do not apply engine oil to the O-ring.
Fill and bleed the cooling system.
Thermostat case assembly
REMOVAL/INSTALLATION
Remove the following:
- Radiator
- Exhaust pipe/muffler
Disconnect the following from the thermostat case joint:
- Lower radiator hose A [1]
- Lower radiator hose B [2]
- Oil cooler water hoses [3]
Remove the four bolts [4] and thermostat case assembly [5].
Remove the O-ring [1] from the thermostat case assembly [2].
Installation is in the reverse order of removal.
NOTE:
- Replace the O-ring with a new one.
- Do not apply engine oil to the O-ring.
Fill and bleed the cooling system.
See also:
 Honda CBR650 - Service manual > Thermostat
REMOVAL/INSTALLATION Drain the coolant. Remove the bolts [1] and thermostat cover [2]. Remove the thermostat [3] from the thermostat housing. Installation is in the reverse order of removal.
Honda CBR650 - Service manual > Lubrication system
Service information GENERAL CAUTION Used engine oil may cause skin cancer if repeatedly left in contact with the skin for prolonged periods. Although this is unlikely unless you handle used oil on a daily basis, it is still advisable to thoroughly wash your hands with soap and water as soon as possible after handling used oil. The oil pump can be serviced with the engine installed in the frame. The service procedures in this section must be performed with the engine oil drained. When removing and installing the oil pump, use care not to allow dust or dirt to enter the engine. If any portion of the oil pump is worn beyond the specified service limits, replace the oil pump as an assembly. After the oil pump has been installed, check that there are no oil leaks and that oil pressure is correct. For engine oil pressure indicator/EOP switch inspection.
 Rider's Manual BMW R 1250 GS GSA
 Owner's Manual Harley-Davidson Sportster XL1200X Forty-Eight
 Owner's Manual Honda CBR650R
 Service manual Honda CBR650
 Owner's Manual Honda PCX125
 Owner's Manual Kawasaki Z1000SX
 Service manual Kawasaki Z1000SX
 Owner's Manual Lexmoto Echo
 Owner's Manual Royal Enfield Interceptor 650
 Service manual Royal Enfield Interceptor 650
 Owner's Manual Yamaha MT-07