 Harley-Davidson Sportster XL1200X Forty-Eight - Owner's Manual > Tail Lamp Bulb Replacement
XL883L XL1200L, XL1200T and Models with Standard Style Tail Lamp
1. See Tail Lamp Assembly. Remove two screws and lens from base.
NOTE: Remove the 4-pin connector to ease bulb removal.
2. Pull bulb assembly from lens. Remove bulb.
3. Coat base of new bulb with ELECTRICAL CONTACT GREASE. Install new bulb.
4. Install (push) bulb assembly to lens.
5. If removed, connect connector to circuit board.
6. Install lens to base with two screws. Tighten to 20-24 in-lbs (2.3-2.7 Nm).
 Be sure that all lights
and switches operate properly before operating motorcycle. Low visibility of
rider can result in death or serious injury.
Be sure that all lights
and switches operate properly before operating motorcycle. Low visibility of
rider can result in death or serious injury.
7. Turn ignition on. Check operation of all lamps.
 Tail Lamp Assembly
- Lens
- Base
- Tail lamp connector
- Bulb socket
XL1200C, XL1200CP XL1200CA, XL1200CB
Though similar in appearance to the standard style tail lamp, the tail lamp on XL1200C/CP/CA/CB models is an LED assembly. See a dealer or service manual for replacement.
XL883N, XL1200X, XL1200V
The tail and stop lamps are dual filament turn bulbs in the rear turn signal bullet housings with red lenses. To replace a tail or stop lamp, replace the turn signal bulbs. See Turn Signal Bulb Replacement: Bullet Style.
XL883N, XL1200X, XL1200V Models with LED Turn Signal Tail and
Stop Lamps
On International and Japanese XL883N, XL1200X and XL1200V models, the rear turn signal/tail lamps are LED assemblies. There are not replacement bulbs for this style lamp. The caps on the rear turn signals are not removeable. See a dealer or service manual for assembly replacement.
This feature may not be available in all markets.
Left Side Cover
The left side cover provides access to the battery and fuse block. No tools are required to remove or install the side cover.
Opening
NOTES:
- The left side cover does not need to be completely removed from the vehicle to access the battery or fuses.
- Place a shop cloth or other clean, dry cloth over left passenger footpeg (if applicable). This will protect cover from damage.
1. See Left Side Cover. Grasp left side cover at upper corners and gently pull away from frame. Disengage the front clip first for easier opening.
2. While rotating top of cover out away from motorcycle, slide cover down slightly so mounting slot slides down from mounting tab on battery tray.
Closing
1. Raise the left side cover.
2. Align the barrel clips on the cover with the socket clips on the frame. Press the cover to secure.
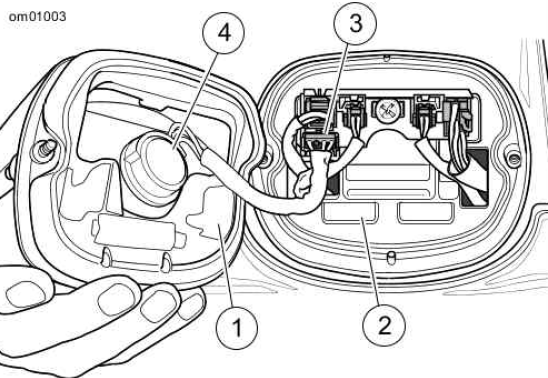
 Left Side Cover
- Barrel clips on cover
- Socket clips on frame
See also:
 Harley-Davidson Sportster XL1200X Forty-Eight - Owner's Manual > Headlamp Bulb
Removal To prevent accidental vehicle start-up, which could cause death or serious injury, remove main fuse before proceeding.
 Rider's Manual BMW R 1250 GS GSA
 Owner's Manual Harley-Davidson Sportster XL1200X Forty-Eight
 Owner's Manual Honda CBR650R
 Service manual Honda CBR650
 Owner's Manual Honda PCX125
 Owner's Manual Kawasaki Z1000SX
 Service manual Kawasaki Z1000SX
 Owner's Manual Lexmoto Echo
 Owner's Manual Royal Enfield Interceptor 650
 Service manual Royal Enfield Interceptor 650
 Owner's Manual Yamaha MT-07