 Harley-Davidson Sportster XL1200X Forty-Eight - Owner's Manual > Headlamp Bulb
Removal
 To prevent accidental
vehicle start-up, which could cause death or serious injury, remove main fuse
before proceeding.
To prevent accidental
vehicle start-up, which could cause death or serious injury, remove main fuse
before proceeding.
 When replacement is
required, use only the specified sealed beam unit or bulb, available from a
Harley-Davidson dealer. An improper wattage sealed beam or bulb, can cause
charging system problems.
When replacement is
required, use only the specified sealed beam unit or bulb, available from a
Harley-Davidson dealer. An improper wattage sealed beam or bulb, can cause
charging system problems.
1. Remove main fuse. See Fuses.
2. Loosen the trim ring screw. Remove the trim ring.
3. Support the lens and reflector.
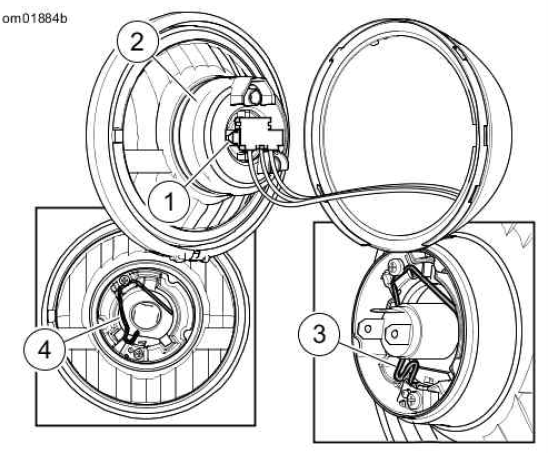
4. See Headlamp. While compressing the release tabs (1) on the connector, pull the connector off the bulb spade terminals.
5. Pull the rubber boot (2) back.
6. To remove the bulb from the lens and reflector, press the loop (3) on the wire retaining clip (4) down and to one side to disengage the free end of the clip from the metal catch. Rotate the clip up.
 Headlamp
- Release tab
- Rubber boot
- Loop
- Retaining clip
Installation
Handle bulb carefully and
wear eye protection. Bulb contains gas under pressure, which, if not handled
carefully, could cause serious eye injury.
Never touch the quartz
bulb. Fingerprints will etch the glass and decrease bulb life. Handle the bulb
with paper or a clean, dry cloth. Failure to do so could result in bulb damage.
1. Align bulb tabs with slots in the reflector. Install the bulb.
2. Rotate the retaining clip down against the bulb flange. Press the wire loop down and in until the free end of the clip engages the metal catch.
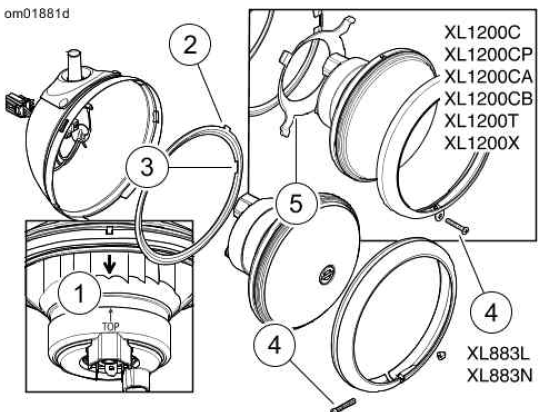
3. See Headlamp Assembly. Match the rubber boot TOP arrow to the reflector arrow (1). Fit the rubber boot over the spade terminals of the bulb.
Press the air out of the boot to seal over the lens and the reflector assembly.
4. Install the connector.
5. Verify that the adapter ring is in place with the two tabs (2) of the ring in the two bulges in the headlamp shell.
6. Match the single tab on the reflector to the notch (3) on the inside of the adapter ring.
7. Fit the trim ring and rotate the ring clockwise to lock the ring on the lens and reflector.
NOTES:
- XL883L. XL1200N, XL1200R, XL1200T, XL1200X: The trim ring is secured with a screw (4) and nut.
- XL1200C, XL1200CP, XL1200CA, XL1200CB, XL1200V: A rubber finger gasket (5) cushions the reflector and a single screw secures the trim ring.
8. Tighten the screw to 9-14 in-lbs (1.0-1.5 Nm).
9. Install main fuse. See Fuses.
Be sure that all lights
and switches operate properly before operating motorcycle. Low visibility of
rider can result in death or serious injury.
10. Test headlamp operation.
11. Align headlamp. See Headlamp Alignment.
 Headlamp Assembly
- Arrows
- Tabs
- Notch
- Screw
- Finger gasket: XL1200C, XL1200CA, XL1200CB, XL1200CP, XL1200V
Position Lamp: HDI
1. Remove the main fuse. See Fuses.
2. Remove the trim ring. Support the lens and reflector.
3. See Position Lamp. Remove the spade connectors from the bulb.
4. Pull the bulb holder from the lens and reflector.
5. Turn the bulb one-quarter turn to remove. Install with a one-quarter turn.
6. Install the bulb and holder.
7. Match the reflector tab to the adapter ring notch.
8. Install the trim ring. Tighten to 9-14 in-lbs (1.0-1.5 Nm).
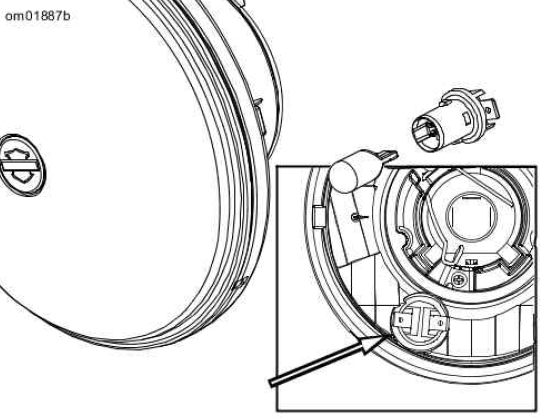 Position Lamp
Headlamp Alignment
1. Check tire pressure.
2. Fill fuel tank or add an equal amount of ballast.
3. Adjust rear shocks for the rider and intended load.
NOTE: Choose a wall in minimum light.
4. See Headlamp Alignment: Sportster Models. Park the motorcycle on a perpendicular line (1) with the front axle 25 ft 7.6 m (3) from a wall.
5. Draw a vertical line (2) on the wall.
NOTE: Adjust the headlamps of motorcycles with multiple beam headlamps to converge into one pattern.
6. With the motorcycle loaded, point the front wheel straight forward at wall. Measure the distance (4) from the floor to the center of the high beam bulb.
7. Draw a horizontal line (5) through the vertical line on the wall. Place line 2.1 in 53.3 mm lower than the measured bulb centerline.
NOTE: The headlamp is aligned when the light beam hot spot is located over the intersection of the lines.
8. With the high beam activated, verify headlamp alignment. Adjust as necessary.
 Headlamp Alignment: Sportster Models
- Perpendicular line
- Vertical line
- 25 ft (7.6 m)
- High beam bulb centerline
- Horizontal line 2.1 in (53.3 mm) lower than bulb centerline
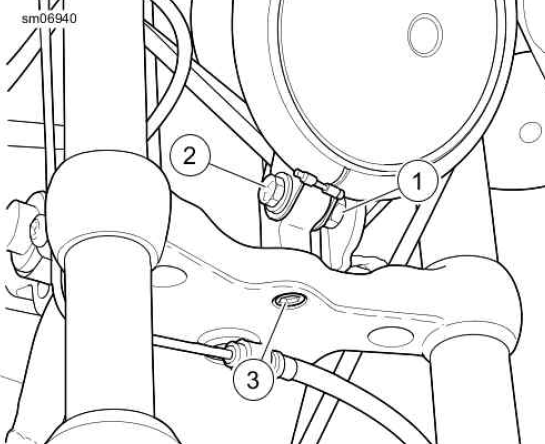
Headlamp Adjustment
Adjustment: XL1200C, XL1200CA, XL1200CB, XL1200CP, XL1200V, XL1200X
1. Set horizontal adjustment:
- See Headlamp Adjustment: XL1200C, XL1200CA, XL1200CB, XL1200CP, XL1200V, XL1200X. Loosen horizontal adjustment screw (3).
- Turn headlamp right or left as necessary to direct light beam straight ahead.
- Tighten horizontal adjustment screw to 30-35 ft-lbs (40.7-47.5 Nm).
2. Set vertical adjustment:
- Loosen locknut (1) for vertical adjustment bolt.
- Tilt headlamp up or down to aim it at horizontal line on wall.
- Tighten headlamp locknut to 30-35 ft-lbs (40.7-47.5 Nm).
 Headlamp Adjustment: XL1200C, XL1200CA, XL1200CB, XL1200CP, XL1200V,
XL1200X
Headlamp Adjustment: XL1200C, XL1200CA, XL1200CB, XL1200CP, XL1200V,
XL1200X
- Locknut
- Vertical adjustment bolt
- Horizontal adjustment screw
Adjustment: XL883L, XL883N, XL1200T
1. See Headlamp Adjustment: XL883L, XL883N, XL1200T. Remove snap plug (1) on top of headlamp bracket (2).
2. Loosen headlamp clamp nut (3).
3. Tilt headlamp up or down to aim it at horizontal line. At same time, turn it right or left to aim beam straight ahead.
4. Tighten headlamp clamp nut to 120-240 in-lbs (13.6-27.1 Nm) after lamp is properly positioned.
5. Install snap plug.
 Headlamp Adjustment: XL883L, XL883N, XL1200T
- Snap plug
- Headlamp bracket
- Clamp nut
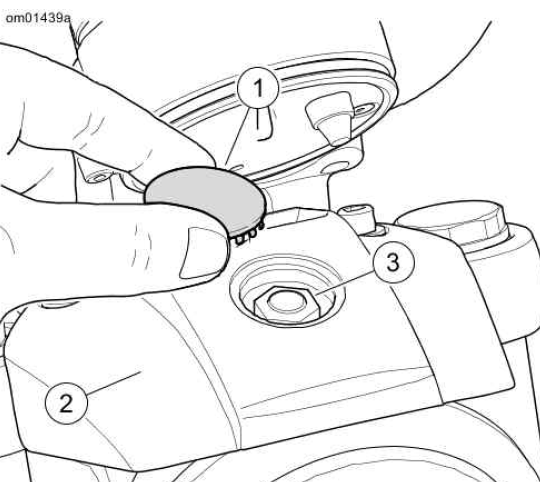
Turn Signal Bulb Replacement: Bullet Style
NOTE: Models with LED lamps do not contain replacement bulbs. Replace the LED assembly.
1. See Remove Lens. Insert a coin or the blade of a small screwdriver into the notch at the bottom of the lens cap. Carefully twist until the lens cap pops out of the lamp housing.
2. Push bulb in and rotate counterclockwise. Pull bulb from socket.
3. Inspect condition of electrical contacts in socket. If necessary, clean with a small wire brush and electrical contact cleaner.
4. Apply ELECTRICAL CONTACT LUBRICANT to contacts in socket and at bottom of new bulb.
5. Align pins on new bulb with pin guides in bulb socket. Push bulb in and turn clockwise to lock in place.
6. Snap lens cap onto the lamp housing with notch at bottom.
Be sure that all lights
and switches operate properly before operating motorcycle. Low visibility of
rider can result in death or serious injury.
7. Check operation of all lamps.
 Remove Lens
See also:
 Harley-Davidson Sportster XL1200X Forty-Eight - Owner's Manual > Air Cleaner
Removal Install air filter before running engine. Failure to do so can draw debris into the engine and could result in engine damage.
Harley-Davidson Sportster XL1200X Forty-Eight - Owner's Manual > Tail Lamp Bulb Replacement
XL883L XL1200L, XL1200T and Models with Standard Style Tail Lamp 1. See Tail Lamp Assembly. Remove two screws and lens from base. NOTE: Remove the 4-pin connector to ease bulb removal.
 Rider's Manual BMW R 1250 GS GSA
 Owner's Manual Harley-Davidson Sportster XL1200X Forty-Eight
 Owner's Manual Honda CBR650R
 Service manual Honda CBR650
 Owner's Manual Honda PCX125
 Owner's Manual Kawasaki Z1000SX
 Service manual Kawasaki Z1000SX
 Owner's Manual Lexmoto Echo
 Owner's Manual Royal Enfield Interceptor 650
 Service manual Royal Enfield Interceptor 650
 Owner's Manual Yamaha MT-07