 Kawasaki Z1000SX - Service manual > Transmission Shaft Assembly
- Install the new ball bearing [A] and collar [B] (output shaft) on the
each shaft, using the bearing driver.
Spacial Tool - Bearing Driver,
 32:
57001-382
32:
57001-382
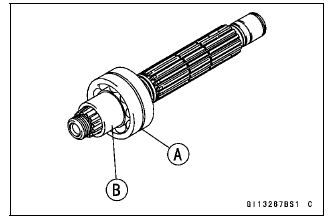
- Apply engine oil to the bushings, ball bearings and shafts.
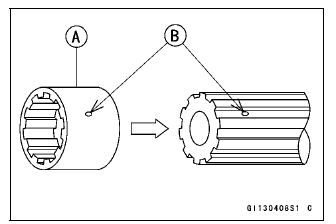
- Install the gear bushings [A] on the shaft with their holes [B] aligned.
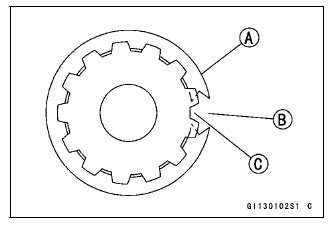
- Replace any circlips removed with new ones.
- Install the circlips [A] so that the opening [B] is aligned with a spline groove [C].
- The drive shaft gears can be recognized by size: the gear with the smallest diameter is 1st gear, and the largest one is 6th gear. Be sure that all parts are put back in the correct sequence and all circlips and washers are properly in place.
- Install the 3rd/4th gear onto the drive shaft with their oil holes aligned.
- Install the 6th gear bushing onto the drive shaft with their oil holes aligned.
- The output shaft gears can be recognized by size: the gear with the largest diameter is 1st gear, and the smallest one is 6th gear. Be sure that all parts are put back in the correct sequence and all circlips and washers are properly in place.
- Install the 6th gear onto the output shaft with their oil holes aligned.
- Install the 3rd/4th gear bushings onto the output shaft with their oil holes aligned.
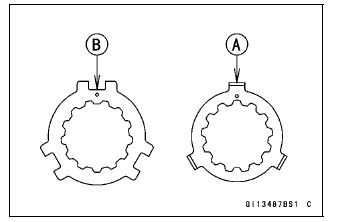
NOTE
- When the toothed washers are assembled onto the output shaft, note the following.
- When the tangs [A] of the toothed washer shall be assembled, they should be installed into the notch [B] of the toothed washer.
- Fit the steel balls into the 5th gear holes in the output shaft,
aligning the hole as shown in the figure.
5th Gear [A]
Output Shaft [B]
Steel Balls [C]
Hole [D]

NOTICE Do not apply grease to the balls to hold them in place. This will cause the positive neutral finder mechanism to malfunction.
- After assembling the 5th gear with steel balls in place on the output shaft, check the ball-locking effect that the 5th gear doesn't come out of the output shaft when moving it up and down by hand.
- Check that each gear spins or slides freely on the transmission shafts without binding after assembly.
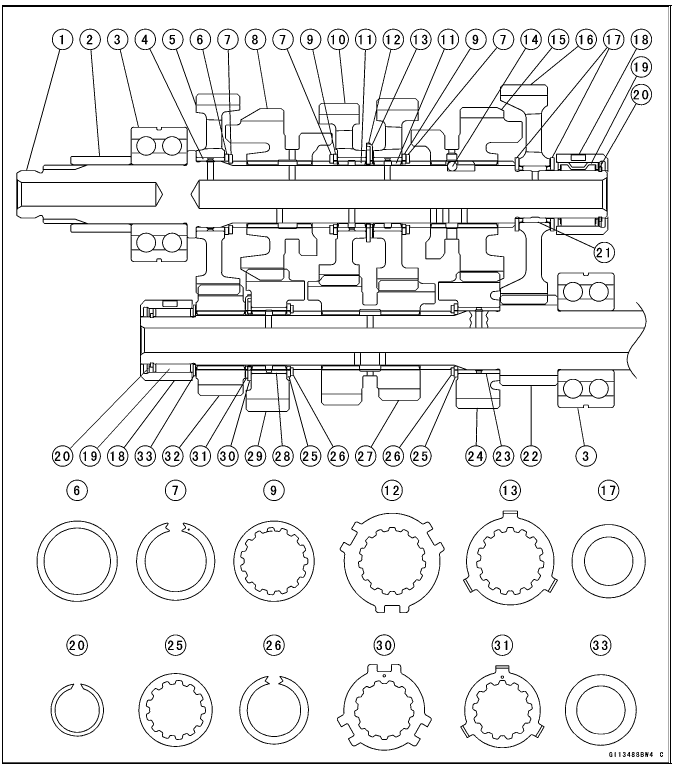
- Output Shaft
- Collar
- Bearing
- Bushing
- 2nd Gear (39 T)
- Washer ( 34
× 28.1)
- Circlips ( 33
× 25.9)
- Top Gear (25 T)
- Toothed Washer ( 34)
- 4th/3rd Gear (25 T/24 T)
- Bushing
- Toothed Washer ( 40.5)
- Toothed Washer ( 37)
- Steel Balls
- 5th Gear (26 T)
- Low Gear (39 T)
- Washers ( 31
× 20.5)
- Races
- Needle Bearings
- Circlips ( 22.2
× 18.7)
- Needle Bearing
- Low Gear (15 T) (Drive Shaft)
- Bushing
- 5th Gear (21 T)
- Toothed Washer ( 31)
- Circlip ( 29
× 22.6)
- 3rd/4th Gear (15 T/18 T)
- Bushing
- Top Gear (22 T)
- Toothed Washer ( 34.2)
- Toothed Washer ( 32)
- 2nd Gear (20 T)
- Washer ( 30
× 20.5)
See also:
 Kawasaki Z1000SX - Service manual > Transmission Shaft Disassembly
Remove the transmission shafts (see Transmission Shaft Removal). Remove the circlips, and disassemble the transmission shafts. Special Tool - Outside Circlip Pliers: 57001-144 The 5th gear [A] on the output shaft has three steel balls assembled into it for the positive neutral finder mechanism.
Kawasaki Z1000SX - Service manual > Shift Drum and Fork Removal
Remove: Lower Crankcase Half (see Crankcase Splitting) Transmission Shafts (see Transmission Shaft Removal) Gear Positioning Lever (see External Shift Mechanism Removal) Bolts [A] Shift Drum Bearing Holder [B] Pull out the shift rods [C], and take off the shift forks. Pull out the shift drum [D].
 Rider's Manual BMW R 1250 GS GSA
 Owner's Manual Harley-Davidson Sportster XL1200X Forty-Eight
 Owner's Manual Honda CBR650R
 Service manual Honda CBR650
 Owner's Manual Honda PCX125
 Owner's Manual Kawasaki Z1000SX
 Service manual Kawasaki Z1000SX
 Owner's Manual Lexmoto Echo
 Owner's Manual Royal Enfield Interceptor 650
 Service manual Royal Enfield Interceptor 650
 Owner's Manual Yamaha MT-07