 Kawasaki Z1000SX - Service manual > Wheel Inspection
- Raise the front/rear wheel off the ground.
Special Tools - Jack: 57001-1238
Jack Attachment: 57001-1608
Attachment Jack: 57001-1252
- Spin the wheel lightly, and check for roughness or binding.
If roughness or binding is found, replace the hub bearings (see Hub Bearing Removal/Installation).
- Inspect the wheel for small cracks, dents, bending, or warp.
If there is any damage to the wheel, replace the wheel.
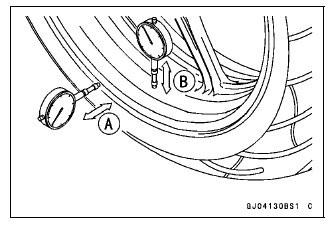
- Remove the wheel, and support it with the tire by the axle.
- Measure the rim runout, axial [A] and radial [B], with a dial gauge.
If rim runout exceeds the service limit, check the hub bearings (see Hub Bearing Inspection).
If the problem is not due to the bearings, replace the wheel.
Rim Runout (with tire installed)
Standard:
Axial TIR 0.5 mm (0.02 in.) or less
Radial TIR 0.8 mm (0.03 in.) or less
Service Limit:
Axial TIR 1.0 mm (0.04 in.)
Radial TIR 1.0 mm (0.04 in.)
WARNING Damaged wheel parts may fail and cause an accident resulting in serious injury or death. Never attempt to repair a damaged wheel part. If the wheel part is damaged, it must be replaced with a new one.
Axle Inspection
- Remove the front and rear axles (see Front/Rear Wheel Removal).
- Visually inspect the front and rear axle for damages.
If the axle is damaged or bent, replace it.
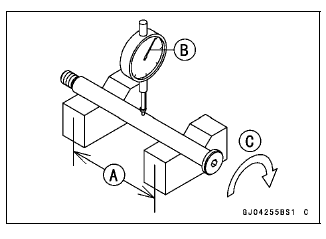
- Place the axle in V blocks that are 100 mm (3.94 in.) [A] apart, and set
a dial gauge [B] on the axle at a point halfway between the blocks. Turn [C]
the axle to measure the runout. The difference between the highest and
lowest dial readings is the amount of runout.
If axle runout exceeds the service limit, replace the axle.
Axle Runout/100 mm (3.94 in.)
Standard: TIR 0.1 mm (0.004 in.) or less
Service Limit: TIR 0.2 mm (0.008 in.)
Balance Inspection
- Remove the front and rear wheels (see Front/Rear Wheel Removal).
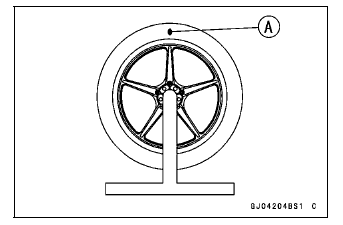
- Support the wheel so that it can be spun freely.
- Spin the wheel lightly, and mark [A] the wheel at the top when the wheel
stops.
- Repeat this procedure several times. If the wheel stops of its own accord in various positions, it is well balanced.
If the wheel always stops in one position, adjust the wheel balance (see Balance Adjustment).
See also:
 Kawasaki Z1000SX - Service manual > Rear Wheel Removal
Raise the rear wheel off the ground with the stand [A]. Loosen the torque link nuts [A] lightly for chain adjuster turn easily. Remove: Rear Caliper Mounting Bolts [A] Rear Caliper [B] For ABS equipped Models, remove the bolt [A], clamp [B] and rear wheel rotation sensor [C]. Loosen the chain adjuster clamp bolts [A] (Both Sides). Turn the chain adjuster [B] to make the chain slack. Remove: Retaining Rings [C] (Both Sides) Rear Axle Nut [D] Washer Remove: Rear Axle [A] (from Left Side) Remove the drive chain [A] from the rear sprocket toward the left. Move the rear wheel back and remove it.
Kawasaki Z1000SX - Service manual > Balance Adjustment
If the wheel always stops in one position, provisionally attach a balance weight [A] on the rim at the marking using adhesive tape. Rotate the wheel 1/4 turn [B], and see whether or not the wheel stops in this position. If it does, the correct balance weight is being used.
 Rider's Manual BMW R 1250 GS GSA
 Owner's Manual Harley-Davidson Sportster XL1200X Forty-Eight
 Owner's Manual Honda CBR650R
 Service manual Honda CBR650
 Owner's Manual Honda PCX125
 Owner's Manual Kawasaki Z1000SX
 Service manual Kawasaki Z1000SX
 Owner's Manual Lexmoto Echo
 Owner's Manual Royal Enfield Interceptor 650
 Service manual Royal Enfield Interceptor 650
 Owner's Manual Yamaha MT-07